background image

34

Scoring Your Karaoke Skill 


This System can score your Karaoke skill by comparing 
your singing along with the vocal on the playback 
source.
•  This function is available only for disc/USB mass 

storage class device playback.

•  It is recommended to select the sound track as 

follows (see page 22):

For Karaoke DVD Video:

 Select a sound track with 

vocal.

For Karaoke SVCD/CD:

 Select “ST,” “ST1” or 

“ST2.”

•  After selecting a sound track, select VOCAL MASK, 

L CHANNEL or R CHANNEL using the VOCAL 
MASKING button (see the previous column).

1

  Select “DVD/CD” or “USB” as the source.

or

2

  Connect the microphone(s) (not supplied) 

to the MIC 1 and/or MIC 2 jack.

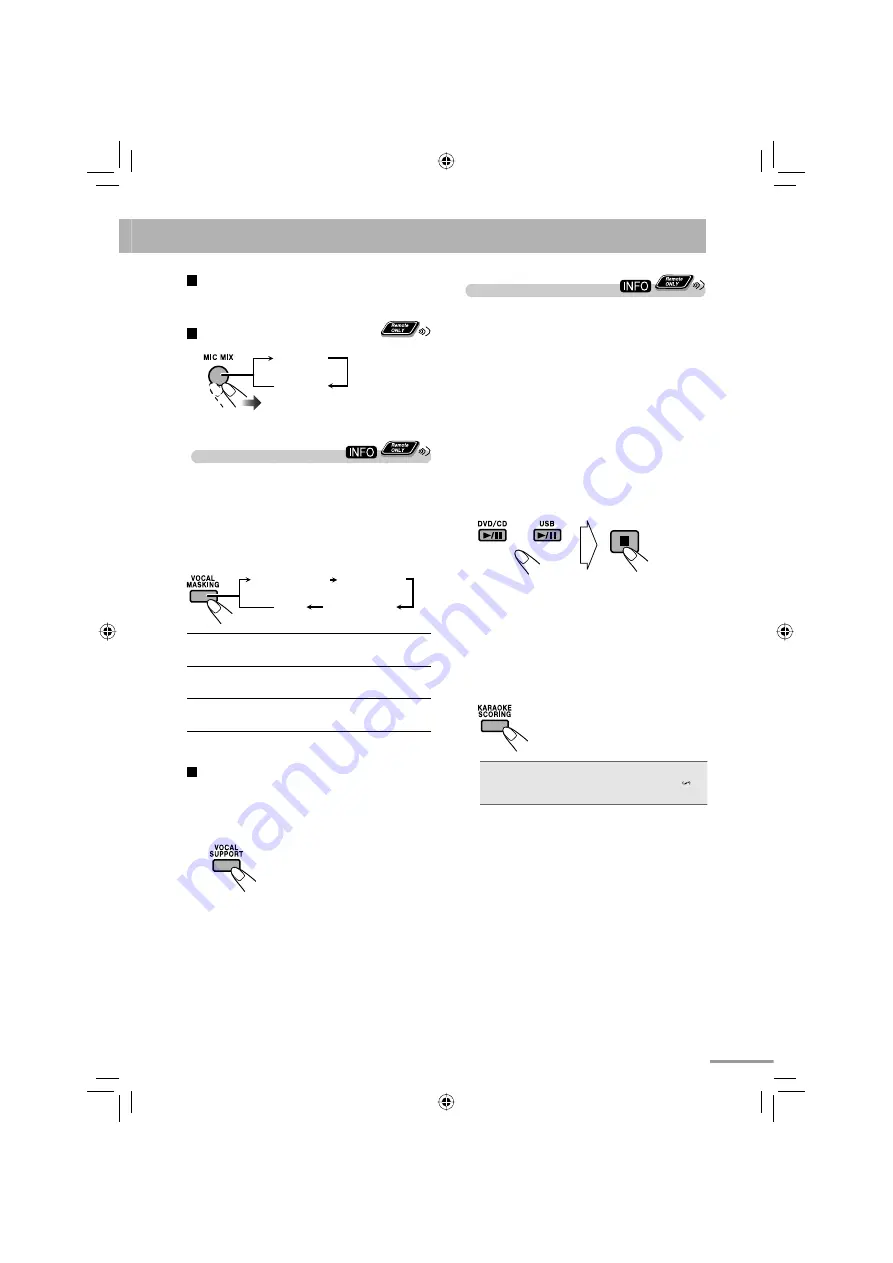
Mic Mixing will be activated.
•  If a microphone is already connected and Mic 

Mixing is not activated, use the MIC MIX button 
to reactivate Mic Mixing (see page 33).

3

  Activate Karaoke Scoring.

K.Scoring

KSCORE  ON

•  During Karaoke Scoring, scoring will start when 

playback is started.

• 

To cancel Karaoke Scoring before playback

press the same button again. “KSCORE OFF” 
appears on the display.

4

  Start playback and sing into the 

microphone.

Scoring starts.
•  The K.Scoring indicator flashes during scoring.
•  Adjust echo level and key if you want. (See “To 

apply an echo to your voice” and “To adjust the 
key” on page 35.)

•  When you press 

4

 or 

¢

, Karaoke Scoring is 

canceled and restarts from the selected track/file.

  To use only microphones

Select “DVD/CD” or “USB” in step 

3

, and stop the 

playback.

  To cancel the Mic Mixing 

MIC MIX

MIC OFF

Adjusting the Sound Track 
for Karaoke 


You can adjust the sound track for Karaoke.
• 

For stereo (2-channel) source:

 By selecting VOCAL 

MASK, you can reduce the lead vocal—Vocal 
Masking.

• 

For Karaoke disc:

 By selecting L CHANNEL or R 

CHANNEL, you can select the audio channel to play.

While Mic Mixing is activated...

VOCAL MASK L CHANNEL

R CHANNEL

OFF

VOCAL MASK

Reduce the vocal from stereo (2-
channel) source.

L CHANNEL

Reproduces only the left audio 
channel.

R CHANNEL

Reproduces only the right audio 
channel.

To return to normal playback, select “OFF.”

  To restore the vocal temporarily

This function allows you to recover the lead vocal 
temporarily for your reference while singing.
While Vocal Masking, L CHANNEL or R CHANNEL 
is activated...

The vocal or stereo effect will be 
restored temporarily.

To return to Vocal Masking, L CHANNEL or R 
CHANNEL,

 press the same button again.

text_EN_NXG7G3.indb   34

text_EN_NXG7G3.indb   34

08.6.25   2:22:27 PM

08.6.25   2:22:27 PM

Summary of Contents for CA-NXG3

Page 1: ...NENT SYSTEM CA NXG7 NX G3 Consists of CA NXG3 and SP NXG5 INSTRUCTIONS GVT0259 001A US UN UB UG UX A UW CA NXG7 CA NXG7 Cover_NXG7G3_U_eng indd 2 Cover_NXG7G3_U_eng indd 2 08 6 19 7 32 54 PM 08 6 19 7 32 54 PM DRAFT ...

Page 2: ... remote controlled CAUTION To reduce the risk of electrical shocks fire etc 1 Do not remove screws covers or cabinet 2 Do not expose this appliance to rain or moisture IMPORTANT FOR LASER PRODUCTS 1 CLASS 1 LASER PRODUCT 2 CAUTION Do not open the top cover or cabinet There are no user serviceable parts inside the unit leave all servicing to qualified service personnel 3 CAUTION Visible and or invi...

Page 3: ... may not be able to get out Do not place any naked flame sources such as lighted candles on the apparatus When discarding batteries environmental problems must be considered and local rules or laws governing the disposal of these batteries must be followed strictly Do not expose this apparatus to rain moisture dripping or splashing and that no objects filled with liquids such as vases shall be pla...

Page 4: ...rol in the specified direction s Indicates that this operation is only possible using the remote control Indicates that this operation is only possible using the main unit Precautions Installation Install the System in a location with adequate ventilation to prevent internal heat build up in the System DO NOT install the System in a location near heat sources or in a place subject to direct sunlig...

Page 5: ...ndex 56 Remote control 56 Main unit 56 Playable Disc File Types 3 Connections 4 Rear panel 4 Preparing the remote control 6 Changing the Color System and Scanning Mode 7 Front panel 7 Display Indicators 8 Daily Operations Playback 9 Listening to the Radio 10 Playing Back a Disc USB Mass Storage Class Device 12 Playing Back a Digital Audio Player 14 Sound Other Adjustments 15 Adjusting the Sound 15...

Page 6: ... the OPTICAL DIGITAL OUTPUT terminal on the rear How to cancel the demonstration Press and hold DEMO button on the main unit until DEMO CLEAR appears on the display while on standby Refer to the attached sheet Information about the demonstration function Playable Disc File Types DIGITAL VIDEO SUPER VIDEO COMPACT DIGITAL AUDIO CD R RW Recorded in the Audio CD Video CD and SVCD formats MP3 WMA WAV J...

Page 7: ...ed for Australia Hong Kong Thailand and the Middle East If any items are missing consult your dealer immediately Rear panel From AM FM antenna See page 5 Ÿ From the speakers See page 5 From the digital input of digital audio component See page 6 From the input of TV monitor See page 6 To a wall outlet Plug in the power cord only after all connections have been completed If the wall outlet does not...

Page 8: ...Disconnect the supplied FM antenna and connect to an outdoor FM antenna using a 75 Ω wire with coaxial type connector IEC or DIN45325 AM loop antenna supplied Turn it until the best reception is obtained If the cords are covered with vinyl remove the vinyl to expose the tip of the cord by twisting the vinyl FM antenna supplied Extend it so that you can obtain the best reception FM outdoor antenna ...

Page 9: ...ponent video cord not supplied Composite video cord supplied Yellow Voltage selector only for CA NXG7 This operation is not required for Saudi Arabian models and Australian models Use a screwdriver to slide the voltage selector so that it is pointing to the correct voltage in the area you are plugging in the unit See also the back cover page Preparing the remote control Insert the battery into the...

Page 10: ...is stopped 1 You cannot connect JVC Everio camcorder to the USB REC PLAY terminal of the System Noise and static electricity may stop the USB mass storage class device sound In this case disconnect and connect the USB mass storage class device again after turning off the System When connecting a digital audio player Stereo mini plug not supplied From audio output or headphone out etc See page 14 f...

Page 11: ...scanning mode is selected See page 7 t Karaoke operation indicators only for CA NXG7 See page 33 K Scoring lights when Karaoke Scoring is activated lights when Mic Mixing is activated flashes when Karaoke Scoring is in use lights when Echo is activated V MASK lights when Vocal Masking is activated 1 SLEEP indicator Lights when the Sleep Timer is activated See page 21 2 A STBY Auto Standby indicato...

Page 12: ... panel while it is opening or closing Remote control Main unit Number buttons 1 Turn on the power On the remote On the main unit The STANDBY lamp on the main unit turns off The front panel opens automatically 2 Select the source On the remote On the main unit DVD CD USB AUDIO IN TUNER FM TUNER AM Playback automatically starts if the selected source is ready 3 Adjust the volume You can adjust the v...

Page 13: ...ivate listening Connect a pair of headphones to the PHONES jack on the main unit The sound will no longer come out of the speakers HPHONE IN appears on the display for a while Be sure to turn down the volume before connecting or putting on the headphones Disconnecting the headphones will activate the speakers again DO NOT turn off standby the System with the volume set at an extremely high level o...

Page 14: ... button the frequency changes step by step To manually stop the search press either button If the FM reception is poor The MONO monaural indicator lights on the display Reception will improve though stereo effect is lost Monaural reception To restore the stereo effect press the button again The MONO monaural indicator disappears To preset the stations You can preset 30 FM and 15 AM stations 1 Tune...

Page 15: ... While playback is stopped You can also select the file type using Setup Menu See FILE TYPE in PICTURE menu on page 46 Playing Back a Disc USB Mass Storage Class Device To insert a disc When using an 8 cm disc place it on the inner circle of the disc tray To close the disc tray press 0 again If you press DVD CD 6 disc tray closes automatically and playback starts depending on how the disc is progr...

Page 16: ...ack file For SVCD VCD cancel PBC see page 14 While playing When you press 4 for the first time you will go back to the beginning of the current chapter track file To locate a particular portion This does not function for JPEG files While playing For MP3 WMA WAV MPEG 1 MPEG 2 ASF DivX files the search speed and indications on the TV are different from those above No sound comes out if searching is ...

Page 17: ...3 As the number of the level increases the preset input level is increased For SVCD VCD with PBC While playing a disc with PBC PBC appears on the display When disc menu appears on the TV select an item on the menu Playback of the selected item starts To select a number see How to select a number on page 10 To move to the next or previous page of the current menu Moves to the next page Moves to the...

Page 18: ...mponent You can obtain a strong bass sound TECHNO only for CA NXG7 Suitable for disco or techno music You can obtain a strong bouncy bass sound TURBO Suitable for most kinds of music and playback of external component You can obtain a balanced bass sound OFF No sound effect Reinforcing the bass sound SUPER BASS You can adjust the bass level from level 1 to level 5 This function is available only o...

Page 19: ...attern To store other equalization patterns press the button again and repeat steps 3 to 6 To exit MY SOUND setup Creating a Soothing Tone for Your Ear MY SOUND The sound tone you can hear is different in individuals MY SOUND creates an appropriate equalization pattern for your listening condition To set up MY SOUND 1 Select DVD CD or USB as the source 2 Enter MY SOUND setup MY SOUND SELECT START ...

Page 20: ...lements are added to the SEA elements to create being there feel in your room While one of the Sound Modes is activated S MODE indicator lights up While one of the Sound Modes with surround effect is activated lights up To cancel the Sound Mode select FLAT To select the preset MY SOUND This does not function for DivX file Creating 3 Dimensional Sound Field 3D Phonic This only functions while liste...

Page 21: ... Modes which suit your taste The changed settings can be stored as the USER1 USER2 and USER3 Modes 1 Select one of the preset Sound Modes To create your own Sound Mode with surround effect select DANCE HALL or STADIUM 2 Start editing the selected Sound Mode 3 Select the SEA parameter you want to adjust BASS TRE BASS To adjust the bass sound TRE To adjust the treble sound 4 Adjust the parameter BAS...

Page 22: ...atic DVD Sound Increase Level DVD sound is sometimes recorded at a lower level than other discs and sources You can set the increase level for the currently loaded DVD so you do not have to adjust the volume when you change the source This only functions for DVD Video and DVD VR While DVD CD is selected as the source As the number increases the DVD sound level is increased Changing the Display Bri...

Page 23: ...starts working To adjust the picture tone 1 Select USER1 or USER2 Follow steps 1 and 2 explained in To select a preset picture tone 2 Select a parameter you want to adjust GAMMA Adjust if the neutral color is bright or dark 3 to 3 BRIGHTNESS Adjust if the entire picture is bright or dark 8 to 8 CONTRAST Adjust if the brightness ratio is unnatural 7 to 7 SATURATION Adjust if the picture is whitish ...

Page 24: ...hapter number 2 Folder name file name and tag information 1 Clock 1 Only for MP3 WMA WAV files 2 Only while playing back the following discs files DVD VR Program number Play List number and chapter number MP3 WMA WAV JPEG MPEG 1 MPEG 2 ASF DivX files Group and file number DVD Video Title and chapter number 3 Only while disc or USB playback is stopped Turning Off the Power Automatically Auto Standb...

Page 25: ...udio track using the on screen bar see page 38 While playing a DVD Video Ex ENGLISH 1 3 3 3 FRENCH 2 3 JAPANESE ENGLISH 1 3 FRENCH 2 3 JAPANESE 3 3 While playing a DivX file 1 3 2 3 3 3 While playing a DVD VR or SVCD VCD ST1 ST2 L1 R2 L2 R1 ST L R SVCD DVD VR VCD ST1 ST2 ST To listen to normal stereo 2 channel playback L1 L2 L To listen to the left audio channel R1 R2 R To listen to the right audi...

Page 26: ...guage For DivX files DVD Video While playing back a chapter file containing subtitles in different languages you can select the subtitle language to display on the TV For DVD VR While playing you can turn the subtitles on or off For SVCD While playing you can select the subtitles even if no subtitles are recorded on the disc For DVD Video DVD VR SVCD You can also select the subtitle language using...

Page 27: ...M 2 ZOOM OFF 2 Move the zoomed in position To cancel Zoom press ZOOM repeatedly until ZOOM OFF appears on the TV Frame by frame playback This function is used only while playing DVD Video DVD VR SVCD VCD 1 Display the still picture 2 Advance the still picture frame by frame To resume normal playback press 3 Slow motion playback This function is used only while playing DVD Video DVD VR SVCD VCD 1 D...

Page 28: ...tivate Program Play Canceled PRGM PROGRAM PROGRAM No Group Title Track Chapter 1 2 3 4 5 6 7 8 9 10 On the display On the TV 2 Select chapters tracks files you want for Program Play using the number buttons To select a number see How to select a number on page 10 For DVD Video and MP3 WMA WAV files 1Select a title or group number 2Select a chapter or track file number 3 Repeat step 2 until you com...

Page 29: ... track To pause To stop To release press the same button again To exit Random Play Before or after playback Canceled To check the programmed contents Before or after playback In the reverse order In the programmed order You can also use 4 or to check the programmed contents To modify the program Before or after playback To erase the last step while holding To erase the entire program To add anothe...

Page 30: ...same button again You can search for the end point using the button To cancel A B Repeat press REPEAT A B again A B Repeat will also be canceled when you stop play or skip the chapter or track Playing Repeatedly For DVD Video DVD VR SVCD VCD CD You can also select the repeat mode using the on screen bar see page 39 For DVD Video While playing REPEAT CHAP REPEAT TITL REPEAT OFF For CD SVCD VCD Whil...

Page 31: ...will not be recorded The tracks which are recorded to the USB device will be converted into MP3 format You cannot start recording into a USB device while READING is shown on the display Some USB devices have limit of recordable track number in the root group Select another group or make a new group to record tracks when the number of target tracks to record is over the limit Do not disconnect a US...

Page 32: ...programmed order To stop recording manually To record the playing track 1 track During play or pause on the main unit Then follow the steps 4 and 5 above Recording from a Disc You can record tracks in digital recording from an Audio CD onto the USB device Do not vibrate the System while recording editing tracks Take care especially while the REC indicator is flashing or while EDITING is shown on t...

Page 33: ...itle by following step 4 in the previous column 3 Finish the procedure Recording starts See page 54 for more information about the warning messages shown on the display Giving Editing Titles to Tracks or Groups You can give titles to the tracks up to 24 characters and groups up to 28 characters in the USB device While playing you cannot edit track group titles 1 Start and stop playback of the USB ...

Page 34: ...ers is entered in step 2 Enter a title Available Characters Button Uppercase character Lowercase character Numerical character Space Some symbols may not appear on the display 1 ABC abc 2 DEF def 3 GHI ghi 4 JKL jkl 5 MNO mno 6 PQRS pqrs 7 TUV tuv 8 WXYZ wxyz 9 0 To move the character entry position Move the entry position to the right Move the entry position to the left To erase a character When ...

Page 35: ...ter a space Select the space by pressing MARK See Available Characters on page 31 You can also enter a space at the end of a title by pressing 3 cursor key To quit title entry The entered titles are not stored Erasing the Tracks or Groups You can erase tracks groups on the USB device Once the tracks are erased you cannot resume them 1 Start and stop playback of the USB device 2 Select a track grou...

Page 36: ... MIC 1 and MIC 2 jacks MIC LEVEL and MIC LVL mentioned in this Instructions carry the same meaning Singing Along Karaoke You can enjoy singing along Karaoke by using one or two microphones 1 Set the microphone level to MIN 0 2 Connect the microphone s not supplied to the MIC 1 and or MIC 2 jack Mic Mixing will be automatically activated MIC IN 3 Start playing a source For Karaoke discs Select a de...

Page 37: ...cator flashes during scoring Adjust echo level and key if you want See To apply an echo to your voice and To adjust the key on page 35 When you press 4 or Karaoke Scoring is canceled and restarts from the selected track file To use only microphones Select DVD CD or USB in step 3 and stop the playback To cancel the Mic Mixing MIC MIX MIC OFF Adjusting the Sound Track for Karaoke You can adjust the ...

Page 38: ...nfare Your score The latest top 3 The calorie you consumed in your singing When you press 8 scoring is canceled When playback starts again scoring starts from that point If you do not sing for about 2 minutes after Karaoke Scoring starts Karaoke Scoring is canceled To obtain a correct scoring result it is recommended to sing the song completely If the singing time is less than 3 minutes the scorin...

Page 39: ...L FANFARE 5 Adjust the key To raise the key up to 6 To lower the key down to 6 To return to normal key select 0 To change the calculation level You can change the scoring level of Karaoke Scoring This function is available only for disc USB mass storage class device playback 1 Select DVD CD or USB as the source 2 Connect the microphone s not supplied to the MIC 1 and or MIC 2 jack Mic Mixing will ...

Page 40: ...ine the playback order of the titles chapters tracks or files on the disc player You can program up to 12 steps This function is not available for files in a USB mass storage class device 1 Select DVD CD as the source 2 Set the microphone level to 0 3 Connect the microphone s not supplied to the MIC1 or MIC2 jack Mic Mixing will be automatically activated If a microphone is already connected and M...

Page 41: ...t to repeat playback Select for time search CHAP Select for chapter search 1 3 Select to change the audio language or channel see also page 22 1 3 Select to change subtitle language see also page 23 1 3 Select to change the view angle see also page 23 On screen Bar Operations You can check the source information disc USB mass storage class device and playback status by using the on screen bar not ...

Page 42: ...cable for DVD Video DVD VR 2 Select OFF 3 Display the pop up window OFF 1 3 1 3 1 3 TIME TITLE 14 TOTAL1 25 58 CHAP 23 DVD VIDEO TITLE 2 TIME OFF CHAP 1 3 1 3 1 1 TOTAL 1 01 58 CHAP 3 OFF Dolby D 3 2 1ch To operate using the On screen Bar Ex Selecting a subtitle French for DVD Video While DVD CD is selected as the source 1 Display the entire on screen bar disappears This does not appear for MPEG 1...

Page 43: ...en 0 To move to a point of 54 minutes 00 seconds press 0 5 4 0 then 0 It is always required to enter the hour digit even 0 hours but it is not required to enter the final zeros the last two digits in the examples above To correct a mis entry press 2 to erase the last entry 4 Select the repeat mode you want A B Repeats a desired portion see the next column TITLE Repeats the current title ALL Repeat...

Page 44: ...8 017 0 09 08 6 7 8 1 2 5 1Listed number 2Recording creating date 3Recording channels 4Recording time 5Title 6Highlight bar current selection 7Chapters included 8Playback time 5 Confirm your entry The System starts playing the disc from the selected playing time Chapter Search For DVD Video DVD VR You can search for the chapter number to play This function is not available during Program Play and ...

Page 45: ...e playing back the selected item starts playback automatically Control screen for MP3 WMA WAV JPEG MPEG 1 MPEG 2 ASF DivX files The control screen appears on the TV when the System detects MP3 WMA WAV JPEG MPEG 1 MPEG 2 ASF DivX files on the loaded disc or connected USB mass storage class device For JPEG MPEG 1 MPEG 2 ASF DivX it appears when playback is stopped Ex While playing an MP3 file on a d...

Page 46: ...f manually see To turn on or off the Daily Timer on page 44 When the on time comes The System turns on tunes in to the specified station or starts playing from the specified source and gradually increases the volume level to the preset level after about 30 seconds While Daily Timer is working the timer indicator flashes on the display When the off time comes The System stops playback and turns off...

Page 47: ...AM or TUNER FM Select a preset channel For DISC Select the title group number then the chapter track file number For USB Select the group number then the track file number 5Select the volume level You can adjust the volume level 0 to MAX and VOLUME If you select VOLUME the volume is set to the same level as when the System was last turned off Once settings are completed the timer setting informati...

Page 48: ...54 ON SCREEN LANGUAGE You can select ENGLISH CHINESE or SPANISH as the on screen language PICTURE MONITOR TYPE 16 9 4 3 LB 4 3 PS You can select the monitor type to match your TV when you play back picture recorded for wide screen televisions 16 9 NORMAL 16 9 MULTI NORMAL Wide screen television Select this when the aspect ratio of your wide screen TV is fixed to 16 9 16 9 AUTO 16 9 MULTI AUTO Wide...

Page 49: ... Dolby Digital decoder STREAM PCM When connecting to a DTS decoder or an amplifier with a built in DTS decoder DOWN MIX This setting is effective for digital audio output if DIGITAL AUDIO OUTPUT is set to PCM ONLY DOLBY SURROUND Select this when connecting to a surround decoder STEREO Select this when connecting to a stereo receiver MD player etc D RANGE COMPRESSION You can enjoy powerful audio ev...

Page 50: ... USB mass storage class devices and does not support DRM Digital Rights Management It will take some time to start up a digital audio player whose contents are larger than 1 Gigabyte Learning More about This System Connections see pages 4 to 7 Make sure the antenna conductors do not touch any other terminals connecting cords or the power cord Also keep the antennas away from metallic parts of the ...

Page 51: ...or DVD VR playback This System can play only a disc of UDF Bridge format For details about DVD VR format and Play List refer to the manual of the recording equipment For MP3 WMA WAV playback MP3 WMA WAV discs require a longer readout time than regular CDs It depends on the complexity of the group file configuration Some MP3 WMA WAV files cannot be played back and will be skipped This results from ...

Page 52: ...rts playback that track number will be erased from the Karaoke Reserve screen the programmed contents will remain until you erase it For some VCD the Karaoke Scoring result may not appear at the end of the track if PBC is activated In this case press 7 to view your scoring result Creating a Soothing Tone for Your Ear MY SOUND MY SOUND setup is prohibited for certain file format MY SOUND setup is p...

Page 53: ...rce Daily Timer will not work correctly If you set the Sleep Timer after Daily Timer starts playing the selected source Daily Timer is canceled Setup Menu Operations see pages 45 and 46 General If the upper and lower parts of the menu are cut off adjust the picture size control of the TV LANGUAGE menu When the language you have selected for MENU LANGUAGE AUDIO LANGUAGE or SUBTITLE is not recorded ...

Page 54: ...ed Cleaning the System Stains should be wiped off with a soft cloth If the System is heavily stained wipe it with a cloth soaked in water diluted neutral detergent and wrung well then wipe clean with a dry cloth Since the System may deteriorate in quality become damaged or get its paint peeled off be careful about the following DO NOT wipe it with a hard cloth DO NOT wipe it forcefully DO NOT wipe...

Page 55: ...se reload the disc or disconnect the USB mass storage class device and connect it again The disc sound is discontinuous The disc is scratched or dirty Troubleshooting General Adjustments or settings are suddenly canceled before you finish There is a time limit Repeat procedure again Operations are disabled The built in microprocessor may malfunction due to external electrical interference Unplug t...

Page 56: ...VICE CENTER USE OF THIS PRODUCT IN ANY MANNER THAT COMPLIES WITH THE MPEG 4 VISUAL STANDARD IS PROHIBITED EXCEPT FOR USE BY A CONSUMER ENGAGING IN PERSONAL AND NON COMMERCIAL ACTIVITIES No subtitle appears on the display though you have selected the initial subtitle language Some DVDs DivX files are programmed not to display any subtitle initially If this happens press SUBTITLE after starting play...

Page 57: ... TW Twi EO Esperanto KS Kashmiri RO Rumanian UK Ukrainian ET Estonian KU Kurdish RW Kinyarwanda UR Urdu EU Basque KY Kirghiz SA Sanskrit UZ Uzbek FA Persian LA Latin SD Sindhi VI Vietnamese FI Finnish LN Lingala SG Sangho VO Volapuk FJ Fiji LO Laothian SH Serbo Croatian WO Wolof FO Faroese LT Lithuanian SI Singhalese XH Xhosa FY Frisian LV Latvian Lettish SL Slovenian YO Yoruba GA Irish MG Malagas...

Page 58: ...MA WAV format Dynamic range 80 dB Horizontal resolution 500 lines Wow and flutter Immeasurable USB section Playable files MP3 WMA WAV JPEG MPEG 1 MPEG 2 ASF DivX format USB specification Compatible with USB 2 0 Full Speed Compatible device Mass storage class Compatible system FAT16 FAT32 Bus power supply DC 5 V 500 mA General CA NXG7 Power requirements AC 220 V AC 230 V AC 240 V adjustable with th...

Page 59: ... REPEAT A B 27 RESERVE 37 RETURN 14 SCAN MODE 7 SET UP 45 SHIFT Press and hold together with another button when you want to use the function printed in green SLEEP 21 SOUND MODE 17 SUBTITLE 23 SUPER BASS LEVEL 15 TITLE DEL 30 TOP MENU 13 TUNER MODE 11 TV 50 TV CHANNEL 50 TV VIDEO 50 TV VOL 50 USB 6 12 V BASS 15 VFP 19 VOCAL MASKING 34 VOCAL SUPPORT 34 ZOOM 24 Parts Index Remote control Main unit ...

Page 60: ...r mains AC line voltage corresponds with the position of the voltage selector switch provided on the outside of this equipment and if different reset the voltage selector switch to prevent from a damage or risk of fire electric shock For CA NXG7 Mains AC Line Instruction not applicable for Europe U S A Canada and U K Cover_NXG7G3_U_eng indd 1 Cover_NXG7G3_U_eng indd 1 08 6 19 7 32 53 PM 08 6 19 7 ...

Reviews: