JVC CA-MXKC50 Instructions Manual Download Page 3

G-2

IMPORTANT FOR LASER PRODUCTS / IMPORTANT POUR PRODUITS LASER

1. CLASS 1 LASER PRODUCT
2.

CAUTION:

 Do not open the top cover or the cabinet. There are no user serviceable parts inside the unit; leave all servicing to

qualified service personnel.

3.

CAUTION:

 (For U.S.A.) Visible and/or invisible class II laser radiation when open. Do not stare into beam. (For Canada) Visi-

ble and/or invisible class 1M laser radiation when open. Do not view directly with optical instruments.

4. REPRODUCTION OF LABEL: CAUTION LABEL, PLACED INSIDE THE UNIT.

1. PRODUIT LASER CLASSE 1
2.

ATTENTION:

 N'ouvrez pas le couvercle supérieur ni le boîtier. Il n’y a aucune pièce réparable par l’utilisateur à

l’intérieur de l’appareil; confiez toute réparation à un personnel qualifié.

3.

ATTENTION:

 (Pour les Etats-Unis) Radiation laser de classe II visibles et/ou invisible si l’appareil est ouvert. Ne regar-

dez pas le rayon. (Pour le Canada) Rayonnement laser visible et/ ou invisible de classe 1M une fois ouvert. Ne pas
regarder directement avec des instruments optiques.

4. REPRODUCTION DE L’ÉTIQUETTE: ÉTIQUETTE DE PRÉCAUTION PLACÉE À L’INTERIEUR DE L’APPAREIL.

CAUTION

To reduce the risk of electrical shocks, fire, etc.:
1. Do not remove screws, covers or cabinet.
2. Do not expose this appliance to rain or moisture.

ATTENTION

Afin d’èviter tout risque d’électrocution, d’lncendie. etc.:
1. Ne pas enlever les vis ni les panneaux et ne pas ouvrir le coffret de

l’appareil.

2. Ne pas exposer l’appareil à la pluie ni à l’humidité.

CAUTION

1. Do not block the ventilation openings or holes.

(If the ventilation openings or holes are blocked by a
newspaper or cloth, etc., the heat may not be able to
get out.)

2. Do not place any naked flame sources, such as lighted

candles, on the apparatus.

3. When discarding batteries, environmental problems

must be considered and local rules or laws governing
the disposal of these batteries must be followed strictly.

4. Do not expose this apparatus to rain, moisture, dripping

or splashing and that no objects filled with liquids, such
as vases, shall be placed on the apparatus.

ATTENTION

1. Ne bloquez pas les orifices ou les trous de ventilation.

(Si les orifices ou les trous de ventilation sont bloqués
par un journal un tissu, etc., la chaleur pent ne pas être
évacuée correctement de l’appareil.)

2. Ne placez aucune source de flamme nue, telle qu’une

bougie, sur l’appareil.

3. Lors de la mise au rebut des piles, veuillez prendre en con-

sidération les problèmes de l’environnement et suivre stricte-
ment les règles et, les lois locales sur la mise au rebut des piles.

4. N’exposez pas cet appareil à la pluie, à l’humidité, à un

égouttement ou à des éclaboussures et ne placez pas des
objets remplis de liquide, tels qu’un vase, sur l’appareil.

CAUTION:

Excessive sound pressure from earphones or headphones can
cause hearing loss.

ATTENTION:

Une pression acoustique excessive des écouteurs ou du
casque d’écoute peut entraîner une perte auditive.

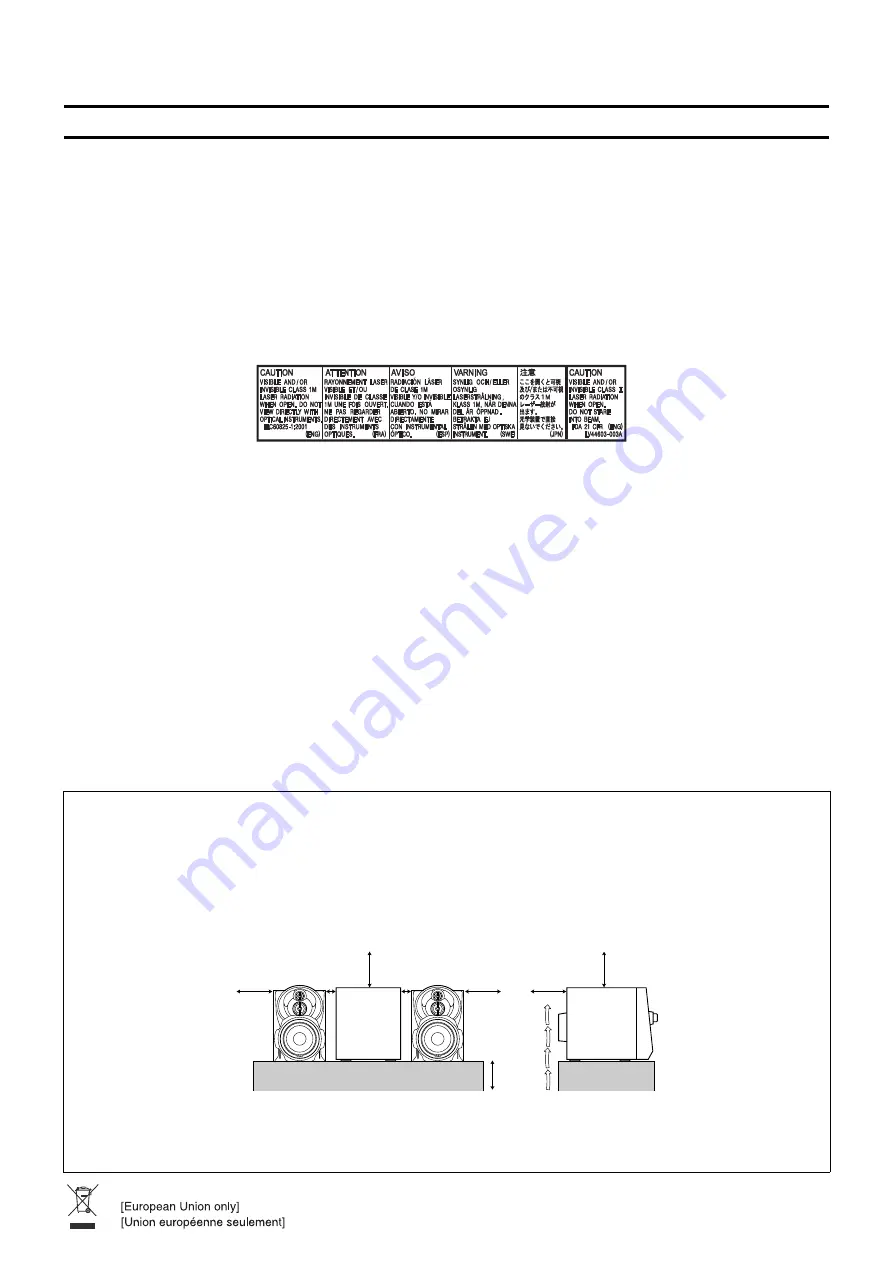
Attention: Aération correcte

Pour prévenir tout risque de décharge électrique ou d’incendie et éviter toute
détérioration, installez l’appareil de la manière suivante:
1. Avant:

Bien dégagé de tout objet.

2. Côtés/dessus/dessous:

Assurez-vous que rien ne bloque les espaces indiqués sur le schéma ci-dessous.

3. Dessous:

Posez l’appareil sur une surface plane et horizontale. Veillez à ce que sa 
ventilation correcte puisse se faire en le plaçant sur un support d’au moins 
dix centimètres de hauteur.

15cm
(5

in)

15

16

/

1cm
(

in)

7

16

/

1cm
(

in)

7

16

/

15cm
(5

in)

15

16

/

10cm
(3

in)

15

16

/

15cm
(5

in)

15

16

/

15cm
(5

in)

15

16

/

15cm
(5

in)

15

16

/

Caution: Proper Ventilation

To avoid risk of electric shock and fire, and to prevent damage, locate the apparatus
as follows:
1. Front:

No obstructions and open spacing.

2. Sides/ Top/ Back:

No obstructions should be placed in the areas shown by the dimensions below.

3. Bottom:

Place on the level surface. Maintain an adequate air path for ventilation by 

placing on a stand with a height of 10cm (3

15

/

16

 in.) or more.

Side view
Côt

Front view
Face

About the cooling fan

Cooling fan is built into the main unit. The internal cooling fan automatically rotates for emitting generated heat. To ensure sufficient cooling, leave a
space of more than 1 cm between the main unit and the speakers or other objects.

À propos du ventilateur de refroidissement

Un ventilateur de refroidissement est incorporé dans l’unité principale. Ce ventilateur de refroidissement interne tourne automatiquement pour libérer la
chaleur générée. Afin de garantir un refroidissement suffisant, laissez un espace de plus d’1 cm entre l’unité principale et les enceintes ou d’autres objets.

Summary of Contents for CA-MXKC50

Page 1: ...which are located either on the rear bottom or side of the cabinet Retain this informa tion for future reference Model No Serial No LVT1728 001A J COMPACT COMPONENT SYSTEM MX KC50 Consists of CA MXKC50 and SP MXKC50 CA MXKC50 SP MXKC50 SP MXKC50 INSTRUCTIONS ...

Page 2: ...round shall be connected to the grounding system of the building as close to the point of cable entry as practical This equipment has been tested and found to comply with the limits for a Class B digital device pursuant to Part 15 of the FCC Rules These limits are designed to provide reasonable protection against harmful inter ference in a residential installation This equipment generates uses and...

Page 3: ... journal un tissu etc la chaleur pent ne pas être évacuée correctement de l appareil 2 Ne placez aucune source de flamme nue telle qu une bougie sur l appareil 3 Lors de la mise au rebut des piles veuillez prendre en con sidération les problèmes de l environnement et suivre stricte ment les règles et les lois locales sur la mise au rebut des piles 4 N exposez pas cet appareil à la pluie à l humidi...

Page 4: ... recorder The CD Player can play back a CD R and CD RW How This Manual Is Organized Basic information that is the same for many different functions e g setting the volume is given in the section Basic Operations and not repeated under each function The names of buttons controls and display messages are written in all capital letters e g FM AM NO DISC If the button names on the Unit and the Remote ...

Page 5: ...ing the Tuner 9 Tuning In a Station 9 Presetting Stations 10 To Change the FM Reception Mode 10 Using the CD Player 11 To Load CDs 12 To Unload CDs 12 Changing the MP3 WMA Playback Mode 12 Basics of Using the CD Player Normal Play 13 Resume Play for Audio CD and MP3 WMA Disc 14 Programming the Playing Order of the Tracks 14 Random Play 15 Repeating Tracks 15 Tray Lock Function 15 Using the Cassett...

Page 6: ...h as sunshine fire or the like To avoid battery leakage or explosion Remove batteries when the Remote Control will not be used for a long time When you need to replace the batteries replace both batteries at the same time with new ones Do not use an old battery with a new one Do not use different types of batteries together Using the Remote Control The Remote Control makes it easy to use many of t...

Page 7: ...ith coaxial type connector IEC or DIN45 325 should be connected to the FM 75Ω COAXIAL terminal If reception is poor connect the outdoor antenna Before attaching a 75 ohm coaxial lead the kind with a round wire going to an outdoor antenna disconnect the supplied FM Wire Antenna FM wire antenna Coaxial cable FM outdoor antenna Not supplied ...

Page 8: ...ystem Connect the gray and gray with black stripe cords of the left side speaker to the red and black terminals marked LEFT on the System 3 Close each of the terminals CAUTIONS A TV may display irregular colors if located near the speakers If this happens set the speakers away from the TV Use speakers with the correct impedance only The correct impedance is indicated on the rear panel AM loop ante...

Page 9: ...s made for 2 minutes To cancel this auto DEMO display function press the CANCEL button on the Unit during DEMO display COMPU Play JVC s COMPU PLAY feature lets you control the most frequently used System functions with a single touch With One Touch Operation you can play a CD a tape turn on the radio or listen to an external equipment with a single press of the play button for that function One To...

Page 10: ...ediately ECO Mode ECO The System has three energy modes power on power off Stand by and ECO In ECO mode the display goes off and the least power is consumed To enter ECO mode press the ECO button on the Unit in Stand by mode while the STANDBY indicator lights up ECO MODE appears on the display then the display goes off The STANDBY indicator remains lit To cancel ECO mode and turn on the power pres...

Page 11: ...w frequencies are highly boosted To get the effect press the SOUND TURBO button The SOUND TURBO indicator lights up and S TURBO appears on the display To cancel the effect press the button again The SOUND TURBO indicator goes out and OFF appears on the display Selecting the Sound Mode SOUND MODE You can select one of 3 SEA Sound Effect Amplifier modes You can use this effect only for playback To g...

Page 12: ...n to move from frequency to frequency until you find the station you want OR Auto Tuning If you hold down the 22 or Á button for 1 second or more and then release it the frequency changes down or up automatically until a station is found OR Preset Tuning Possible only after presetting sta tions Preset tuning using the Unit Select the preset number you want using the 4 or button Example Press the b...

Page 13: ...ds the display returns to the band frequency display 6 Repeat above steps 2 to 5 for each station you want to store in memory with a preset number To change the preset stations repeat the same steps as above In step 4 you can select the preset number using the nu meric keys on the Remote Control See Entering the Number with the Remote Control on page 8 CAUTION Even if the System is unplugged or if...

Page 14: ...names and ID3 tags are not shown correctly More about MP3 WMA discs MP3 WMA discs either CD R or CD RW require a longer readout time It varies due to the complexity of the re cording configuration When making an MP3 WMA disc select ISO 9660 Level 1 or Level 2 as the disc format This unit does not support multisession recording This unit can play MP3 WMA files only with the following file extension...

Page 15: ... the CD Open Close 0 button on the Unit to open the tray 2 Remove the CD then press the DISC SKIP button on the Unit The tray turns for the next CD 3 Repeat step 2 to remove all the CDs 4 Press the CD Open Close 0 button on the Unit to close the tray You can remove CDs while listening to the other source Tips Removing changing the CDs during playback While playing back a CD e g CD1 you can remove ...

Page 16: ...ct the track you want to play except for MP3 WMA GROUP mode By pressing the button you can skip to the next track or skip back to the previous track The selected track starts playing Press the button once to skip to the beginning of the next track Press the 4 button to skip to the beginning of the current track Press twice quickly to skip to the beginning of the previ ous track In Stop mode By bri...

Page 17: ...f the Disc button CD1 CD3 to select the CD you want to program The display will change to the Program Entry display 4 Select the track you want to program On the Unit While the display is blinking press the 4 or button on the Unit to select the track then press the SET button within 5 seconds The program order number will be assigned from P 1 On the Remote Control Press the numeric keys to directl...

Page 18: ...epeat all tracks or individual track as many times as you like Press the REPEAT button The Repeat indicator changes with each press of the button as fol lows REPEAT 1 REPEAT 1DISC REPEAT ALL Normal dis play Normal Play back to the beginning In Program Play mode the Repeat indicator changes with each press of the REPEAT button as follows REPEATï Blank display It repeats all the tracks in the progra...

Page 19: ...blinks on the display and the tape is played back The Cassette Deck automatically stops when one side of the tape has finished playing To stop playing press the 7 button To remove the tape stop the tape and press the 0 PUSH OPEN part to open the Cassette Holder To Fast Wind a Tape During playback or in Stop mode press the Á FF button on the Unit to fast wind the tape onto the right side of the cas...

Page 20: ...ing you can adjust the sound you are actually listening to without affecting the recording level Two small tabs on the back of the cassette tape one for side A and one for side B can be removed to prevent accidental erasure or recording To record on a cassette with the tabs removed you must cover the holes with adhesive tape first Type I tape can be used for recording At the start and end of casse...

Page 21: ...ape into the Deck B and wind past the tape leader 3 Press the CD REC START button on the Unit CD REC appears on the display and the REC indicator lights up Then the System begins CD Synchro Recording and the tracks on the CD are recorded on the tape When recording of the tracks of all CDs is finished the CD Player and Cassette Deck stop If the tab of the cassette tape on the Deck B is removed to p...

Page 22: ...rly connect ed to the System See page 6 1 Set the volume level to the minimum posi tion 2 Press the AUX button AUX IN appears on the display 3 Start playing the external equipment 4 Adjust the volume level to the level you want listen to 5 Apply the following sound effects if you wish SOUND TURBO See page 8 SOUND MODE See page 8 For operation of the external equipment refer to its In structions AU...

Page 23: ...the SET button CLOCK OK appears on the display Then the selected time is set and the seconds start counting from 0 Fixing the Clock On the Unit 1 Press the STANDBY ON button to turn on the System 2 Press the CLOCK TIMER button repeatedly until clock setting display time indication appears on the display Each time you press the button display changes as follows DAILY ON TIME REC ON TIME Clock Setti...

Page 24: ... then press the SET button The minute digits of the ON time blink on the display Pressing the button moves the time forwards and press ing the 4 button moves it backwards Holding down the button moves the time rapidly 2 Press the or 4 button to set the minute then press the SET button OFF TIME appears and then the System enters OFF time setting mode The current OFF time appears on the display and ...

Page 25: ...1 Press the CLOCK TIMER button on the Unit repeatedly until the DAILY appears on the display 2 Press the CANCEL button on the Unit OFF appears and both the Timer indicator and the DAILY indicator go out To activate the cancelled Daily Timer 1 Press the CLOCK TIMER button on the Unit repeatedly until the DAILY appears on the display The DAILY indicator blinks and the Timer indicator lights up on th...

Page 26: ...o select the volume level MIN 1 30 or MAX When the timer is turned on the Volume will be automatically set to the selected level 7 Press the SET button The timer setting is completed and the display returns to the display before you set the Timer 8 Press the STANDBY ON button to turn off the System if necessary The Timer indicator and REC indicator are lit on the display showing that the Rec Timer...

Page 27: ...minutes you have set To Confirm the Sleep Time When the SLEEP button on the Remote Control is pressed the re maining sleep time is displayed Wait until the display returns to the original display To Cancel the SLEEP Timer Setting Press the SLEEP button until OFF appears on the display Turning off the System also cancels the SLEEP Timer When the REC Timer or the DAILY Timer is operating SLEEP Timer...

Page 28: ...ontinuous sound Fading Incomplete erasure Difficulty recording Clean the heads capstans and pinch rollers using a cotton swab moistened with alcohol If the heads become magnetized the Unit will produce noise or lose high frequencies To demagnetize the heads turn off the Unit and use a head demagnetizer available at electronics and record shops Remove the CD from its case by holding it at the edges...

Page 29: ... MP3 WMA disc does not play No MP3 WMA files are recorded on the disc MP3 WMA files do not have the file extension wma or mp3 in thier file names MP3 WMA files are not recorded in the format compliant with ISO 9660 Level 1 or Level 2 Replace the disc The readout time of the MP3 WMA disc is too long The readout time varies with the com plexity of the recording configuration Do not use too many hier...

Page 30: ...ble parts inside Please refer to qualified service personnel for repairs NEED HELP ON HOW TO HOOK UP NEED ASSISTANCE ON HOW TO OPERATE NEED TO LOCATE A JVC SERVICE CENTER LIKE TO PURCHASE ACCESSORIES THANK YOU FOR PURCHASING THIS JVC PRODUCT WE WANT TO HELP YOU ACHIEVE A PERFECT EXPERIENCE Remember to retain your Bill of Sale for Warranty Service TOLL FREE 1 800 252 5722 http www jvc com ...

Page 31: ... WARRANTY INFORMATION PACKAGED WITH EACH REFURBISHED PRODUCT Some states do not allow the exclusion of incidental or consequential damages or limitations on how long an implied warranty lasts so these limitations or exclusions may not apply to you This warranty gives you specific legal rights and you may also have other rights which vary from state to state THE DURATION OF ANY IMPLIED WARRANTIES I...

Page 32: ... 710 kHz Unit Dimensions 270 mm 307 mm 492mm W H D 10 11 16 12 1 8 19 3 8 Mass Approx 9 3 kg 20 5 lbs Speaker Specifications each unit SP MXKC50 Type 3 way bass reflex type Speaker Unit Woofer 16 cm 6 5 16 cone 1 Mid 5cm 2 cone 1 Tweeter 2 cm 13 16 dome 1 Power Handling Capacity 200 W Impedance 6 Ω Frequency Range 45 Hz 22 000 Hz Sound pressure level 87 dB W m Dimensions 220 mm 324 mm 238 mm W H D...

Reviews: