background image

No. 51831

C-N14210

5

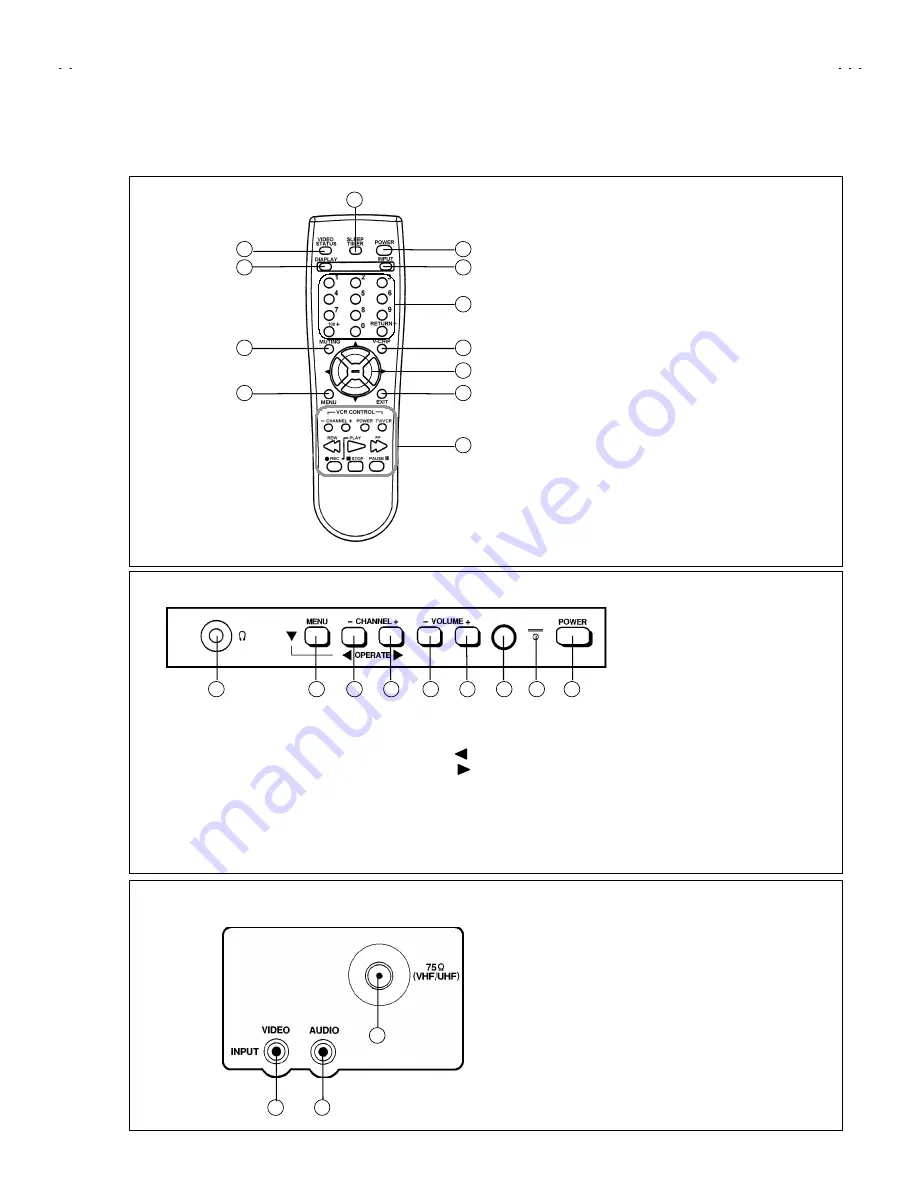
FUNCTIONS

  REMOTE CONTROL UNIT

 FRONT PANEL

 REAR PANEL


Headphone terminals


MENU button


CHANNEL - (Operate      ) button


C (Operate   ) button


VOLUME - button


 button


Remocon window


Indicator lamp (TIMER / POWER)


POWER

 button


VIDEO(INPUT) terminal


AUDIO(INPUT) terminal


Antenna terminal


VIDEO STATUS key


DISPLAY keys


MUTING key


MENU key


POWER key


INPUT SELECT key


CHANNEL key


V-CHIP key


FUNCTION key


EXIT key


SLEEP TIMER key


VCR CONTROL keys

1

2

3

4

5

6

7

8

9

1

2

3

1

2

3

4

5

6

7

8

9

10

11

12

Summary of Contents for C-N14210/S

Page 1: ...AN LTD Aug 2001 C N14210 S CONTENTS SPECIFICATIONS 2 SAFETY PRECAUTIONS 3 FEATURES 4 FUNCTIONS 5 SPECIFIC SERVICE INSTRUCTIONS 6 SERVICE ADJUSTMENTS 10 PARTS LIST 25 OPERATING INSTRUCTIONS STANDARD CIRCUIT DIAGRAM 2 1 SERVICE MANUAL COLOR TELEVISION BASIC CHASSIS FV4 ...

Page 2: ...3 by 07 13 A 1 by 14 22 J W by 23 36 W 1 W 28 by 37 64 W 29 W 84 by 65 125 A8 A4 A1 by 01 96 99 180 Channels Intermediate Frequency Video IF Carrier Sound IF Carrier Color Sub Carrier 45 75MHz 41 25MHz 4 5MHz 3 58MHz Antenna Input Impedance 75Ω VHF UHF Terminal F Type Connector Power Input 120V AC 60Hz Power Consumption 60W Picture Tube 14 34cm Measured Diagonally High Voltage 22 5kV 1kV at zero b...

Page 3: ...or alternatives approved by the manufacturer of the complete product 7 Do not check high voltage by drawing an arc Use a high voltage meter or a high voltage probe with a VTVM Discharge the picture tube before attempting meter connection by connecting a clip lead to the ground frame and connecting the other end of the lead through a 10k 2W resistor to the anode button 8 When service is required ob...

Page 4: ...icture adjustment Adoption of the CHANNEL GUARD function prevents the specific channels from being selected unless the ID number is key in Adoption of the VIDEO STATUS function Adoption of the ON OFF TIMER function With 75ΩV U in common F Type ANT Terminal SLEEP TIMER for setting in real time Closed caption broadcasts can be viewed Audio Video input terminal Built in V CHIP system ...

Page 5: ...on VOLUME button VOLUME button Remocon window Indicator lamp TIMER POWER POWER button VIDEO INPUT terminal AUDIO INPUT terminal Antenna terminal VIDEO STATUS key DISPLAY keys MUTING key MENU key POWER key INPUT SELECT key CHANNEL key V CHIP key FUNCTION key EXIT key SLEEP TIMER key VCR CONTROL keys 1 2 3 4 5 6 7 8 9 1 2 3 1 2 3 4 5 6 7 8 9 10 11 12 ...

Page 6: ...oard 1 By holding up the SPEAKER HOLDER marked slightly and unlocking the claw the SPEAKER HOLDER can be removed Then you can remove the SPEAKER CHECKING THE MAIN PW BOARD 1 To check the backside of the MAIN PW Board 1 Pull out the MAIN PWB Refer to REMOVING THE MAIN PWB 2 Erect the chassis vertically so that you can easily check the backside of the MAIN PW Board CAUTION When erecting the MAIN PWB...

Page 7: ...No 51831 C N14210 7 FRONT CABINET CRT SOCKET PWB Within MAIN PWB SPEAKER REAR COVER SPEAKER HOLDER Fig 1 A B CONTROL KNOB MAIN PWB ...

Page 8: ...ay the Fig 2 SYSTEM CONSTANT screen 4 Refer to the SYSTEM CONSTANT table and check the setting items Where these differ select the setting item with the MENU UP DOWN key and adjust the setting with the MENU LEFT RIGHT keys The letters of the selected item are displayed in yellow 5 After adjusting release the MENU LEFT RIGHT key to store the setting value 6 Press the EXIT key twice to return the no...

Page 9: ... CHANNEL PRESET VOLUME INPUT TV VIDEO OFF CH 02 See OPERATING INSTRUCTIONS 10 TV DISPLAY SLEEP TIMER VIDEO STATUS OFF 0 STANDARD 2 Setting of MENU TINT COLOR PICTURE BRIGHT DETAIL CENTER CENTER CENTER CENTER CENTER NOISE MUTING SET VIDEO STATUS ON ALL CENTER SET CLOCK ON OFF TIMER LANGUAGE CLOSED CAPTION BACK GROUND Unnecessary to set NO SPANISH OFF BLACK AUTO TUNER SETUP CHANNEL SUMMARY V CHIP SE...

Page 10: ...esistors transformers condensers etc 7 Presetting before adjustment Unless otherwise specified in the adjustment instructions preset the following functions with the remote control unit VIDEO STATUS STANDARD TINT COLOR PICTURE BRIGHT DETAIL CENTER ADJUSTMENT EQUIPMENT 1 DC voltmeter or digital voltmeter 2 Oscilloscope 3 Signal generator Pattern generator NTSC 4 Remote control unit 5 TV audio multi...

Page 11: ...SLEEP TIMER 0 MIN is being displayed press DISPLAY key and VIDEO STATUS key on the remote control unit simultaneously to enter the SERVICE MENU screen shown in the next figure page 2 SERVICE MENU screen selection Press the UP DOWN key of the MENU to select any of the following items The letters of the selected items are displayed in yellow PICTURE GAME LOW LIGHT HIGH LIGHT RF AFC CHK VCO CW 3 Ente...

Page 12: ...RATE BY EXIT BY IT 1 BRIGHT EXIT STATUS EXIT BY IT HIGHLIGHT EXIT EXIT BY IT TOOHIGH ABOVE REFERENCE BELOW REFERENCE TOOLOW SYNC YES EXIT SELECT BY OPERATE BY EXIT BY IT RF AFC FINE STATUS EXIT SERVICE MENU MAIN MENU SCREEN HIGH LIGHT MODE VCO CW MODE GAME MODE SELECT BY OPERATE BY EXIT BY IT TINT COLOR PICTURE BRIGHT DETAIL EXIT RF AFC CHK MODE DO NOT ADJUST ON LOW LIGHT MODE PICTURE MODE ...

Page 13: ...ing to the SERVICE MENU upon completion of the setting adjustment work press the EXIT key again The settings for LOW LIGHT and HIGH LIGHT are described in the WHITE BALANCE page of ADJUSTMENT The setting for VCO CW are described in the IF VCO page of ADJUSTMENT SELECT BY OPERATE BY EXIT BY IT 1 BRIGHT EXIT STATUS PICTURE MODE INITIAL SETTING VALUE Adjust SETTING VALUE SETTING ITEM SELECT BY OPERAT...

Page 14: ...he values in the setting items in the video mode are revised automatically to the same values in the TV mode The initial setting values given in are off set values When the four items No 7 8 11 and 12 are adjusted in the video mode the setting values in each item are revised independently No Setting Adjustment items Variable range initial setting value 1 BRIGHT 0 127 64 2 PICTURE 0 127 60 3 TV DTL...

Page 15: ...IGHT MODE Setting Adjustment item Variable range initial setting value R CUTOFF G CUTOFF B CUTOFF 0 255 0 255 0 255 20 20 20 HIGH LIGHT MODE Setting Adjustment item Variable range initial setting value G DRIVE B DRIVE 0 255 0 255 128 128 RF AFC CHECK MODE Setting Adjustment item Variable range initial setting value RF AFC FINE ON OFF 77 77 ON DO NOT ADJUST ...

Page 16: ...nd SYNC YES being shown on the screen Then adjust CW TRANSF until BELOW REFERENCE mark turns yellow and confirm again SYNC YES being shown on the screen RF AGC adjustment No 19 RF AGC 1 Receive a broadcast 2 Select No 19 RF AGC of the PICTURE MODE 3 Press the MUTE key and turn off color 4 With the MENU LEFT key get noise in the screen picture 0 side of setting value 5 Press the MENU RIGHT key and ...

Page 17: ... V SIZE with the LEFT RIGHT key of the MENU 4 Adjust No 13 V SIZE until the vertical screen size is 92 H POSITION Adjustment Signal generator No 15 H POS 1 Receive a crosshatch signal 2 Select the No 15 H POS of the PICTURE MODE 3 Set the initial setting value of the No 15 H POS with the LEFT RIGHT key of the MENU 4 Adjust the No 15 H POS until the screen will be horizontally centered Screen size ...

Page 18: ...that is displayed becomes white using the to keys of the remote control unit 9 Turn the screen VR to where the single horizontal line glows faintly 10 Press the key to return to the regular screen The EXIT key is the cancel key for the WHITE BALANCE WHITE BALANCE High Light Adjustment Signal generator G DRIVE B DRIVE 1 Receive a black and white signal Color off 2 Select the HIGH LIGHT MODE in the ...

Page 19: ...LEFT RIGHT key of the MENU 4 If the contrast is not best with the initial setting value make fine adjustment of the No 2 PICTURE until you get the optimum contrast SUB COLOR Adjustment No 6 COLOR 1 Receive a broadcast 2 Select No 6 COLOR of the PICTURE MODE 3 Set the initial setting value of the No 6 COLOR with the LEFT RIGHT key of the MENU 4 If the color is not best with the initial setting valu...

Page 20: ...he center of the screen Fig 3 8 Move the deflection yoke forward and fix the position of the deflection yoke so that the whole screen will become green 9 Insert the wedge to the top side of the deflection yoke so that it will not move 10 Input a crosshatch signal 11 Verify that the screen is horizontal 12 Input red and blue raster signals and make sure that purity is properly adjusted CRT WEDGE DE...

Page 21: ...ake best convergence DYNAMIC CONVERGENCE ADJUSTMENT 1 Move the deflection yoke up and down and overlap the lines in the periphery Fig 2 2 Move the deflection yoke left to right and overlap the lines in the periphery Fig 3 3 Repeat 1 and 2 above and make best convergence After adjustment fix the wedge at the original position Fasten the retainer screw of the deflection yoke Fix the 6 magnets with g...

Page 22: ...T 1 Turn the POWER SW ON 2 As shown in Fig 1 set the resistor between X connector 1 3 3 Make sure that the screen picture disappears 4 Temporarily unplug the power cord 5 Remove the resistor between X connector 1 3 6 Again plug the power cord make sure that the normal picture is displayed on the screen Fig 1 4 HVT CONNECTOR RESISTOR 14 46kΩ Ω Ω Ω 1 1 4W HEATER R562 D561 R561 X C561 R563 D562 3 2 1...

Page 23: ...ing of shorting of the power supply output from the HVT to the vertical circuit and the small signal power supply is also detected The microcomputer detects at 1 second intervals If NG is detected for more than 1 ms a malfunction is interpreted When a malfunction has been detected the POWER is turned off While the POWER is being turned off the power key of the remote controller is not operational ...

Page 24: ...tweezers and remove the chip part Transistors diodes variable resistors etc 1 Apply extra solder to each lead 2 As shown in the figure push the part with tweezers and alternately melt the solder at each lead Shift and remove the chip part Note After removing the part remove remaining solder from the pattern 2 How to install Chip parts Resistors capacitors etc 1 Apply solder to the pattern as indic...

Page 25: ...N14210S MEM 3 4 VP 0108 DP3051 VICTOR COMPANY OF JAPAN LIMITED HOME AV NETWORK BUSINESS UNIT 12 3 chome Moriya cho Kanagawa ku Yokohama Kanagawa prefecture 221 8528 Japan ...

Reviews: