background image

Parts and Functions - Remote 


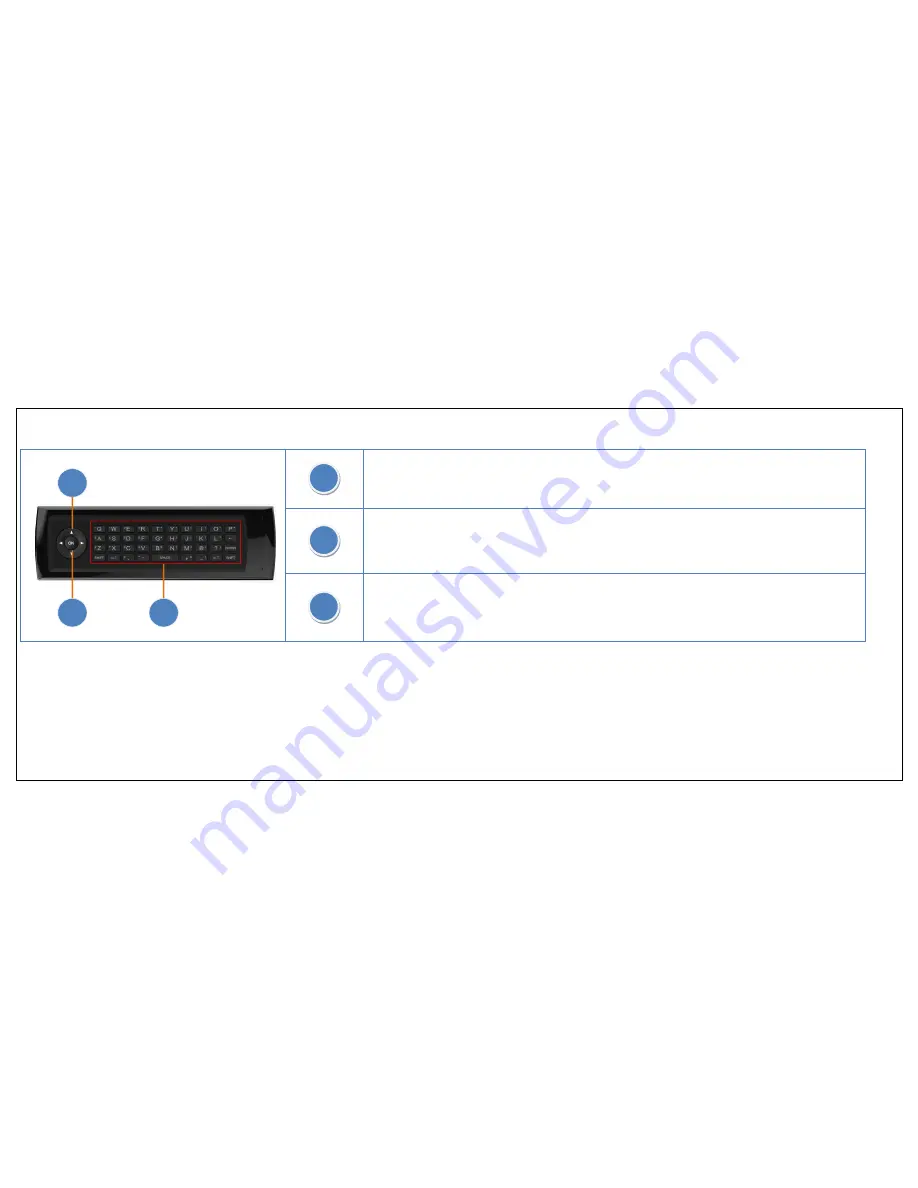
Direction buttons: Navigate the menu, select options, or adjust settings value. 


OK

 button: Launches a menu, selects a menu option, and selects on-screen keypad 

characters. 


QWERTY Keypad: Enter log in information such as your Username and Password or 
fill in I.C.E. App fields. 

27 

26 

25 

25


26


27


Summary of Contents for Black Sapphire SL42B-C

Page 1: ......

Page 2: ... For assistance call the JVC Customer Support and Service Center at 1 855 868 1928 or visit our website at http go jvc com HDTVSupport We recommend that you register your JVC Smart E LED HDTV either at our website at http go jvc com HDTVSupport or fill out and mail the Product Registration Card on the back of the Quick Start Guide Retain your purchase receipt and write down the model and serial nu...

Page 3: ...PECTIVE OWNERS IMAGES USED ARE FOR ILLUSTRATION PURPOSES ONLY JVC THE JVC LOGO AND OTHER JVC TRADEMARKS ARE THE INTELLECTUAL PROPERTY OF JVC KENWOOD CORPORATION PRODUCT SPECIFICATIONS ARE SUBJECT TO CHANGE WITHOUT NOTICE COPYRIGHT 2012 AmTRAN Video Corporation ALL RIGHTS RESERVED ...

Page 4: ...of uninsulated dangerous voltage with the product s enclosure that may be of sufficient magnitude to constitute a risk of electric shock The exclamation point within an equilateral triangle is intended to alert the user to the presence of important operating and maintenance servicing instructions in the literature accompanying the appliance ...

Page 5: ...dio communications However there is no guarantee that interference will not occur in a particular installation If this equipment does cause harmful interference to radio or television reception which can be determined by turning the equipment off and on the user is encouraged to try to correct the interference by one or more of the following measures Reorient or relocate the receiving antenna Incr...

Page 6: ...ssly approved by the party responsible for compliance with the FCC Rules could void the user s authority to operate this equipment Responsible Party AmTRAN Video Corporation Address 9 Goddard Irvine CA 92618 USA Telephone No 949 336 6633 Required Marking Location The rating sheet and the safety caution are on the rear of the unit ...

Page 7: ...n when moving the cart apparatus combination to avoid injury from tip over 12 Unplug this apparatus during lightning storms or when unused for long periods of time 13 Refer all servicing to qualified service personnel Servicing is required when the apparatus has been damaged in any way such as power supply cord or plug is damaged liquid has been spilled or objects have fallen into the apparatus th...

Page 8: ...etermine that the unit is in proper operating condition 21 When you connect the product to other equipment turn off the power and unplug all of the equipment from the wall outlet Failure to do so may cause an electric shock and serious personal injury Read the owner s manual of the other equipment carefully and follow the instructions when making any connections 22 Sudden high volume sound may cau...

Page 9: ...lectronics industry is committed to making home entertainment enjoyable and safe TUNE INTO SAFETY One size does NOT fit all Follow the manufacturer s recommendations for the safe installation and use of your TV Carefully read and understand all enclosed instructions for proper use of this product Don t allow children to climb on or play with furniture and television sets Don t place TVs on furnitu...

Page 10: ... glass to break and injury may occur If the LCD panel is broken make absolutely sure that you do not touch the liquid in the panel This may cause skin inflammation If the liquid gets in your mouth immediately gargle and consult with your doctor Also if the liquid gets in your eyes or touches your skin consult with your doctor after rinsing for at least 15 minutes or longer in clean water Possible ...

Page 11: ...ctromagnetic waves Some equipment placed too near this unit may cause interference Effect on infrared devices There may be interference while using infrared devices such as infrared cordless headphones Television Antenna Connection Protection External Television Antenna Grounding If an outside antenna satellite dish or cable system is to be connected to the TV make sure that the antenna or cable s...

Page 12: ...lightning storm or when it is left unattended or unused for long periods of time unplug the TV from the wall outlet and disconnect the antenna or cable system Power Lines Do not located the antenna near overhead light or power circuits or where it could fall into such power lines or circuits ...

Page 13: ... only TVs continue to work as before to receive low power Class A or translator television stations and with cable and satellite TV services gaming consoles VCRs DVD players and similar products For more information about the DTV transition visit www dtv gov FCC Consumer Center Email dtcinfo fcc gov Phone 1 888 CALLFCC 1 888 225 5322 Fax 1 866 418 0232 or writing to Federal Communications Commissi...

Page 14: ...ontents Your JVC Black Sapphire HDTV is shipped with the items shown below Attaching the Stand Keep the protective bag on TV and place them on a flat surface Attach stand to TV Fasten the four screws provided Carefully lift TV up ...

Page 15: ...ion for the right wall mount size For product protection and safety reasons JVC strongly recommends contacting a professional installer or technician for assistance with the installation of the wall mount and with the setup of your TV JVC will not be held responsible for any damage to the product or injury to yourself and others should you decide to install the wall mount and TV without the assist...

Page 16: ...onto the TV before laying the TV down on flat surface 3 Using a cross tip screwdriver remove four screws securing TV stand to rear of TV Remove TV stand 4 Follow instructions in wall mount kit and install wall mount Install TV onto wall mount in accordance with wall mount kit instructions NOTE Wall mount screw hole pattern on rear of this model is VESA 400 x 400mm with M6 screws ...

Page 17: ...over and slide up into place Battery Precautions Be sure to follow the correct polarity Incorrect installation may cause battery leakage or damage to the remote control Always replace batteries in pairs never combine a used battery with a new one Do not use different battery types together e g Alkaline and Carbon zinc If remote control will not be used for an extended period of time remove batteri...

Page 18: ... of sight Things To Prevent Weakened 3D effects may be caused by Viewing TV at an angle Viewing the TV too close or too far away TV is not aligned to audiences line of sight TV placed on TV stand and aligned to audiences eye level Use wall mount hardware with tilt capability TV is tilted down aligning to audiences eye line Weakened 3D effects Viewing TV at an angle Viewing TV too close or too far ...

Page 19: ...Parts and Functions TV Side View Power Button MENU Button CH Button CH Button VOL Button VOL Button INPUT Button USB Port HDMI 3 Port Audio Out headphone Optical Audio Out 5 4 3 2 1 1 2 3 4 5 ...

Page 20: ...Parts and Functions TV Rear View HDMI 1 ARC and HDMI 2 ports Ethernet port Component Video Input Jack Component Video Music Port Audio Input Jack TV Antenna Cable Input Jack 5 4 3 2 1 1 2 3 4 5 ...

Page 21: ...TV screen MULTIMEDIA button When pressed displays contents in the USB drive connected to TV FAV CH button When pressed displays your favorite channels list INPUT button When pressed displays Input Source menu on TV screen NETFLIX button When pressed launches NETFLIX application 5 4 3 2 1 1 2 3 4 5 ...

Page 22: ...ption and selects on screen keypad characters BACK button Returns User to previous TV screen ICE Internet Connected Experience Apps button When pressed displays I C E application icons on TV screen VOL Volume button Increases VOL and decreases VOL TV volume MUTE button When pressed sets TV audio on or off 11 10 9 8 7 6 6 10 9 7 8 11 ...

Page 23: ...dcast channels Number keypad 0 9 When input source is TV changes channel Can be used when entering numeric values in application log in fields CH Channel button When input source is TV increases and decreases channel number Multipurpose buttons EXIT button Used for exiting a menu application or mode 17 16 15 14 13 12 12 13 17 16 15 14 ...

Page 24: ...r 3D 2D control options Note 3D functionality is applicable to 3D TV models only WIDE button When pressed displays Screen Mode selections on TV screen AUDIO ONLY button When pressed turns off TV screen but continues to play audio from input source Playback buttons Used for Video in USB flash and HDMI CEC functions Power button When pressed turns TV on or off 24 23 22 21 20 19 18 23 22 21 20 19 18 ...

Page 25: ...the menu select options or adjust settings value OK button Launches a menu selects a menu option and selects on screen keypad characters QWERTY Keypad Enter log in information such as your Username and Password or fill in I C E App fields 27 26 25 25 26 27 ...

Page 26: ...Making A V Connections ...

Page 27: ...Making A V Connections ...

Page 28: ...e home network This can be accomplished in two ways Hard Wired Ethernet Connection Wireless Connection Making a Hard Wired Ethernet Connection To connect your TV to your home network 1 Connect one end of a CAT 5 Ethernet cable to your home network s Ethernet drop box 2 Connect other end of cable to the Ethernet connector jack at rear of TV 3 Follow the instructions on the Network portion of the On...

Page 29: ...t your TV to your home network via a wireless connection follow the instructions on the Network portion of the One Time Setup Wizard in the Basic Operations section or on remote press MENU choose NETWORK then choose a wireless network and enter security key ...

Page 30: ...utton choose SETUP and then Setup Wizard General Settings Make sure batteries is inserted to remote and follows on screen instruction to select Language TV Mode Time Zone and Daylight Saving selections Network Settings When you see Network Setting screen plug in Ethernet cable for wired connection or make sure wireless router is turned on For Wired connection the TV will automatically detect the c...

Page 31: ...K and key in security password by using remote QWERTY keypad Auto Channels Scan Ensure Antenna or Cable TV input cable is connected to DTV TV jack choose Start Scan to begin Note Channels scanning may take a few minutes On Finish screen press OK button to save and exit the Setup Wizard Align the remote IR emitter to TV s IR receiver lens ...

Page 32: ...D source device such as a 3D Blu Ray player 3D Game Console and or Cable TV or Satellite TV converter box that can decode 3D content A 3D media such as Blu ray 3D movie disc An HDMI connection cable XinemaView 3D Glasses included with TV Connecting Your 3D Source Device Connecting a 3D source device to your TV is very simple 1 Connect one end of the HDMI cable to the HDMI connector jack on your de...

Page 33: ... the TV and 3D source device 2 Insert 3D media game disc Blu ray disc etc 3 TV will detect and play the 3D content automatically Put on a pair of 3D glasses and enjoy 4 To switch between 2D and 3D mode press 3D button on remote and select desirable viewing mode ...

Page 34: ...ance between you and the TV screen should be 7 feet Refer to Section 2 TV Placement for Best 3D Experience for proper TV distance and height from viewing audience For those with epilepsy have a family history linked to epilepsy or have experienced epileptic type symptoms in the past consult your health care provider before viewing 3D videos or images Avoid viewing 3D content when under the influen...

Page 35: ...application Follow the instruction on screen to setup each application To exit an application press the Exit button on remote New ICE Apps Update With internet connection setup the TV will periodically look for new ICE Apps as well as other TV software update available in server The TV will automatically download newest ICE apps and software update NOTE ICE apps are software provided by the conten...

Page 36: ...MEDIA button on remote or press ICE App button and choose multimedia icon Note The TV is capable of photos music and video playback However due to the wide variety of multimedia file formats Some formats may not be supported It is recommended to use USB flash memory ONLY USB external hard disk drive HDD is not supported due to its higher power consumption ...

Page 37: ... control press button 2 At rear of TV press the CHANNEL UP or CHANNEL DOWN buttons Selecting Analog Channels 1 9 Press 1 9 as needed For example to select channel 2 press 2 then press OK 10 99 Press the 2 digits in order For example to select channel 15 press 1 5 and then press OK 100 135 Press the 3 digits in order For example to select channel 130 press 1 3 0 and then press OK Selecting Digital ...

Page 38: ... Exit to close Channel List screen Mute Press the Mute button to turn off the sound To turn on the sound press the Mute button again Setting the Sleep Timer Use the Sleep timer to automatically turn off the TV after a preset amount of time has elapsed 1 Press Sleep button to display Sleep Timer screen 2 Press Sleep button repeatedly or use up and down direction buttons to select desired sleep time...

Page 39: ... Mode display or Press MENU then choose Wide Normal When watching a 4 3 content the TV displays a standard picture with black side bars When viewing a 16 9 content it displays a full picture Wide Applying to 4 3 content the picture is stretched horizontally to fill the width of the screen Applying to 16 9 content the image is slightly overscanned ...

Page 40: ... Stretch The picture is stretched horizontally on the left and right sides Only available in 16 9 content Panoramic The picture is stretched horizontally on the left and right sides to fill the width of the screen The center of the picture is not stretched Notes Panoramic mode is only available on 4 3 contents Stretch is only available in 16 9 contents ...

Page 41: ...ton to select desired input source Connecting Music The TV supports music playback from portable music players such as iPods and various MP3 players Connect one end of an audio cable to TV Component Audio In jacks and the other end to the music player s Audio Out or headphone jack Press INPUT button and select MUSIC Audio Only Mode While playing music you can set the TV to Audio Only mode to turn ...

Page 42: ... button to confirm your TV Setting selection Select and Adjust a TV Setting Option Press up or down to select a TV Setting Option Press left or right to adjust the setting Press OK to apply the adjustment Press CH or CH buttons to select a TV Setting Option Press VOL or VOL buttons to adjust the setting Press INPUT button to apply the adjustment Exit the Menu Press EXIT button Press MENU button Pi...

Page 43: ...icture Low contrast makes pictures look dark High contrast makes pictures washed out 0 100 Brightness Adjust the brightness setting 0 100 Color Adjust the amount of color level in the picture 0 100 Tint Adjust the picture hue 50 50 Sharpness Adjust the sharpness of the edges of elements in the picture Size Position Horiz Position Vertical Position Adjust the horizontal vertical position of the pic...

Page 44: ...d and crisp color pictures Off Normal Rich Dynamic Contrast Dynamic contrast automatically enhances the image for greater picture details Off Low Medium High Adaptive Backlight Backlight dimming based on video contents Off On Noise Reduction Reduce the noise level Off Low Medium High Digital NR Reduce noise level of digital signals Off Low Medium High Film Mode Produce smoother motion pictures whe...

Page 45: ...eble Adjust the bass level to your preference 12 12 Balance Adjust the audio level of the L R channels of the speakers to your preference 10 10 Lip Sync Adjust to match the movements and the lips of the person talking on the screen 0 5 TV Speakers Turn the internal speakers on or off Digital Audio Out Select the type of digital audio output Off Dolby Digital PCM Analog Audio Out Select the type of...

Page 46: ...sable the CEC function System Audio Control Enable or disable system audio control ARC Audio Return Channel on HDMI 1 Device Discovery Select to view CEC devices Menu Language Select the on screen menu language Time Settings Time Zone Select a location to apply the time zone Daylight Savings Enable or disable daylight savings time Power Indicator Turn On or Off the TV power indicator LED ...

Page 47: ...abel name on an input source 1 Press MENU select Setup and Press OK on Input Source to select which input from the list that you want to name 2 Then press OK on Input Labels to select from a list or choose CUSTOM on the list then press OK on the box below Custom to type in a desired name ...

Page 48: ...ntrol 3 Enter password Default password is 0 0 0 0 and select the blocking options Parental control options Enable Rating To turn On or Off the Parental Control Channel Lock To block by TV Channel USA TV To block by TV rating USA Movie To block by MPAA rating CAN English To Block by Canadian English Channel rating CAN French To Block by Canadian French Channel rating Block Unrated Shows On to bloc...

Page 49: ...dicator LED at the TV lower left hand corner when the TV is on Setup Wizard to run the step by step Setup Wizard ICE Apps Setting to deactivate Netflix and VUDU ICE apps Customer Support choose to view TV System Information User Manual and JVC Customer Service contact information ...

Page 50: ...ia Ethernet cable is not available to the TV the TV will automatically scan and show all available wireless networks in the area icon Indicates current connected wireless network To connect a different network choose the desired network and press OK then enter Network Security Key Add Network To manually enter hidden network s SSID Wireless Network List ...

Page 51: ...ual Setup Choose to manually setup Static IP information Note Manual Setup is only for advanced users and network where the network client devices need specific setting to access the network Test Connection Choose to test and view connection status ...

Page 52: ...pendent on video contents Analog Closed Caption Select desired closed caption service for analog video contents including analog NTSC broadcast and video via Composite inputs Digital Closed Caption Select desired closed caption service for digital video contents including digital ATSC broadcast and video via HDMI inputs Digital CC Option To select closed caption display options including font size...

Page 53: ...ct to scan all analog and digital channels Partial Channel Scan Select to scan a user specific channels range Find Channel Select to find a specific channel and add to the channel list Channel Management Select to mark channels as favorite channel which can be accessed by FAV CH button on remote or remove channels from channel list by press OK Digital MTS Select available MTS Multichannel Televisi...

Page 54: ...nced TV Settings Sleep Timer Sleep Timer Setting Select a sleep timer option where the TV automatically turns off after the selected preset time Off 30 minutes 60 minutes 90 minutes 120 minutes 180 minutes ...

Page 55: ...d then plug it back in Poor or No Sound Press the VOL Up button on the remote control or the VOL button on the TV Press MUTE button on the remote control to ensure mute is not on The channel or cable TV broadcast is experiencing problems Tune to another channel Check the TV audio settings Check for possible sources of interference Poor or No Picture The channel or cable TV is experiencing problems...

Page 56: ...k Batteries may be weak dead or inserted incorrectly Point the remote control directly at the IR sensor on the TV with an angle of 35 degrees Remove any obstacles between the remote control and the TV Remote control is out of range Move closer to the TV TV Shuts Off Sleep timer is set Power is interrupted No CATV Reception Check all cable TV connections Set the TV Mode in Channel menu Closed Capti...

Page 57: ... choose NETWORK MANUAL SETUP Make sure DHCP is chosen in TYPE On TV menu choose NETWORK TEST CONNECTION If Status shows Connected the TV has connected properly with the router or gateway Please consult your internet service provider for possible internet outage in your area Try if you can access internet with PC or other devices through the same router or network switches ...

Page 58: ...etwork SSID Try reboot the wireless router On TV menu choose NETWORK TEST CONNECTION If Status shows Connected the TV has connected properly with wireless router Please consult your internet service provider for possible internet outage in your area Try if you can access internet with PC or other devices through the same wireless router No 3D contents Make sure the source device support 3D format ...

Page 59: ...11n Single Band Preloaded Internet Apps ICE apps Netflix Vudu Pandora TV Features Color Enhancement Yes CrystalColor Built in NTSC ATSC Clear QAM tuner Yes PIP POP No Close Caption Yes Audio Audio Technology XinemaSound 3D Dolby Digital Decode Graphic Equalizer Yes Speaker Output Power 20W 10Wx2 Convenience Features Interactive Setup Guide Yes Input Port Naming Yes Audio Only Mode Yes Gaming Mode ...

Page 60: ...Stereo Audio Out 1 Mechanical Wall Mount Pattern VESA 400x400mm M6 screw Without Stand approx 37 5 x 22 0 x 1 8 27 lbs 41 9 x 24 5 x 1 9 33 lbs With Stand approx 37 5 x 23 6 x 5 8 29 lbs 41 9 x 26 1 x 5 8 35 lbs Power Consumption Input Voltage 120V AC CrystalMotion is a set of motion enhancement technologies including Motion Estimation Motion Compensation or Backlight Scanning or both ...

Page 61: ...PC Timing HDMI 720 x 400 70Hz 640 x 480 60 75Hz 800 x 600 60 75Hz 1024 x 768 60 75Hz 1280 x 1024 75Hz 1920 x 1080 60Hz Supported NTSC Composite Timing 480i Supported ATSC Components HDMI Video Timing 480i 480p 720p 1080i 1080 24p 60p ...

Page 62: ...rtation costs to the service center but will cover the costs for return shipping to the customer PRE AUTHORIZATION IS REQUIRED BEFORE SENDING ANY PRODUCT TO A DESIGNATED SERVICE CENTER FOR WARRANTY SERVICE Product returned to designated service centers must either utilize the original carton box and shipping material or packaging that affords an equal degree of protection Technical Support will pr...

Page 63: ...r distribute only if you agree to all of the terms and conditions of the GPL LGPL Please note that any software component developed or created independently by AmTRAN Video Corporation shall not be subject to GPL LGPL requirement for provision of the source code Users are urged to read the details for the relevant license carefully before using the software component covered by GPL LGPL You can ob...

Reviews: