background image

6

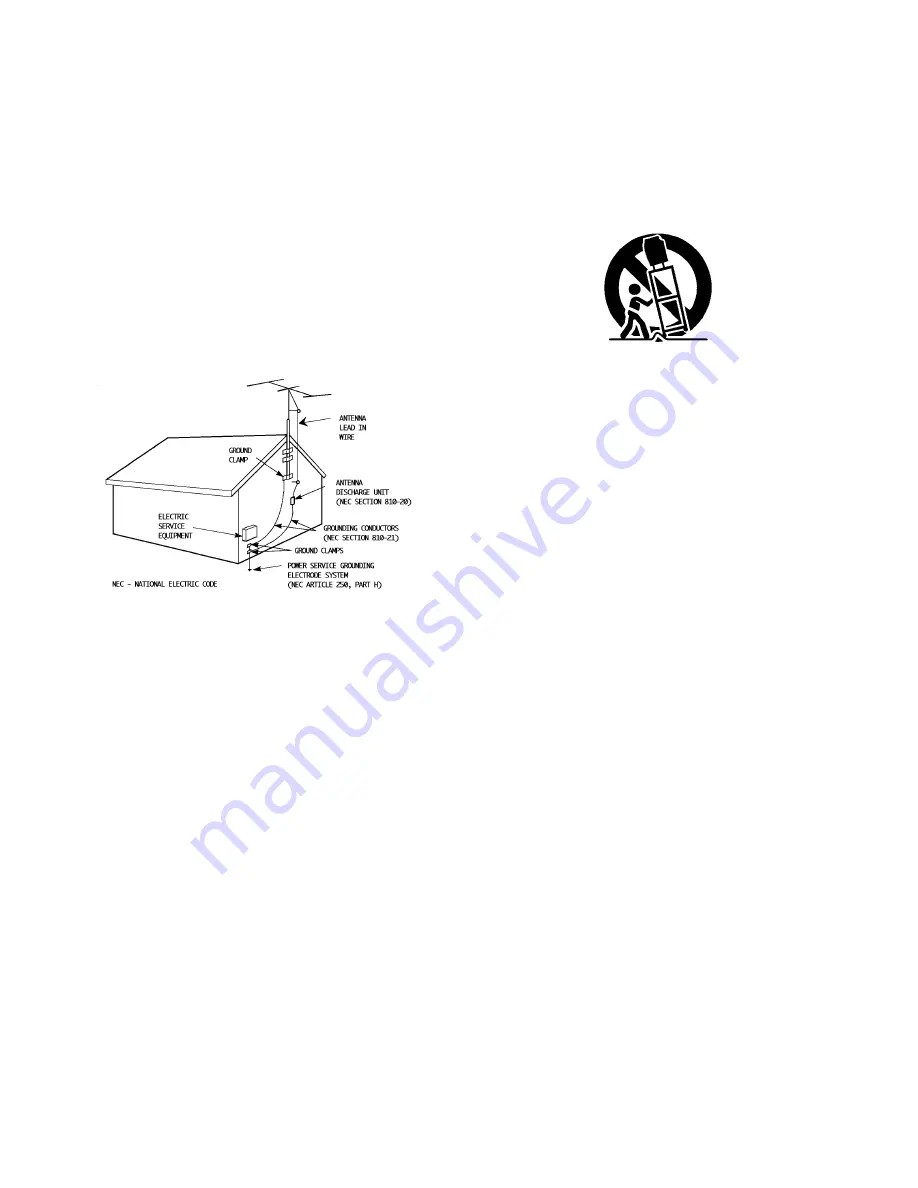
If an outside antenna is connected to the TV set, be sure the

antenna system is grounded so as to provide some pro t e c t i o n

against voltage surges and built-up static charges. Section 810

of the National Electrical Code provides information with re s p e c t

to proper grounding of the mast and supporting stru c t u re ,

g rounding of the lead-in wire to an antenna discharge unit, size

of grounding conductors, location of antenna discharge unit,

connection re q u i rements for the grounding electro d e .

7

An outside antenna system should not be located in the

vicinity of overhead power lines or other electric light or

power circuits, or where it can fall into such power lines or

circuits. When installing an outside antenna system, extreme

care should be taken to keep from touching such power

lines or circuits as contact with them might be fatal.

8

TV sets are provided with ventilation openings in the cabinet

to allow heat generated during operation to be released.

Therefore:

— Never block the bottom ventilation slots of a portable TV

set by placing it on a bed, sofa, rug, etc.

— Never place a TV set in a “built-in” enclosure unless

proper ventilation is provided.

— Never cover the openings with a cloth or other material.

— Never place the TV set near or over a radiator or heat re g i s t e r.

9

To avoid personal injury:

— Do not place a TV set on a sloping shelf unless properly secure d .

— Use only a cart or stand recommended by the TV s e t

m a n u f a c t u re r.

— Do not try to roll a cart with small casters across thresh-

olds or deep pile carpets.

— Wall or shelf mounting should follow the manufacturer’s

instructions, and should use a mounting kit approved by

the manufacturer.

USE

10

Caution children about dropping or pushing objects into the TV set

t h rough cabinet openings. Some internal parts carry hazard o u s

voltages and contact can result in a fire or electrical shock.

11 

Unplug the TV set from the wall outlet before cleaning. Do

not use liquid or an aerosol cleaner.

12

Never add accessories to a TV set that has not been designed for

this purpose. Such additions may result in a hazard .

13

For added protection of the TV set during a lightning storm or

when the TV set is to be left unattended for an extended period

of time, unplug it from the wall outlet and disconnect the

antenna. This will prevent damage to product due to lightning

s t o rms or power line surg e s .

14

A TV set and cart combination should be moved with care .

Quick stops, excessive force, and uneven surfaces may cause

the TV set and cart combination to overt u rn .

SERVICE

15

Unplug this TV set from the wall outlet and refer servicing to

q u a l i fied service personnel under the following conditions:

A. When the power cord or plug is damaged or frayed.

B. If liquid has been spilled into the TV set.

C. If the TV set has been exposed to rain or water.

D. If the TV set does not operate normally by following the

operating instructions. Adjust only those controls that are

c o v e red in the operating instructions as improper adjust-

ment of other controls may result in damage and will often

re q u i re extensive work by a qualified technician to re s t o re

the TV set to normal operation.

E. If the TV set has been dropped or damaged in any way.

F. When the TV set exhibits a distinct change in perfor-

mance — this indicates a need for service.

1 6

Do not attempt to service this TV set yourself as opening or

removing covers may expose you to dangerous voltage or

other hazards. Refer all servicing to qualified service personnel.

17

When replacement parts are re q u i red, have the serv i c e

technician verify in writing that the replacement parts he uses

have the same safety characteristics as the original part s .

Use of manufacture r’s specified replacement parts can

p revent fire, shock, or other hazard s .

18

Upon completion of any service or repairs to this TV s e t ,

please ask the service technician to perf o rm the safety check

described in the manufacture r’s service literature .

19

When a TV set reaches the end of its useful life, impro p e r

disposal could result in a picture tube implosion. Ask a

q u a l i fied service technician to dispose of the TV set.

20

Note to CATV system installer.

This reminder is provided to call the CATV system installer’s

attention to Article 820-40 of the NEC that provides

guidelines for proper grounding and, in particular, specifies

that the cable ground shall be connected to the grounding

system of the building, as close to the point of cable entry

as practical.

EXAMPLE OF ANTENNA GROUNDING

AS PER NATIONAL ELECTRICAL CODE

Summary of Contents for AV 27050

Page 1: ...al Number IMPORTANT NOTE TO THE CUSTOMER In the spaces below enter the model and serial number for your television located on the rear of the television cabinet Staple your sales receipt or invoice to the inside cover of this guide Keep this user s guide in a convenient place for future reference Keep the carton and original packaging for future use ...

Page 2: ...hbowl kitchen sink or laundry tub in a wet basement or near swimming pool etc IMPORTANT SAFETY PRECAUTIONS CAUTION RISK OF ELECTRIC SHOCK DO NOT OPEN CAUTION To reduce the risk of electric shock do not remove cover or back No user serviceable parts inside Refer servicing to qualified service personnel POLARIZED TYPE The lightning flash with arrowhead symbol within an equilateral triangle is intend...

Page 3: ...he TV set is to be left unattended for an extended period of time unplug it from the wall outlet and disconnect the antenna This will prevent damage to product due to lightning storms or power line surges 14 A TV set and cart combination should be moved with care Quick stops excessive force and uneven surfaces may cause the TV set and cart combination to overturn SERVICE 15 Unplug this TV set from...

Page 4: ...Exit 26 Display 26 Video Status 26 Sleep Timer 26 Hyper Surround 27 TV Video 27 100 27 VCR Buttons 27 Muting 27 Return 27 Number Buttons 10 Key Pad 27 PIP On Move 28 Freeze 28 Swap 28 Channel for PIP 28 Source 28 APPENDICES Troubleshooting 29 Limited Warranty 30 Authorized Service Centers 31 Specifications 32 TABLE OF CONTENTS WELCOME Congratulations on your new television purchase We thank you fo...

Page 5: ...ions 4 Unplug the power cord between each connection 5 Each jack on the back of the TV is labeled If you read these instructions and still do not fully understand the connections process seek assistance 6 The AV Compu Link Cable is supplied with the JVC device which you want to connect If you do not have one but you do have a JVC Compu Link capable VCR or HiFi contact your local JVC dealer RF Conn...

Page 6: ... or antenna RF wire out from the wall in to the splitter RF input 2 Connect RF wire Out from the splitter RF output in to the VCR RF input 3 Connect RF wire Out from the splitter RF output in to the TV VHF UHF input 4 Connect yellow video cable out from the VCR Video output in to the TV Video input jack 5 Connect white audio cable out from the VCR Left Audio output in to the TV Left Audio input ja...

Page 7: ... jack If your VCR is mono it has only one audio out jack connect it to TV L Mono input 3 CABLE VCR CONNECTIONS CONTINUED 1 Connect Cable RF wire out from wall in to splitter RF input 2 Connect RF Out from splitter RF output in to cable box RF input 3 Connect RF wire Out from cable box RF output in to VCR RF input 4 Connect RF wire Out from splitter RF output in to TV VHF UHF input 5 Connect yellow...

Page 8: ...ONNECT TO S VHS ACCESSORIES Keep the audio connections the same as for a non S VHS VCR or camcorder above and use the special S VHS cable that came with the VCR or Camcorder 1 S VHS Plug out from VCR in to TV s S Video input CONNECTING TO A CAMCORDER CONNECTING TO AN EXTERNAL AMPLIFIER 1 White audio cable out from TV Left Audio output jack in to Amplifier Left input 2 Red audio cable out from TV R...

Page 9: ...cable has a male 3 5 mm mono mini plug on each end B If your JVC brand VCR has A Code B Code Remote Control Switching see your VCR instructions using VCR A Code will switch the TV to Video Input 1 If you use Input 1 for Video out from the cable box use Input 2 here Using B Code will switch the TV to Video Input 2 C To connect a JVC HiFi receiver or amplifier for a completely automated home theater...

Page 10: ... short circuit insert end first Snap the cover back into place If the remote control acts erratically replace the batteries Typical battery life is usually about six months to one year We recommend alkaline batteries for a longer battery life RM C341 RM C345 USERS NOTE When you change the batteries try to complete the task within three minutes If it takes longer than 3 minutes the remote control c...

Page 11: ... the Return channel To cancel a Return channel press and hold down the RETURN button for another three seconds and the message RETURN CHANNEL CANCELLED appears Pressing a number key or turning the set off will also cancel a Return channel Make sure that the TV CATV switch is set to TV Switch to CATV only to operate a cable box Press the POWER button on the remote control or the TV front panel The ...

Page 12: ...w Citizen Curtis Diamond Eagle Eastern GCBrand Gemini General Instrument Hamlin Hitachi Jerrold Macom Magnavox Memorex Movietime Oak Panasonic Paragon Philips Pioneer Pulsar CODES 024 032 025 051 032 022 051 058 059 024 032 025 029 034 032 051 022 043 065 024 025 026 027 020 021 022 057 023 040 041 042 045 049 024 065 024 025 026 027 020 021 022 057 023 049 050 051 054 033 030 032 051 039 037 048 ...

Page 13: ...041 042 078 090 047 027 062 003 004 005 000 024 023 028 021 035 064 026 020 023 024 021 022 024 058 045 063 003 004 005 058 005 045 031 024 027 023 026 020 043 031 023 024 086 023 045 058 023 024 031 046 059 060 033 087 021 022 023 024 033 024 063 036 067 040 027 033 045 058 023 024 031 046 059 060 083 085 087 024 063 036 067 040 027 VCRs Samsung Sansui Sanyo Scott Sears Shintom Sharp Signature 20...

Page 14: ...a power interruption of more than 90 seconds Note1 The menu screens shown in this book are representations of the menu screens on your set not exact replications Note2 The V Chip feature appears only on 50 series models Note3 TV Speaker and Audio Out appear on all but AV 32015 ON AIR THE SYMBOLS USED IN THIS GUIDE Whenever you see up and down arrows is this book press the MENU UP or MENU DOWN butt...

Page 15: ... preferences are set right away If you do exit don t panic you can set these preferences later with the regular menu LANGUAGE Your JVC television allows you to choose from English French or Spanish on screen menus and displays To LANGUAGE To choose the language PLUG IN MENU The Plug In Menu comes up automati cally when you first turn on the TV after plugging it in The Plug In Menu sets the default...

Page 16: ...attempt to use the On Off Timer you will get the following message To set the hour AM PM To move to minutes To set the minutes To move to START CLOCK when done with settings To start the clock TIME START CLOCK THANK YOU THANK YOU SET CLOCK PLEASE SET CLOCK FIRST TIME START CLOCK FINISH Once you have set up the items in the Plug In Menu you must select Finish To FINISH To exit Note You can reset th...

Page 17: ...NEL GUARD LOCK To CHANNEL SUMMARY To operate To the Lock column The access code zero 0 to lock or unlock that channel Use the CHANNEL button to go to any other channel you want to lock EXIT when finished CHANNEL GUARD AND V CHIP MESSAGE This message appears when a viewer attempts to watch a guarded channel or a channel blocked by V Chip To watch a channel you have locked enter the lock code using ...

Page 18: ... with the following Ratings are appropriate for the entire audience TV G stands for General Audience Most parents would find these programs suitable for all age groups They contain little or no violence no strong language and little or no sexual dialog or situations TV PG Parental Guidance Suggested May contain some but not much strong language limited violence and some suggestive sexual dialog or...

Page 19: ...ateur producers who didn t intend to have their film widely released NR Not Rated Programming may contain all types of programming including chhildren s programming foreign programs or adult material G General Audience In the opinion of the review board these films contain nothing in the way of sexual content violence or language that would be unsuitable for audiences of any age PG Parental Guidan...

Page 20: ... lock icon UNRATED VIEW BLOCK X NC 17 R PG 13 PG G NR X NC 17 R PG 13 PG G NR R Restricted These films contain material that is explicit in nature and is not recommended for unsupervised children under the age of 17 NC 17 No One Under 17 These movies are considered what most parents would feel is too adult for their children to view and can consist of strong language nudity violence and suggestive...

Page 21: ...l be blocked SET LOCK CODE The Lock Code locks and unlocks Channel Guard and V Chip settings Write this four digit number down and keep it safe Press the MENU button To SET LOCK CODE To operate The padlock icon appears ZERO the access code is zero To choose the number To move to the next place Continue to follow these directions for all four numbers To FINISH To save settings and exit Note If you ...

Page 22: ...e degree of light and dark Press the MENU Button To BRIGHT To lighten the picture To darken the picture To move to the next NOISE MUTING Inserts a blue screen and eliminates noise from channels that are not broadcasting or are too weak Press the MENU Button To NOISE MUTING To turn ON OFF Note Noise Muting will not work when you operate the Auto Tuner Setup or Channel Summary SET VIDEO STATUS Save ...

Page 23: ...reble To move to next BALANCE The Balance adjustment feature allows you to center the TV s sound to your needs Press the MENU Button To BALANCE To shift the speaker balance to the right To shift the speaker balance to the left To move to next S O U N D A D J U S T 23 Some Sound Advice You can tell if a program is broadcast in stereo by the position of the ON AIR arrow in the MTS menu Unfortunately...

Page 24: ... the TV to turn on To move to minutes To set the minutes To accept ON TIME and to move to OFF TIME set time again To move to CHANNEL To select channel To move to MODE Choose ONCE or EVERYDAY To YES NO Choose YES for on NO for off To FINISH To save settings Note In order for ON OFF Timer to work the clock must be set After a power interruption the clock will be cancelled Note ON OFF Timer cannot be...

Page 25: ... OUT VARI FIX CLOSED CAPTION If they are included in a program you can view closed captions or text information Press the MENU button To CLOSED CAPTION To operate To select CAPTION TEXT or OFF To CAPTION or TEXT To select a caption CC1 to CC4 or text channel T1 to T4 To accept that selection and move to FINISH To exit and save settings Note If you turn the Mode to Caption or Text that mode will au...

Page 26: ...l turn off the TV for you in case you fall asleep Program it to work in intervals of 15 minutes up to 180 minutes SLEEP TIMER SLEEP TIMER MESSAGE 20 seconds prior to the automatic shut off this message will appear You then have 20 seconds to press the Sleep Timer button to delay turn off for another 15 minutes CHOICE THEATER STANDARD 0 15 30 45 60 75 90 105 120 135 150 165 180 GOOD NIGHT PUSH SLEE...

Page 27: ...Return Channel to return to after scanning with CHANNEL RETURN and hold for 3 seconds Scan with CHANNEL RETURN Note To cancel a Return channel press and hold Return for another 3 seconds until RETURN CHANNEL CANCELLED appears Return Return to the last channel viewed after moving to another channel via the 10 key pad RETURN Move to another channel with the 10 key pad RETURN Note When PIP is on the ...

Page 28: ...ure SOURCE You can select the source for the PIP window SOURCE SWAP You can swap the PIP picture and the main picture SWAP 02 07 You can move the PIP window to any of the TV s four corners ON MOVE Note Each press of the On MOVE button will shift the PIP window one position Note When the PIP screen has no signal the PIP window will be blue TV V 1 V 2 CHANNEL For PIP Change the channel in the PIP wi...

Page 29: ...with the 10 key pad and follow instructions Perhaps the On Off Timer is set press the power button check page 24 The power was interrupted or the power cord unplugged The Sleep Timer may be set see page 26 The clock needs to be reset See page 16 CHECK Tint and color may be improperly adjusted Check page 22 Video Status mode may be set to an inappropriate setting Check page 22 There could be interf...

Page 30: ...nstallation removal for repair and reinstallation after repair is not covered 3 Operational adjustments covered in the Owner s manual normal maintenance video and audio head cleaning 4 Damage that occurs during shipment due to an act of God or of consequence to cosmetic changes 5 Signal reception problems and failures due to line power surges 6 Video Pick up Tubes CCD Image Sensor Cartridge Stylus...

Page 31: ...9 2522 2969 Mapunapuna Place Honolulu HA 96819 2040 808 833 5828 8192 State Road 84 Davie FL 33324 954 472 1960 705 Enterprise Street Aurora IL 60504 8149 630 851 7855 10700 Hammerly Suite 110 Houston TX 77043 713 935 9331 890 Dubuque Avenue South San Francisco CA 94080 1804 650 871 2666 Pack your JVC unit in the original carton or one of equivalent size and strength Enclose with the unit a letter...

Page 32: ... 7 x 54 7cm 112 2 lbs 51 0 kg AV 32020 301 4 x 26 1 4 x 21 1 2 76 8 x 66 7 x 54 7cm 112 2 lbs 51 0 kg Color Television NTSC system BTSC system Multichannel Sound VHF 2 to 13 UHF 14 to 69 Sub Mid Mid Super Hyper and Ultra bands 181 channel frequency synthesizer system AC 120V 60Hz 3W 3W Remote control x 1 AA batteries x 2 3 5 mm mini jack x 1 130 W 1 9 A 125 W 1 8 A 120 W 1 7 A S P E C I F I C A T ...

Page 33: ......

Reviews: