background image

3

Preparation

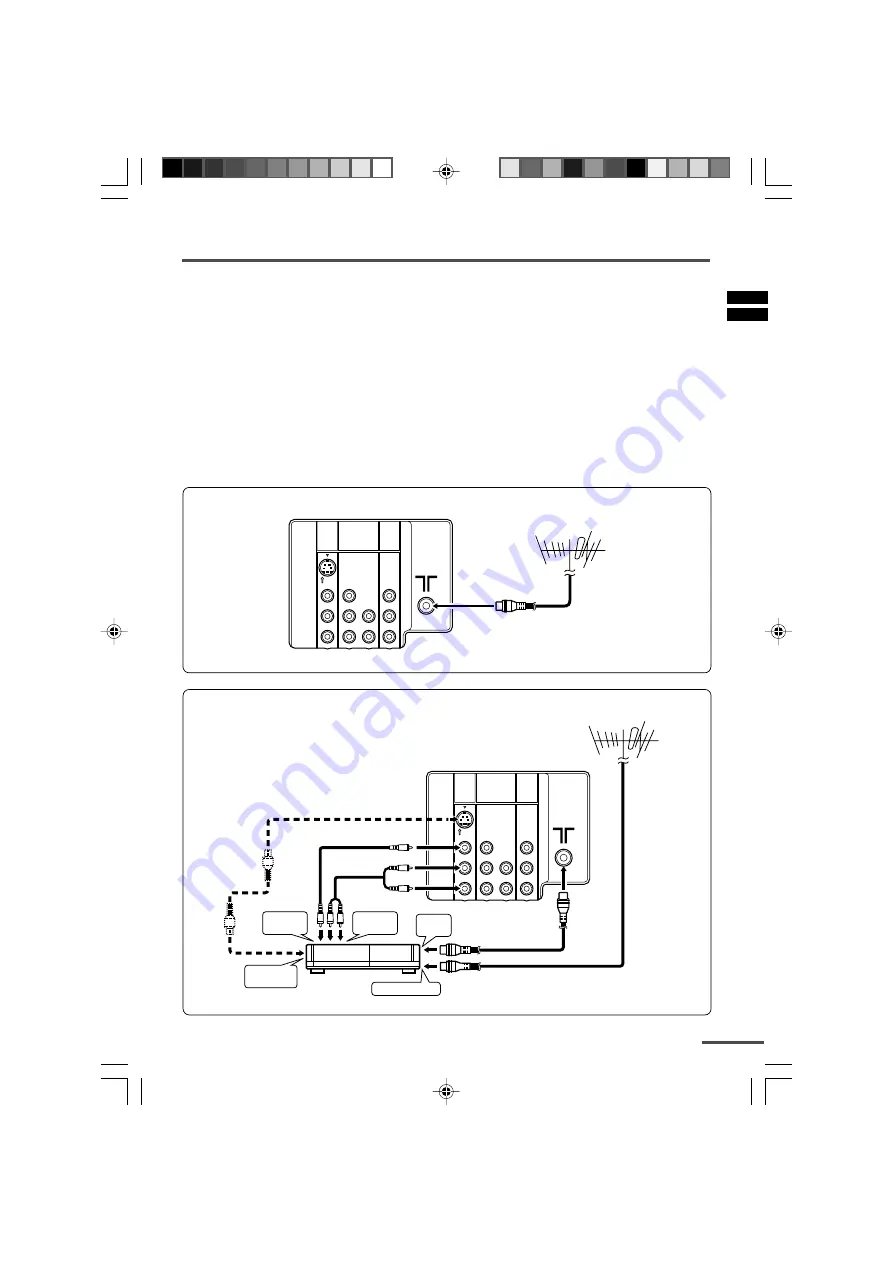
2 Connecting the aerial and VCR

• Read the manuals provided with the devices. Depending on the device, the connection method

may be different from the diagrams. Also the device settings may need to change depending on
the connection method.

• Turn off all the devices including the TV.
• Connecting cables are not supplied.
• When connecting monaural audio to the TV, use the L/MONO jack.
• You can connect an S-VIDEO compatible device (such as an S-VHS VCR) to the S-connector with

an S-VIDEO cable and enjoy the high quality picture of the S-VIDEO signal (Y/C signal). In that
case, do not connect it to the TV with a video cable.

• If you connect the VCR to the TV only with an aerial cable, you should preset the video channel

from the VCR to the AV channel (channel number 0) on this TV. See “MANUAL CH PRESET” on
page 15 and preset it manually.

VHF/UHF outdoor aerial

VIDEO-1

INPUT

OUTPUT

COMPONENT

(VIDEO-2)

INPUT

R

R

R

C

R

To RF 
output

To video 
output

To S-video 
output

VCR

VHF/UHF outdoor aerial

To aerial input

1

To audio 
output

2

3

S

OVER

V

MONO

L

/

V

Y

/

V

L

MONO

L

/

C

B

VIDEO-1

INPUT

OUTPUT

COMPONENT

(VIDEO-2)

INPUT

R

R

R

C

R

S

OVER

V

MONO

L

/

V

Y

/

V

L

MONO

L

/

C

B

Connecting the aerial

Connecting the aerial and VCR

  GGT0014-29VS11-E6

6/9/03, 4:52 PM

3

Summary of Contents for AV-21VS11

Page 1: ...uttons and functions 7 MUTING button 7 COLOUR SYSTEM button 7 SOUND SYSTEM button 7 CINEMA SURROUND button 7 DISPLAY button 7 ECO SENSOR button 8 button 8 OFF TIMER button 8 PICTURE MODE button 8 CHANNEL SCAN button 9 FAVORITE CH button 9 RETURN button 9 Using the TV s menus 10 Basic operation 10 INPUT 11 PICTURE TILT 11 VNR 11 COMPRESS 16 9 11 AUTO SHUTOFF 12 CHILD LOCK 12 BLUE BACK 12 VIDEO 2 SE...

Page 2: ... attempt to repair it by yourself or remove the rear cover The surface of the TV screen is easily damaged Be very careful with it when handling the TV Should the TV screen become soiled wipe it with a soft dry cloth Never rub it forcefully Never use any cleaner or detergent on it When you don t use this TV for a long period of time be sure to disconnect the power plug from the AC outlet The appara...

Page 3: ...quality picture of the S VIDEO signal Y C signal In that case do not connect it to the TV with a video cable If you connect the VCR to the TV only with an aerial cable you should preset the video channel from the VCR to the AV channel channel number 0 on this TV See MANUAL CH PRESET on page 15 and preset it manually VHF UHF outdoor aerial VIDEO 1 INPUT OUTPUT COMPONENT VIDEO 2 INPUT R R R CR To RF...

Page 4: ...ls when the TV is turned off Connect components outputting a component signal Y CB CR signal such as a DVD player to the VIDEO 2 terminal and set VIDEO 2 SET function to COMPONENT See page 13 The following illustrations are for the AV 21VS11 Your TV s front and rear panels may not look exactly like the illustrations 4 Connect the power cord to the AC outlet Operate only from the power source indic...

Page 5: ...he AUTO PROGRAMMING function will start and the indicator blinks STOP BY SETUP TOUR NOW PROGRAMMING To stop the AUTO PROGRAMMING function press the CHANNEL m or the MENU buttons When all the TV channels that can be received on your TV have been preset the display goes out and the AUTO PROGRAMMING function operation is completed OFF TIMER ECO SENSOR SYSTEM COLOUR SOUND CINEMA SURROUND MENU DISPLAY ...

Page 6: ...ttons to enter the channel number If you want to enter a two digit number press the button to select the two digit mode then enter the channel number 3 Press the VOLUME M button to adjust the sound 4 To turn your TV off press the POWER button We recommend that you press the Main power button on the TV to turn the main power off if you do not plan to use your TV for a long time or if you wish to sa...

Page 7: ...58 NTSC4 43 CINEMA SURROUND button You can enjoy an enhanced sound for a wider audience by using CINEMA SURROUND function Press this button to select one of the CINEMA SURROUND mode HIGH LOW When you listen to the stereo sound please select HIGH mode or LOW mode You can enjoy the sound for a wider audience similar to the experience at the theatre In case that you setting up the CINEMA SURROUND fun...

Page 8: ...eception of a stereo broadcast you can change from stereo sound to monaural sound so that you can hear the broadcast more clearly and easily If the multi sound function cannot work normally due to poor signal quality noise may be included in the sound or the sound may change many times If this happens change the sound setting to MONO mode to cancel the multi sound function OFF TIMER button You can...

Page 9: ...n When MENU is displayed FAVORITE CH cannot be correlated Correlation of FAVORITE CH button and the channel cannot be reset eventhough the main power is turned off Remote control buttons and functions RETURN button You can set a channel you frequently view to the Return Channel and you can view that channel at any time with one touch To set the channel to the Return Channel 1 Select the channel yo...

Page 10: ...the MENU buttons to change function settings Example MENU 2 AUTO SHUTOFF OFF CHILD LOCK OFF BLUE BACK ON VIDEO 2 SET COMPONENT SELECT BY EXIT BY OPERATE BY D I SPLA Y MENU 2 AUTO SHUTOFF ON CHILD LOCK OFF BLUE BACK ON VIDEO 2 SET COMPONENT SELECT BY EXIT BY OPERATE BY D I SPLA Y With some functions the operation method may differ 5 Press the DISPLAY button to turn the display off To operate a menu...

Page 11: ...Continue pressing CHANNEL or MENU until the picture becomes level VNR You can reduce picture noise 1 Press MENU T to display the MENU 1 menu then select VNR MENU 1 INPUT TV VNR ON COMPRESS 16 9 ON PICTURE TILT 00 SELECT BY EXIT BY OPERATE BY D I SPLA Y 2 Press CHANNEL or MENU to select ON To cancel the VNR function select OFF COMPRESS 16 9 This function converts a normal picture 4 3 aspect ratio i...

Page 12: ...parental consent 1 Press MENU T to display the MENU 2 menu then select CHILD LOCK MENU 2 AUTO SHUTOFF ON CHILD LOCK ON BLUE BACK ON VIDEO 2 SET COMPONENT SELECT BY EXIT BY OPERATE BY D I SPLA Y 2 Press CHANNEL or MENU to select ON To cancel the CHILD LOCK function select OFF The CHILD LOCK function is canceled when you turn the power off BLUE BACK You can mute the sound and change the picture into...

Page 13: ...e MENU buttons to select COMPONENT Using the TV s menus Picture Adjustments You can adjust the picture as you like 1 Press MENU T to display the MENU 4 menu MENU 4 TINT COLOUR BRIGHT CONT SHARP SELECT BY EXIT BY OPERATE BY D I SPLA Y 2 Press MENU T to select an item and press CHANNEL or MENU to adjust it TINT Reddish Greenish COLOUR Lighter Deeper BRIGHT Darker Brighter CONT Lower Higher SHARP Sof...

Page 14: ...tails see MANUAL CH PRESET on page 15 AI VOLUME You can prevent the sudden increase or decrease of volume that occurs when changing channels or switching VIDEO modes 1 Press MENU T to display the MENU 5 menu then select AI VOLUME MENU 5 BASS TREBLE BALANCE AI VOLUME ON SELECT BY EXIT BY OPERATE BY D I SPLA Y 2 Press CHANNEL or MENU to select ON To cancel the AI VOLUME function select OFF The AI VO...

Page 15: ...TV channel you want to preset is not displayed repeat step 4 until the TV finds the TV channel you want to preset To stop the MANUAL CH PRESET function press any button other than the VOLUME m button If the picture is not clear Fine tune the TV channel 1 Press MENU t to select FINE MANUAL FINE SKIP NO SOUND SYSTEM B G EXIT SELECT BY PR 1 VL PROGRAM BY EXIT BY FINE BY VOL D I SPLA Y 2 Hold VOLUME m...

Page 16: ...N PICTURE EFFECT ON SELECT BY EXIT BY OPERATE BY D I SPLA Y Using the TV s menus SKIP You can set undesired channels to be skipped Channels set to be skipped cannot be selected by the CHANNEL m buttons nor the CHANNEL SCAN button Channels to which TV channels have not been preset are automatically set to be skipped 1 Press MENU T to display the MENU 3 menu then select MANUAL CH PRESET 2 Press CHAN...

Page 17: ...XIT BY OPERATE BY D I SPLA Y Using the TV s menus AI ECO SENSOR You can enable this function so that the brightness of TV screen is automatically adjusted according to the brightness of your room 1 Press MENU T to display the MENU 6 menu then select AI ECO SENSOR MENU 6 FAVORITE CH SETTING VIDEO SETTING AI ECO SENSOR 1 AI ECO DISPLAY ON SELECT BY EXIT BY OPERATE BY D I SPLA Y 2 Press CHANNEL or ME...

Page 18: ...EO CHANNEL VOLUME POWER 4 5 3 1 2 7 8 9 0 1 Headphone jack 2 VIDEO 3 terminal 3 MENU button 4 CHANNEL m buttons 5 VOLUME m buttons 6 TV VIDEO button 7 ECO sensor 8 Remote control sensor 9 POWER lamp 0 Main power button AV 29VS11 AV 21VS11 AV 25VS11 GGT0014 29VS11 E6 6 9 03 4 59 PM 18 ...

Page 19: ...TV VIDEO button select the VIDEO mode with the INPUT function in MENU 1 Using the buttons on the TV Operating menus You can operate function in menus using the front control buttons on the TV 1 Press MENU y to display a menu 2 Press MENU y repeatedly to display the menu you want to use 3 Press MENU y to select the desired function or item 4 Press CHANNEL or VOLUME to carry out the desired operatio...

Page 20: ...t another colour system see page 7 Adjust the picture settings see page 13 Is a component signal output device such as a DVD player connected correctly see page 4 Is the VIDEO 2 SET function setting correct see page 13 If noise snow totally blocks out the picture check the following Have the TV and aerial been connected properly Has the aerial cable been damaged Is the aerial pointing in the right...

Page 21: ... mm diameter Design and specifications subject to change without notice Broadcasting systems Area Country or Region System Colour Sound Bahrain Kuwait Oman Qatar United Arab Emirates Yemen etc PAL B G Asia Indonesia Malaysia Singapore Thailand Middle India etc East China Vietnam etc PAL D K Hong Kong etc PAL I Islamic Republic of Iran Lebanon Saudi Arabia etc SECAM B G Philippines Taiwan Myanmar e...

Page 22: ...GGT0014 29VS11 E6_cover 6 9 03 4 30 PM 2 ...

Reviews: