background image

ENGLISH 

  - 18 -

Preparation

Place TV on a solid surface.
For ventilation, leave a space of at least 10 cm free all around

the set. To prevent any fault and unsafe situations, please do

not place any objects on top of the set.
“Use this apparatus in tropical and/or moderate climates.”

Features

• It is a remote controlled colour television.
• 100 programmes from VHF, UHF bands or cable channels

can be preset.

• It can tune cable channels.
• Controlling the TV is very easy by its menu driven system.
• It has two Euroconnector sockets for external devices (such

as video recorder, video games, audio set, etc.)

• Front AV  Input available.
• Stereo sound systems (Nicam + German) are available.
• 3D Panorama.
• Full function Teletext (Fastext, Toptext).
• It is possible to connect headphone.
• Direct channel access.
• APS (Automatic Programming System).
• All programmes can be named.
• Forward or backward automatic tuning.
• Sleep timer.
• Child Lock.
• Automatic sound mute when no transmission.
•  5  minutes  after  the  broadcasting  (closedown),  the  TV

switches itself automatically to stand-by mode.

Before  Switching  on  your  TV

Power connection

Important:

 The TV set is designed to operate on 

220-240 V

AC, 50 Hz.

• After unpacking, allow the TV set to reach the ambient room

temperature before you connect the set to the mains.

Aerial Connections

• Connect the aerial plug to the aerial input socket located at

the back of the TV.

How to connect the external equipments

See “

Connect the External Equipments

” on 

page 26

.

• See the instruction manuals provided with the external de-

vices too.

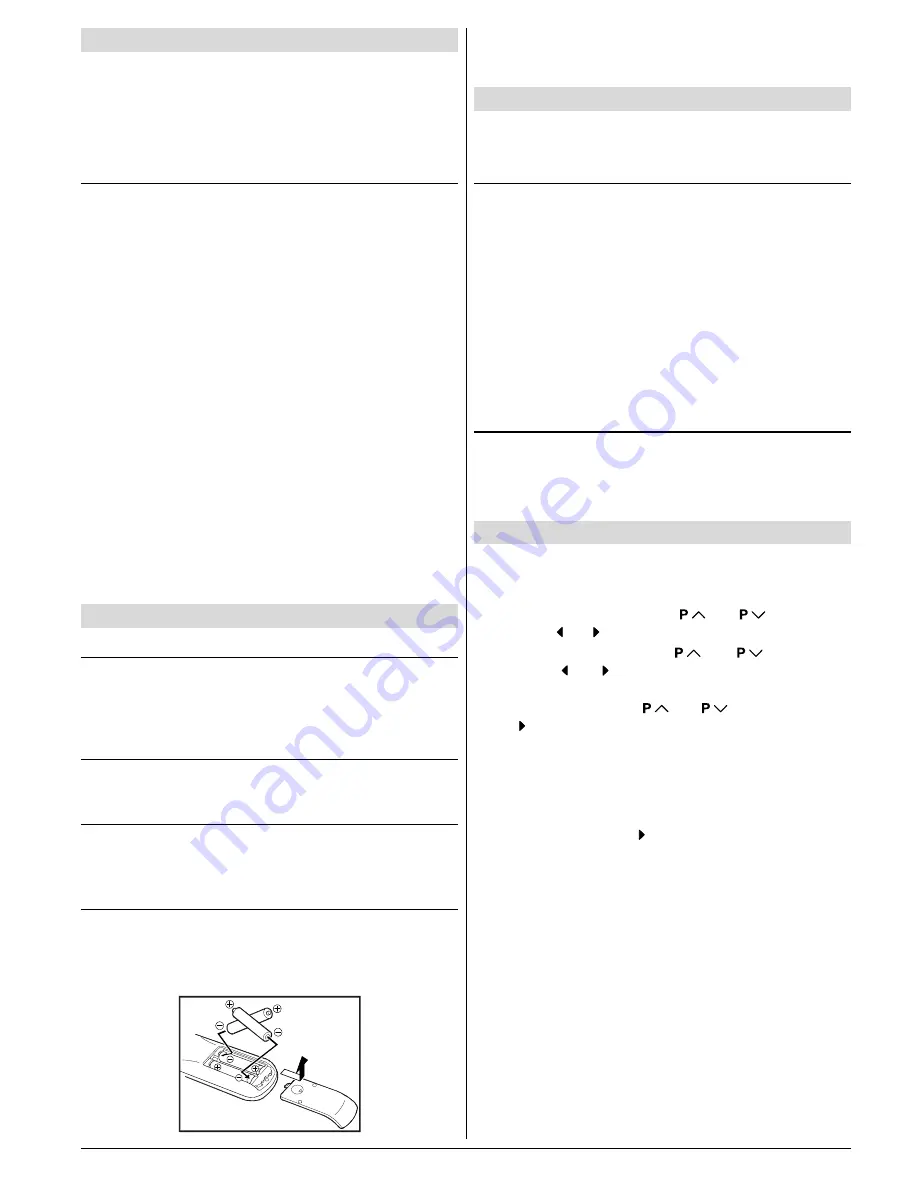
Inserting batteries in the remote control handset

• Remove the battery cover located on the back of the hand-

set by gently pulling upwards from the indicated part.

• Insert two 

AA (R6)

 or equivalent type batteries inside.

• Replace the battery cover.

NOTE:

 Remove batteries from remote control handset when it is

not to be used for a long period. Otherwise it can be damaged

due to any leakage of batteries.

Switching  the  TV  ON/OFF

You can operate your TV either using the remote control

handset or directly using the TV onset buttons.

To switch the TV on

Your TV will switch on in two steps:

1-

 Press the power button located on the front of the TV. Then

the TV switches itself to standby mode and the 

RED LED

located below the TV turns on.

2-

 To switch on the TV from stand-by mode either:

Press a digit button on the remote control so that a program-

me number is selected,
or,
Press Standby / Power Button or Programme Up and Down

buttons on the front of the TV or on the remote control re-

spectively, so the TV will switch on and the 

RED

 Led will turn

GREEN

.

To switch the TV off

• Press the stand-by button on the remote control, so the TV

will switch to stand-by mode and the 

GREEN LED

 will be-

come 

RED

,    or,

• Press the power button located on the front of the TV.

Initial  Settings

The message "

PLEASE CHECK ANTENNA CABLE AUTO.

PROGRAMMING SYSTEM

" will be displayed when you turn

on your TV for the first time.

1-

 Select 

LANGUAGE

 with the “

“ or “

” button, then

press the “ ” or “ ” button to select a menu language.

2-

 Select 

COUNTRY

 with the “

“ or “

” button, then

press the “ ” or “ ” button to select the country you are

now located.

3-

 Select 

START

 with the “

“ or “

” button, then press

the “ ” button to start APS.

APS  (Automatic  Programming  System)  automatically  pro-

grammes  the  received  channels  in  your  TV’s  programme

numbers.  During APS,  "

A.  P.  S.  IS  RUNNING

"  will  be  dis-

played. After APS  is  finalized,  the  “

PROGRAM.

” menu ap-

pears.
To cancel APS, press the “ ” button.
You can delete a channel, insert a channel into a programme

number, or re-start APS with the “

PROGRAM.

” menu.

For details, see “

Program.


(Programming) Menu

” on 

page

22

.

4-

 Press the "

STANDARD

" button to complete the initial set-

tings.

After the initial settings are complete, you can change a pro-

gramme number or to name a programme number or to pro-

gramme  new  channel  manually.  For  details,  see  “

Install.

Menu

” on 

page 22

.

If the message "

PLEASE CHECK ANTENNA CABLE AUTO.

PROGRAMMING SYSTEM

" does not appear, follow the de-

scription “

Program.


(Programming) Menu

” on 

page 22

 to

select a menu language and the country where you are now

located, and to use

 A.P.S.

.

02-ENG&BG-3D-AK30-C85-2156MAV-(AV-21PB4N)-50049973.p65

24.02.2004, 13:21

18

Summary of Contents for AV-21PB4N

Page 1: ...MPANY OF JAPAN LIMITED 0503 JVC N LIMITED AV 21PB4N COLOUR TELEVISION INSTRUCTIONS ENGLISH DEUTSCH FARBFERNSEHGERÄT BEDIENUNGSANLEITUNG AK 30 Almanya AV 21PB4N 3D COVER PAGE BG 3D AK30 C85 2156MAV AV 21PB4N 50049973 cdr ...

Page 2: ...ning Any intervention contrary to regulations in particular any modification of high voltage or a replacement of the picture tube may lead to an increased concentration of x rays Any television modified in this way no longer complies with license and must not be operated Instructions for waste disposal Packaging and packaging aids are recyclable and should principally be recycled Packaging materia...

Page 3: ...mation point within an equilateral triangle is intended to alert the user to the presence of important operating and maintenance servicing instructions in the literature accompanying the appliance 9 5 9 3 9 0 18 3 67 1 5 79 Stand By Power 0 9 Direct Program Colour Buttons Standard Button PICTURE default settings Cursor Up Programme Up MENU Menu Button Cursor Right Volume Teletext VCR DVD Control B...

Page 4: ...ENGLISH 17 Control Panel Buttons Antenna Connections ...

Page 5: ... the TV ON OFF You can operate your TV either using the remote control handset or directly using the TV onset buttons To switch the TV on Your TV will switch on in two steps 1 Press the power button located on the front of the TV Then the TV switches itself to standby mode and the RED LED located below the TV turns on 2 To switch on the TV from stand by mode either Press a digit button on the remo...

Page 6: ...t buttons on the remote control handset to select programmes between 0 and 9 TV will switch to the selected program after a short delay When you press first digit second digit will be displayed with symbol for 3 seconds To select programmes between 10 and 99 press corresponding digit buttons consecutively be fore symbol on the second digit disappears e g for pro gramme 27 first press 2 and then 7 ...

Page 7: ... will turn this feature on and off Note 3D Panorama is functional only when the current sound sys tem is STEREO Setting Effect You can use this feature to switch on and off sound effect Pressing or button will turn on and off this feature If the current sound system is mono and the sound effect is set ON then the sound will be heard as if it is stereo If the current sound system is stereo switchin...

Page 8: ...he YELLOW button Sleep Timer As you enter the feature menu SLEEP TIMER will be the first selected option Use or button to change the value of the sleep timer between OFF 0 15 00 0 30 00 0 45 00 1 00 00 1 15 00 1 30 00 1 45 00 and 2 00 00 hours Your TV will get into standby mode when the period you selected passes after you make the selection It is displayed on the upper right of the screen If slee...

Page 9: ... the INSTALL menu 3 Follow To programme a channel in a TV s program me number manually on page 22 and change the settings of the current programme number If you want to name the new programme follow the in structions under To change the name of a programme on page 22 Note Do not use Programme item in the INSTALL menu to select the programme number If you select the programme number with Programme ...

Page 10: ... press button The sound will be cut off To cancel mute press or or but ton The volume level will be the same as the level before mute when you cancel mute Stereo Bilingual If the TV channel you are watching broadcasts in two lan guages e g Eurosport you can select the dubbed or the original language pressing the button When the stereo broadcast is received poorly you can change from stereo to mono...

Page 11: ...at ing of Fast forward backward functions and choosing the chapter In this case the the buttons do not work Teletext Teletext is an information system that displays text on your TV screen Using the Teletext information system you can view a page of information on a subject that is available in the list of contents index No on screen display will be available in text mode No contrast brightness or ...

Page 12: ...page Press button Select the required subcode page number by pressing four digit buttons e g 0001 If the selected subcode page is not displayed in a short time press button TV programme will be displayed on the screen Teletext page number will be displayed on the upper left cor ner of the screen when the selected page is found Press button to display the selected Teletext page To exit Teletext Pre...

Page 13: ...eturn to the TV mode repeatedly press AV button or press or button AV 1 SCART 1 terminal Euroconnector 21 pin SCART Video input Audio L R inputs and RGB inputs are available TV broadcast outputs Video and Audio L R are available AV 2 SCART 2 terminal Euroconnector 21 pin SCART Video input S VIDEO Y C input and Audio L R inputs are available Video and Audio L R outputs are available F AV Front AV t...

Page 14: ...onding AV mode NTSC 3 58 4 43 system is detected automatically in AV mode Copy Facility You can output the video and audio signals which inputs from TV or AV 1 SCART 1 terminal to the video recorder connect ed to the AV 2 SCART 2 terminal To select the output source see AV 2 OUTPUT on page 21 Connecting Headphones Use the stereo headphone socket of your TV to connect headphones Tips Care of the Sc...

Page 15: ...1 S41 S75 S79 NUMBER OF PRESET CHANNELS 100 CHANNEL INDICATOR On Screen Display RF AERIAL INPUT 75 Ohm unbalanced OPERATING VOLTAGE 220 240V AC 50 Hz SOUND MULTIPLEX SYSTEMS Nicam German Stereo PICTURE TUBE 21 AUDIOOUTPUTPOWER WRMS 10 THD 2 x 8 POWER CONSUMPTION W max 85 DIMENSIONS mm D 490 L 596 H 446 Weight Kg 21 4 ...

Reviews: