background image

O

PTIONAL SETTING

26

EN

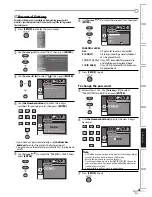
Sub Rating

Category

Rating

FV

Fantasy Violence

TV-Y7

V

Violence

TV-PG
TV-14
TV-MA

S

Sexual Situation

L

Coarse Language

D

Suggestive Dialogue

TV-PG, TV-14

Note:

•  Blocked sub rating will appear beside the main rating 

category in “TV Rating” menu.

•  You cannot block a sub rating (D, L, S or V) if the main 

rating is set to “View”.

•  Changing the category to “Block” or “View” automatically 

changes all its sub ratings to the same (“Block” or “View”).

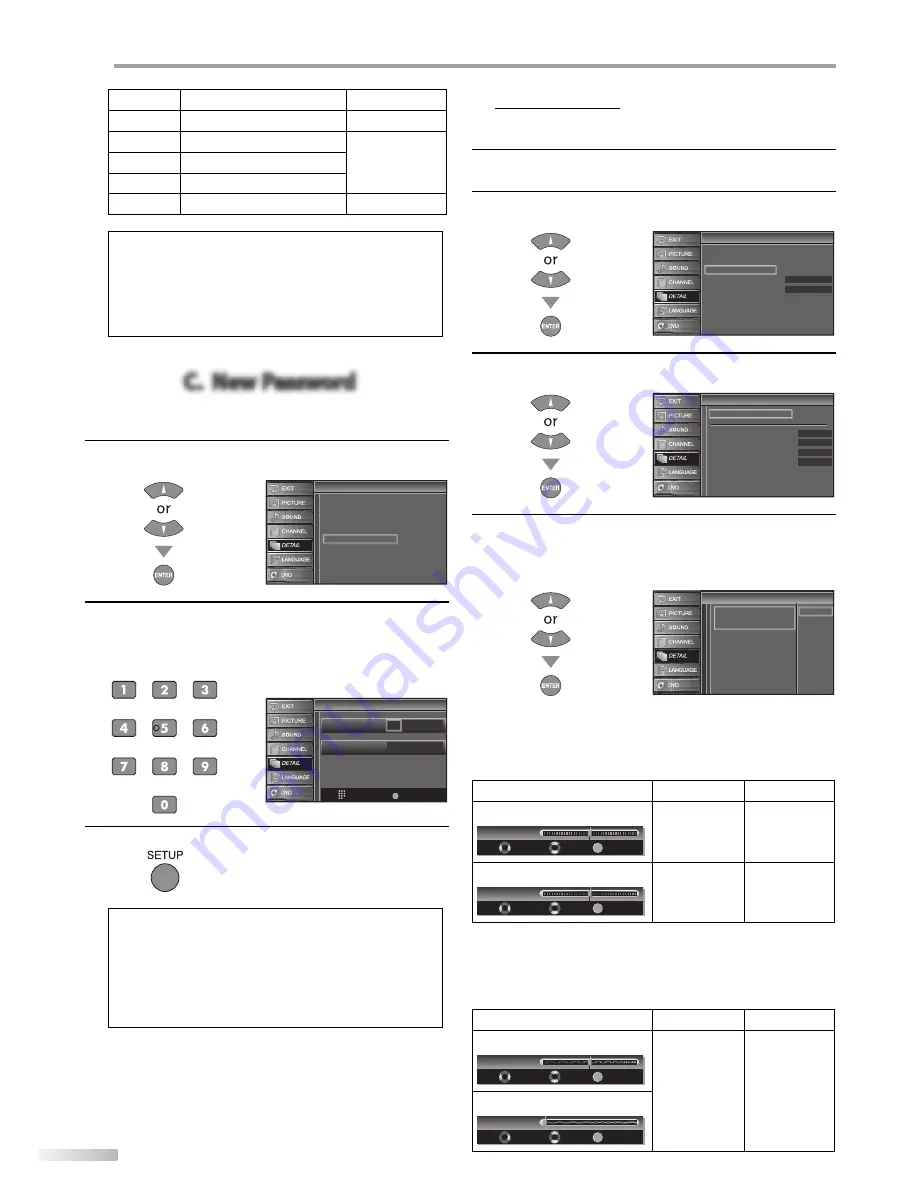
C.  New Password

C.  New Password

Although the default code “0000” is supplied with the unit, you can set 
your own password.

4

Use 

[Cursor 

/

 L

]

 to select “New Password”, then press 

[ENTER]

.


MPAA Rating

TV Rating

Downloadable Rating

Clear Downloadable Rating

New Password

V-chip

V-chip

5

Press 

[the Number buttons]

 to enter the new 4-digit 

password.

Enter password again in “Confirm password.” entry 
field.w


V-chip

V-chip

PIN Code

Back

BACK

Confirm password.

Enter password.

- - - -
- - - -

6

Press 

[SETUP]

 to exit.


Note:

•  Make sure new password and confirm password must be 

exactly the same. If they are different, the space is cleared 
for reentering.

•  Your password will be erased and return to the default 

(0000) when a power failure occurs. If you forget the 
password, unplug the power cord for 10 seconds to restore 
the password to 0000.

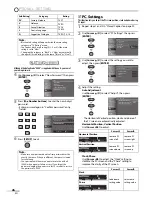
PC Settings

This function lets you adjust the PC screen position, clock and phase during 
PC input.

1

Repeat steps 1 and 2 in “Closed Caption”on page 22.

2

Use 

[Cursor 

/

 L

]

 to select “PC Settings”, then press 

[ENTER]

.


Detail

Detail

Power on

Auto

Closed Caption

V–chip

PC Settings

HDMI1 Audio

Blue LED

3

Use 

[Cursor 

/

 L

]

 to select the setting you want to 

adjust, then press 

[ENTER]

.


PC Settings

PC Settings

Auto Adjustment

Horizontal Position 

Vertical Position

Clock

Phase

- -   

- -   

- -   

- -   

4

Adjust the setting.

Auto Adjustment

Use 

[Cursor 

/

 L

]

 to select “Adjust”, then press 

[ENTER]

.


Cancel

Adjust

Auto Adjustment

Auto Adjustment

This function automatically 
adjusts the position, clock and
phase of the picture element.

The Horizontal/Vertical position, clock and phase of 
the PC screen are automatically adjusted.

Horizontal Position, Vertical Position

Use 

[Cursor 

/

 B

]

 to adjust.

Cursor 

s

Cursor 

B

Horizontal Position

ENTER

H. Position

Adjust

Move

Enter

0

to move PC 
screen left

to move PC 
screen right

Vertical Position

ENTER

V. Position

Adjust

Move

Enter

0

to move PC 
screen down

to move PC 
screen up

Clock, Phase

Use 

[Cursor 

/

 B

]

 to adjust the “Clock” setting to 

stabilize the PC screen and the “Phase” setting to 
improve the clarity of the PC screen.

Cursor 

s

Cursor 

B

Clock

ENTER

Clock

Adjust

Move

Enter

0

to decrease 
setting value

to increase 
setting value

Phase

ENTER

Adjust

Phase

Move

Enter

0

5

Summary of Contents for 0808TKH-FU-FU

Page 1: ...iagonal 0808TKH FU FU Important Note In the spaces below enter the model and serial number of your television located at the rear of the television cabinet Staple your sales receipt or invoice to the inside cover of this guide Keep this user s guide in a convenient place for future reference Keep the carton and original packaging for future use HIGH DEFINITION TELEVISION Serial Number Model No ...

Page 2: ...e to insert the plug fully into the outlet try reversing the plug If the plug should still fail to fit contact your electrician to replace your obsolete outlet Do not defeat the safety purpose of the polarized plug 12 POWER CORD PROTECTION Power supply cords should be routed so that they are not likely to be walked on or pinched by items placed upon or against them paying particular attention to c...

Page 3: ...locate the receiving antenna 2 Increase the separation between the equipment and receiver 3 Connect the equipment into an outlet on a circuit different from that to which the receiver is connected 4 Consult the dealer or an experienced radio TV technician for help This Class B digital apparatus complies with Canadian ICES 003 Cet appareil numérique de la classe B est conforme à la norme NMB 003 du...

Page 4: ... the unit in a horizontal position Avoid locations subject to strong vibration Do not place the unit near strong magnetic fields Avoid moving the unit to locations where temperature differences are extreme Be sure to unplug the AC power cord from the outlet before carrying the unit TO AVOID THE HAZARDS OF ELECTRICAL SHOCK AND FIRE Do not handle the power cord with wet hands Do not pull on the powe...

Page 5: ...Sound Enjoy Dolby Digital multi channel surround sound when you connect the unit to your Dolby Digital decoder Still Fast Slow Step Playback Various playback modes are available including still pictures fast forward reverse slow motion and step frames DVD Menus in a Desired Language You can display DVD menus in a desired language if available on a DVD video Screen Saver If there is no operation fo...

Page 6: ...chip 24 PCSettings 26 HDMIAudio 27 Blue LED 27 5 DVD Functions OPERATING DVD PlayableMedia 28 AboutthePBCFunctionofVideoCD 28 UnplayableMedia 28 Playback 29 DiscMenu 29 ResumePlayback 29 PausedandStep by stepPlayback 29 FastForward FastReverse 30 SlowForward SlowReverse 30 Zoom 30 MP3 JPEGPlayback 30 KodakPictureCD 31 DualPlayback 32 FolderPlayback 32 TransitionMode 32 AdjustmentofPictureSize 32 S...

Page 7: ... Press to skip forward or backward chapters titles DVD tracks CD VCD or files MP3 JPEG 10 EJECT A button p29 Press to eject the disc 11 DISC MENU button p29 Press to call up the menu on a disc Press to call up the file list MP3 JPEG 12 MODE button p35 Press to call up the folder list on a disc when DUAL PLAYBACK is ON MP3 JPEG Press to arrange the playing order or play randomly CD MP3 JPEG Press t...

Page 8: ...12 VGA cable connection for PC 13 HDMI IN jacks p9 HDMI connection for an HDMI device 14 AUDIO IN jacks p10 RCA audio cable connection for a DVI device For HDMI 1 IN jack only 15 AUDIO OUT jacks p12 RCA audio cable connection for an external device Use analog audio input jack of an external device 16 DIGITAL AUDIO OUT COAXIAL jack p12 Digital audio coaxial cable connection for a decoder or an audi...

Page 9: ... installer Connection to Cable Receiver or Satellite Box Use an HDMI or an RCA component video cable to connect the HDMI or the component video input jack of the unit to the HDMI or the component video output jack of the cable receiver satellite box If you connect to the unit s COMPONENT1 or COMPONENT2 video input jack connect an RCA audio cable to the audio L R jack of COMPONENT1 or COMPONENT2 ac...

Page 10: ...IN jack e g Cable box or satellite box with the DVI output jack RCA audio cable Note This unit accepts 480i 480p 720p 1080i video signals DVI does not display 480i image that is not compliant with EIA CEA 861 861B Audio signals are converted from digital to analog for this connection Component Video Cable Connection Component video connection offers better picture quality for video devices connect...

Page 11: ... the video jack at the same time the S video connection will have priority Video Connection Video connection offers standard picture quality for video devices connected to the unit If you connect to the unit s VIDEO 1 or VIDEO 2 input jack connect RCA audio cable to the audio L R jack of VIDEO 1 or VIDEO 2 accordingly When the audio jack of the video device is monaural connect the RCA audio cable ...

Page 12: ...quipped with a PC IN jack If you connect this unit to your PC you can use this unit as a computer monitor Note Please purchase the VGA that has a ferrite core Cables not included Please purchase the necessary cables at your local store e g Stereo system e g Dolby Digital decoder RCA audio cable To AUDIO OUT jack digital audio coaxial cable To DIGITAL AUDIO OUT jack rear of this unit e g PC To moni...

Page 13: ...e cable system directly contact the CATV installer If you press POWER or SETUP during auto channel scan this setting will be canceled The initial auto channel scan function can be executed for either Air or Cable only once When you change the connection Air Cable set auto channel scan again Refer to page 14 You can cancel or exit the initial auto channel scan menu by pressing SETUP If there is no ...

Page 14: ...e When connected to CATV digital signals select Cable 1 hour Cable 1 hour may take an hour to memorize all digital channels Scanning and memorizing of channels start automatically Now the system is scanning for channels please wait Exit SETUP 72 Analog channels 10ch Digital channels 6ch When the scanning and memorizing are completed the lowest memorized channel will be displayed Note If you connec...

Page 15: ...ed Use VOLUME to adjust the audio volume Volume 20 The volume bar will be displayed at the bottom of the TV screen when adjusting the volume The volume bar display will automatically disappear in a few seconds Press MUTE to turn off and on the sound Mute Mute is displayed on the TV screen for a few seconds Press MUTE again or VOLUME to recover the original volume Still Mode You can freeze the imag...

Page 16: ...on the unit select HDMI2 To use the PC IN jack on the unit select PC 5 Switching Audio Mode This section describes how to switch the audio language TV 1 Press AUDIO to display the currently selected audio mode While receiving an MTS broadcast press repeatedly to cycle through the available audio channel 6 SAP STEREO When all audio are available SAP STEREO SAP MONO SAP STEREO When stereo and monaur...

Page 17: ...n 3 program guide The program guide added to broadcasting information is displayed Maximum display of 4 lines 4 channel number 5 audio language Refer to Switching Audio Mode on page 16 6 effective scanning lines and scan mode 7 program format 8 program aspect ratio 9 program rating 10CC not available if CC is set to Off 6 1 English 1 2 TV PG DLSV 1080i 1080i 16 9 16 9 HD HD CC CC A Day of Memories...

Page 18: ...splay the picture with its center at the original size and the edges stretched horizontally 5 For 16 9 video signal Full Display a 16 9 picture at its original size Zoom Display a 16 9 picture at its maximum size without changing its horizontal and vertical ratio Cinema Display a vertically stretched picture Expand Display a horizontally stretched picture For PC input signal Sidebar Display a prop...

Page 19: ...he channel display lightens When you remove a major channel its minor channels are removed as well Note The channel with the DTV indicated on the display is ATSC Otherwise the channel is NTSC 5 Press SETUP to exit 5 Manual Register The manual register function lets you add the channels that were not added by the auto channel scan due to the reception condition at the initial setting 1 Press SETUP ...

Page 20: ...L to select PICTURE then press ENTER 3 Use Cursor K L to select the item you want to adjust then press ENTER Picture Picture Picture Mode Brightness Contrast Color Tint Sharpness Reset Settings Color Temp Energy Saving Dynamic 30 Neutral Off 60 36 0 0 4 Adjust the picture quality Picture Mode Use Cursor K L to select the desired setting then press ENTER Standard Dynamic Movie and News Picture Pict...

Page 21: ...an adjust treble bass and surround 1 Press SETUP to display the main menu 2 Use Cursor K L to select SOUND then press ENTER 5 3 Use Cursor K L to select the sound type you want to adjust then press ENTER Sound Sound Treble Bass Surround Reset Settings 0 0 Off 4 Adjust the sound setting Treble Bass Use Cursor s B to adjust Cursor s Cursor B Treble ENTER Adjust Treble Move Enter 0 to decrease higher...

Page 22: ... Pop on mode Once characters are stored in memory they are displayed all at once Roll up mode Displays the characters continuously by scrolling max 4 lines 6 Press SETUP to exit Note To show the closed caption on your TV screen broadcast signal must contain the closed caption data Not all TV programs and commercials have the closed caption or all types of the closed caption Captions and texts may ...

Page 23: ...n change the style of CC such as font color or size etc 1 Repeat steps 1 and 2 in Closed Caption on page 22 5 5 2 Use Cursor K L to select Closed Caption then press ENTER Detail Detail Auto Closed Caption V chip PC Settings HDMI1 Audio Blue LED Power on 3 Use Cursor K L to select CC Style then press ENTER Closed Caption Closed Caption Off Off Conventional CC DTV CC CC Style 4 Use Cursor K L to sel...

Page 24: ...or Edge Color Edge Type Font Size Back Opacity Edge Color Edge color of the displayed caption can be switched as below CC Style CC Style White Black Red Green Blue Yellow Magenta Cyan Closed Caption User Setting Font Style Font Size Font Opacity Back Color Back Opacity Edge Type Font Color Edge Color Edge Type Edge type of the displayed caption can be switched as below CC Style CC Style Raised Dep...

Page 25: ...ip V chip 5 Use Cursor K L to select the desired rating then press ENTER repeatedly to switch between View and Block Select View Block Back BACK ENTER X NC 17 R PG 13 PG G NR V chip V chip Rating Category X Mature audience only NC 17 No one under 17 admitted R Restricted under 17 requires accompanying parent or adult guardian PG 13 Unsuitable for children under 13 PG Parental guidance suggested G ...

Page 26: ...for 10 seconds to restore the password to 0000 PC Settings This function lets you adjust the PC screen position clock and phase during PC input 1 Repeat steps 1 and 2 in Closed Caption on page 22 2 Use Cursor K L to select PC Settings then press ENTER Detail Detail Power on Auto Closed Caption V chip PC Settings HDMI1 Audio Blue LED 3 Use Cursor K L to select the setting you want to adjust then pr...

Page 27: ... device to the audio sources Digital audio input signal will have priority Digital Select if you have connected digital device to the HDMI 1 IN jack for digital audio input signal Analog Select if you have connected analog device to the analog audio jacks for analog audio input signal 4 Press SETUP to exit 5 Blue LED You can set the blue LED on the front panel to light up when the unit is turned o...

Page 28: ...eo mode and finalized can be played back Unfinalized discs cannot be played back Depending on the recording status of a disc the disc may not be played back at all or the picture or sound may not be smooth etc 9 If the recorded portion of the disc is too small less than 55 mm across it may not play back properly 10 Do not glue paper or put stickers on to the disc These may damage the disc and the ...

Page 29: ...vailable on the DVD Press DISC MENU and use Cursor K L s B to select an item then press ENTER or PLAY B Note Menu operations may vary depending on the disc Refer to the manual accompanying the disc for more details Cancelling the PBC for playback of a video CD 1 Insert a video CD Playback will start automatically 2 Press STOP C 3 Enter track number of your choice with the Number buttons 4 PBC is n...

Page 30: ...rge 2 Press ZOOM repeatedly to change the zoom factor 2x or 4x 5 5 5 3 Once a desired zoom factor is set use Cursor K L s B to slide the zoomed picture across the TV screen 4 Press ZOOM repeatedly to exit zoom mode Note Zoom function does not work while the disc menu is displayed 4x zoom is not available on some discs Only 2x zoom is available on video CD and JPEG files Zoom function is also avail...

Page 31: ...ed in variable bit rate VBR the unit may not display the actual elapsed time Constant bit rate 32 kbps 320 kbps Applicable JPEG file Remarks Normal playback Upper limit 6 300 x 5 100 dots Lower limit 32 x 32 dots File size Max 7 MB A JPEG image that extends beyond the TV screen is reduced so that it will be displayed within the TV screen Dual playback Upper limit 5 000 x 5 000 dots Lower limit 32 ...

Page 32: ...der See page 42 on how to set DUAL PLAYBACK ON or OFF 1 Press STOP C then press MODE folder name 4 folder name 1 folder name 3 folder name 2 folder name 1 DISC NAME FOLDER LIST FOLDER ENTER PLAY ALL 1 1 2 Use Cursor K L to select a desired folder from the folder list then press ENTER or PLAY B or or 5 5 Note To cancel folder playback press MODE again at step 1 If you press FWD D or REV E during fo...

Page 33: ... H G repeatedly until a desired chapter or title will be selected or CH 1 CH 2 CH 3 CH 4 SKIP H SKIP G SKIP H SKIP G TT 1 TT 2 TT 3 TT 4 2 Playback will start automatically from the chapter or title you selected Note SKIP H G are not available when playback is stopped Chapter or title search can only be performed during playback or when the unit has kept the resume information It cannot be perform...

Page 34: ...ect input at step 2 Time search can only be performed during playback or when the unit has kept the resume information It cannot be performed in the stop mode Direct Search Direct Search DVD CD VCD w o PBC MP3 JPEG Press the Number buttons to select your desired chapter title track file Note To select a single digit chapter title track file number press the number directly To select double digit c...

Page 35: ...her screens Use Cursor K L to go on to the next previous pages Repeat this step until you have selected all the tracks files you wish to play back in the program or PROGRAM ENTER PLAY CLEAR CD DA TOTAL 0 08 22 1 1 3 3 T 15 3 18 T 16 4 24 ALL CLEAR T 4 3 58 T 16 4 24 T 16 4 24 Up to 99 tracks files can be ordered If 8 or more tracks files were in a program use SKIPH G to see all the tracks files Wh...

Page 36: ...aying CH Chapter current chapter number total chapters elapsed time of the current chapter remaining time of the current chapter current playback status appears only when multi angle is available on the DVD TT Title current title number total titles elapsed time of the current title remaining time of the current title TR Track current track number total tracks elapsed time of the current track rem...

Page 37: ...the desired language appears 1 ENG Dolby D 3 2 1ch 48k 3 5 Each time you press AUDIO the audio language changes as example below ENG English audio SPA Spanish audio FRE French audio Note Some discs will only allow you to change the audio setting from the disc menu Refer to the manual accompanying the discs for details If your language is not shown after pressing AUDIO several times the disc may no...

Page 38: ...to something other than STEREO Refer to Stereo Sound Mode Turn down the level or select OFF if the sound is distorted Marker Setup Marker Setup DVD CD VCD w o PBC Thisfeatureallowsyoutoassignaspecificpointonadisctobecalledbacklater To set a marker 1 During playback press SEARCH MODE repeatedly until appears e g DVD 2 Use Cursor s B to select an available marker within 30 seconds 3 When the playbac...

Page 39: ...sired subtitle language LANGUAGE ENTER OFF ENGLISH FRENCH SPANISH GERMAN ITALIAN SWEDISH SUBTITLE DISC MENU 1 Default ENGLISH Select the desired language in DVD menu LANGUAGE ENTER ENGLISH FRENCH SPANISH GERMAN ITALIAN SWEDISH DUTCH DISC MENU Note To change the on screen language call up LANGUAGE from the main menu and set the desired language Refer to Language Selection on page 14 1 Language opti...

Page 40: ...format AUDIO ENTER DRC ON DOWN SAMPLING ON DOLBY DIGITAL BITSTREAM ON Compress the range between soft and loud sounds OFF No effects original sound 5 DOWN SAMPLING Default ON Set DOWN SAMPLING This function is available only on digital outputting of a disc recorded in 96kHz AUDIO ENTER DRC ON DOWN SAMPLING ON DOLBY DIGITAL BITSTREAM ON When outputting in 48kHz OFF When outputting the original soun...

Page 41: ... select the PARENTAL LEVEL then press ENTER PARENTAL ENTER PARENTAL LEVEL ALL PASSWORD CHANGE 5 6 Use Cursor K L to select the desired item then press ENTER PARENTAL ENTER ALL 8 ADULT 7 NC 17 6 R 5 PGR 4 PG13 3 PG PARENTAL LEVEL PARENTAL LEVEL ALL All parental locks are cancelled 8 ADULT All ratings adult general children can be played back 7 NC 17 2 G Only DVD intended for general use and childre...

Page 42: ...AME or FIELD based on the date characteristics of the pictures 5 FIELD the picture in the still mode will be stabilized FRAME the picture in the still mode will be highly defined OTHERS ENTER ANGLE ICON ON STILL MODE AUTO AUTO POWER OFF ON PROGRESSIVE OFF DUAL PLAYBACK OFF SLIDE SHOW 5sec AUTO POWER OFF Default ON Set to ON to turn this unit off automatically after 20 minutes of no use OTHERS ENTE...

Page 43: ...149 Oriya 6164 Oromo Afan 6159 Panjabi 6247 Pashto Pushto 6265 Persian 5247 Polish POL 6258 Portuguese POR 6266 Quechua 6367 Rhaeto Romance 6459 Romanian RUM 6461 Russian RUS 6467 S Samoan 6559 Sangho 6553 Sanskrit 6547 Scots Gaelic 5350 Serbian 6564 Serbo Croatian 6554 Sesotho 6566 Setswana 6660 Shona 6560 Sindhi 6550 Singhalese 6555 Siswat 6565 Slovak 6557 Slovenian 6558 Somali 6561 Spanish SPA ...

Page 44: ...earby appliances may affect picture quality View other TV channels The problem might be limited to the broadcasting station Picture blurred When the outside antenna is used check the wire condition and connection View other TV channels The problem might be limited to the broadcasting station Ghosts in picture Check the antenna or cable connection to the main unit When the outside antenna is used c...

Page 45: ...the program to insert advertisement The closed caption decoder cannot read the information of the shortened program No caption is displayed when playing the videotape containing captions The videotape may be illegally copied or the caption signal might not have been read during copying Black box is displayed in the screen Text mode is selected for caption Select CC1 CC2 CC3 CC4 or Off D V D Comple...

Page 46: ...that allows access to parental control features PBC playback control An interactive software which has the selectable images or information in the menu screen to playback video CD Region Code Regions associate discs and players with particular areas of the world This unit will only play back discs that have compatible region codes You can find the region code of your unit by looking on the rear pa...

Page 47: ... 32 inches class 31 5 inches measured diagonally Dimensions H 24 5 inches 620mm W 31 6 inches 802mm D 10 3 inches 260mm Weight 34 7 lbs 15 7kg Designs and specifications are subject to change without notice and without our legal obligation If there is a discrepancy between languages the default language will be English 5 If you subscribe to cableTV the channels are displayed as 1 135 Cable compani...

Page 48: ...48 EN MEMO ...

Page 49: ...49 EN INTRODUCTION CONNECTION INITIAL SETTING OPTIONAL SETTING WATCHING TV OPERATING DVD SETTING DVD TROUBLESHOOTING INFORMATION ...

Page 50: ......

Page 51: ......

Page 52: ...JVC COMPANY OF AMERICA Division of JVC Americas Corp 1700 Valley Road Wayne New Jersey 07470 JVC Loves the Earth Printed in China A74F3UH 1EMN24159 ...

Reviews: