


9
HV-34LH21/34LH51/34LH71/29WH21/29WH51/29WH71/29VH21 / GGT0020-001A-H / English
Remote control buttons and functions
MUTING button
Press the MUTING button to turn off the
volume. Pressing the MUTING button again
resumes the previous volume level.
ZOOM button
You can change the screen size according
to the picture aspect ratio. Choose the
optimum one from the following ZOOM
modes.
Press the ZOOM button to choose a
mode.
• The ZOOM button works only in the
normal screen.
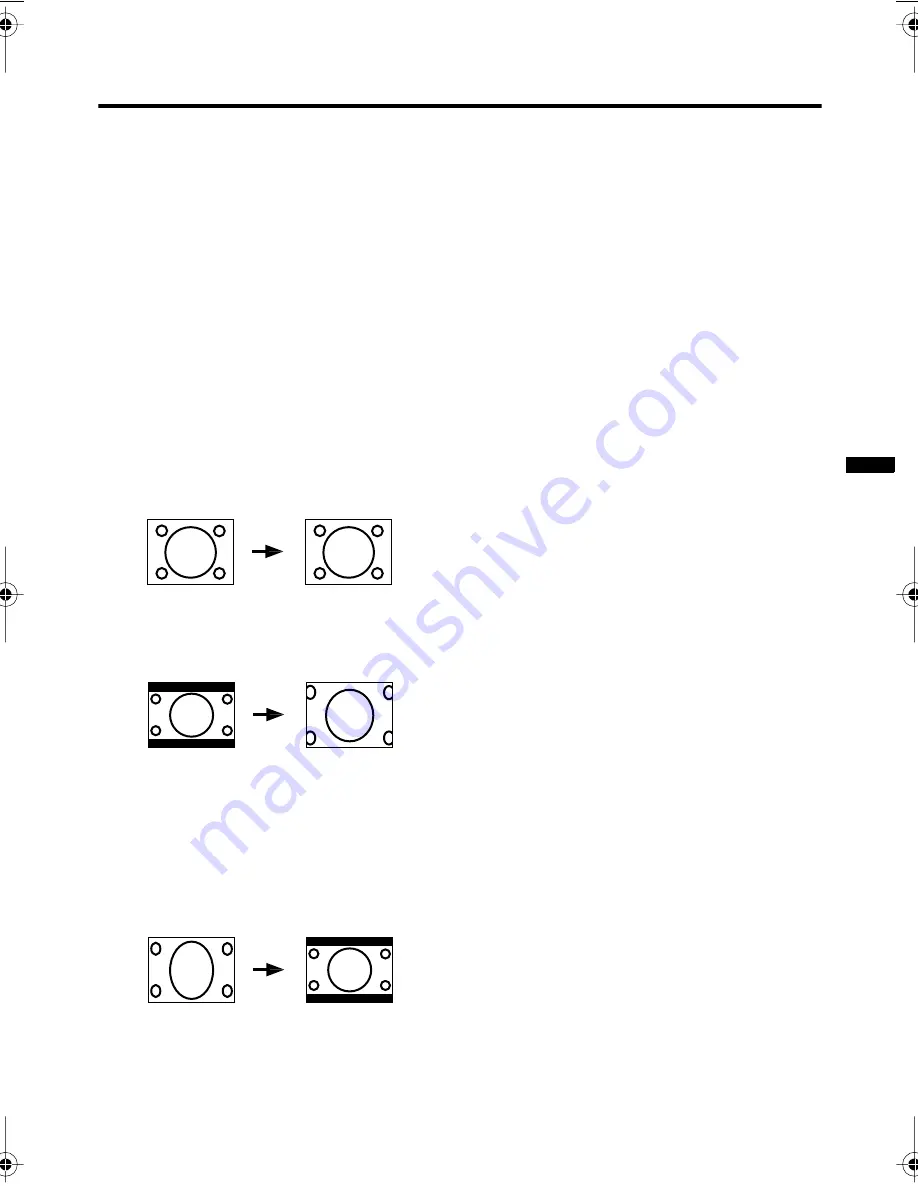
REGULAR:
Use to view a normal picture (4:3 aspect
ratio) as its original size is.
ZOOM:
You can zoom up the Wide picture (16:9
aspect ratio) to fill the TV screen.
• The left side and right side of the Wide
picture (16:9 aspect ratio) will be cut
off.
16:9:
This mode converts a normal picture (4:3
aspect ratio) into a Wide picture (16:9
aspect ratio).
• Use for picture with a 16:9 aspect ratio
that have been squeezed into a normal
picture (4:3 aspect ratio), you can
restore their original dimensions.
CINEMA SURROUND button
You can enjoy an enhanced sound for a
wider audience by using CINEMA
SURROUND function.
Press the CINEMA SURROUND button to
select one of CINEMA SURROUND
modes.
HIGH/LOW:
When you listen to the stereo sound, please
select HIGH or LOW mode.
You can enjoy the sound for a wider
audience similar to the experience at the
theatre.
• In case that you setting up the
CINEMA SURROUND function to
HIGH mode, there may be slight
volume distortion. In case that occurs,
please switch the HIGH mode to LOW
mode, the effect of CINEMA
SURROUND functions will be less
noticeable, however, the volume
distortion will be corrected.
MONO:
Select the MONO mode, when you listen to
the mono sound.
You can enjoy the sound for a wider
audience similar to stereo sound.
OFF:
The CINEMA SURROUND function
switches off.
PICTURE MODE button
You can choose one of three PICTURE
MODEs (three kinds of picture setting) to
adjust the picture settings automatically.
Press the PICTURE MODE button to
choose a mode.
BRIGHT:
Heightens contrast and sharpness.
STANDARD:
Standardizes picture adjustment.
SOFT:
Softens contrast and sharpness.
HV-34LH&29WH_Eng.book.fm Page 9 Monday, September 1, 2003 7:59 PM


