background image

20

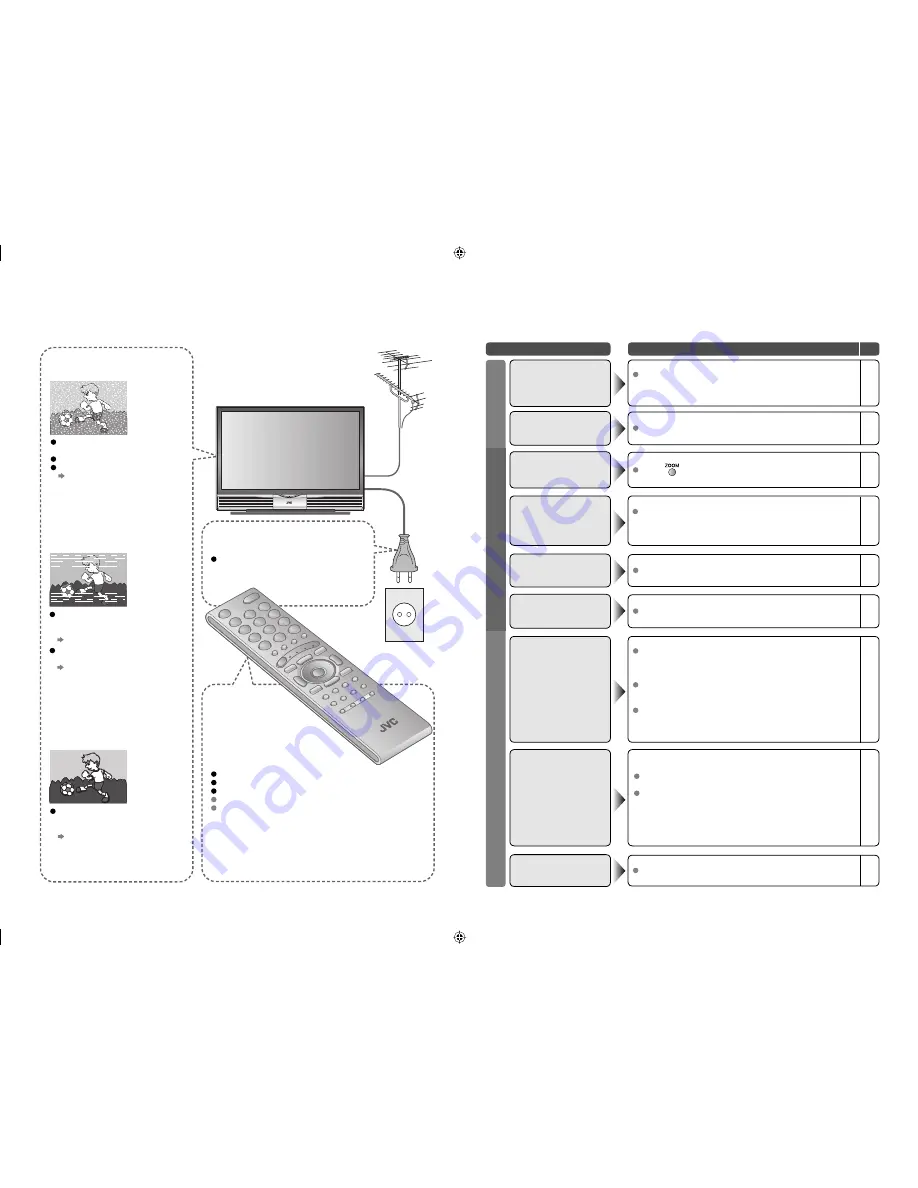
Severe noise or snow

Troubleshooting

Patterns, stripes or 
noise

I can’t turn it on!

The remote 
control doesn’t 
work!

 Is the TV connected correctly to the 

aerial?

 Change the direction of the aerial.
 Is the aerial or its cable damaged?

  Consult your retailer

Ghosting

(Doubling of images)

 Are you receiving interference from 

signals refl ected off mountains or 
buildings?

 Adjust the direction of your aerial, 

or change to a good-quality 
directional aerial

 Is the aerial receiving interference 

from high-voltage power lines or 
wireless transmitters?

 Consult your retailer

 Are connected devices too close to 

the TV?

 Insert the minimum distance 

between the aerial and the cause 
of interference until no interference

 Is the power cord connected to the AC 

outlet correctly?

 Are the batteries fl at?
 Are you more than 7 metres away from the TV?
 Is the “MODE (TV, VCR/DVR, DVD, AUDIO)” set to “TV”?

 When viewing teletext, the TV menu bar does not appear.
 Depending on the stability of the signal, there may be a time 

lag when changing channels.

Problem

Actions

page

 Unplug the TV, and wait about 1 hour until the lamp 

completely cooled. Then plug the TV in again. (Turning on the 
TV soon may shorten the lamp life.)

Remote control stops 
working 

-

 Press  “

” to return to your settings.

Aspect ratio changes 
unintentionally

12

 Unnatural colour >>>  Adjust “Colour” and “Bright.”

Check your “Colour System.”
If “Auto” is selected, select the specific 
colour system manually.

 Noise >>> Set to the following functions.

  Picture 

Mode 

  Standard

  Super 

DigiPure 

 Max

 Dull picture >>> Set to the following functions.

  Picture 

Mode 

  Bright

  Super 

DigiPure 

 Min

Poor picture quality

18
19

-

18
19

-

18
19

 If the top of the image is distorted, check the video signal 

quality itself.

 If movement appears unnatural when receiving a signal from 

a DVD player, etc. with 625p (progressive-scanning),  change 
the output setting of the external device to 625i (interlace-
scanning).

Strange picture when 
using an external device

-

-

Basics

Screen

Picture

 Although the HD-ILA element is manufactured with high-

precision technology, please understand that some pixels 
may be lost or permanently displayed.

Black or white dots 
appear on the screen

-

 Switch “Child Lock” to “Off.”

Front control buttons do 
not work

18

 Adjust the “PC Position.”

PC screen alignment is 
off

14

 Switch “Blue Back” to “Off.”

Blue screen appears on 
the screen

16

 Adjust the “Iris” brighter.

The screen is dim

18

Summary of Contents for 0706TKH-MW-VPC

Page 1: ...HD ILA TV HD Z70RF7 HD Z61RF7 HD Z56RF7 INSTRUCTIONS LCT2132 001A HD Z70RF7 ...

Page 2: ...g channels 6 7 8 9 TV Teletext Video etc Let s try it out Enjoying your new TV 11 Watching TV Viewing teletext Watching videos DVDs Register your favourite channels View and search in multi picture mode Sleep timer Channel Guard Try the advanced features Useful functions 15 Reduce noise Watch a more natural picture Set the aspect ratio etc Just the way you like it Customising your TV Advanced pict...

Page 3: ...your retailer Handle screen with care Use a soft dry cloth when cleaning Never expose to rain or moisture To prevent fire or electric shock never allow liquids to enter the unit If the AC plug is not the right shape or the power cord is not long enough use an appropriate plug adapter or extension cable Consult your retailer Hold the TV so as not to scratch the screen Do not touch the screen when c...

Page 4: ...ks every 2 seconds Do not unplug the TV while the lamp is cooling down This may cause the internal circuits and the lamp to overheat and shorten the lamp life While the LAMP indicator is blinking the TV cannot be turned on You can turn on the TV within 15 seconds after turning off Condensation on the lamp and screen When the heater is turned on or the TV is moved from a cold place to a warm place ...

Page 5: ...acement Lamp Kit TS CL110C 1 Unplug the TV 2 Wait for at least 1 hour until the lamp has fully cooled For purchasing the Replacement Lamp Kit consult your retailer 3 The TV uses a lamp to project the picture onto the screen When the lamp has blown or when the picture becomes dark replace the lamp Before replacing the lamp read all the instructions carefully Prepare the Replacement Lamp Kit When th...

Page 6: ...he lamp housing area the TV won t turn on In this case reinstall the lamp unit Make sure the lamp sits securely and flat in the housing area Never dispose of the lamp with normal trash The lamp contains a small amount of mercury For disposal or recycling information please contact your local authorities or consult your retailer Dispose of it in the same way as disposing of fluorescent lamps If the...

Page 7: ...e correct Channel information P 12 Display on screen menu P 18 Power On Off Power lamp ON Lit Blue OFF Unlit To headphones P 10 Display on screen menu set Switch between TV AV devices To change the brightness of the power lamp Illumination P 18 LAMP indicator The LAMP indicator blinks as follows When turning on the TV the LAMP indicator blinks for about 1 minute every 2 seconds The lamp is warming...

Page 8: ... VIDEO cable are connected S VIDEO will be enable After all the connections have been made insert the plug into an AC outlet AERIAL Power requirements Connect the power cord only to a 110 240V 50 60Hz AC outlet Installation requirements To avoid overheating ensure the unit has ample room Connect a VCR DVD recorder Do not place the TV too close to wallpaper The warm air from the air ducts may chang...

Page 9: ...ster channels Check what was registered select Shown only when powering on for the first time The power button on the remote control can also be used Edit channels Confirm 3 6 select set in Editing channels P 9 After turning on the TV it takes about 1 minute to project the picture to its full brightness After turning off the TV it takes about 5 seconds to make the screen dark After that cooling is...

Page 10: ... 3 Setting AI Volume HDMI Setting PC Position Video Off Video Teletext Language Video 1 Setting Language Lamp Timer Reset Edit Manual IMPORTANT PREPARE USE SETTINGS TROUBLE Display the menu bar Select Set Up Select Edit Manual Finish When coming from Initial settings P 8 skip to 4 Select a row Edit Move a channel s position MOVE Editing channels Edit the channels registered with Auto Program in In...

Page 11: ...EO Using S VIDEO P 14 Watching videos VIDEO 3 Output Input Component signal Composite signal Sound L R Use Component signal Switch between video and component signal P 14 Watching videos VIDEO 4 Output Input S VIDEO Composite signal Sound L R Use S VIDEO Using S VIDEO P 14 Watching videos HDMI 1 HDMI 2 Output Input HDMI signal Sound L R HDMI 1 only HDMI Setting P 18 HDMI 2 input does not support a...

Page 12: ...vourite channels Enlarge the text To the index page Hold the current page Switch briefly between teletext and TV Bookmark your favourite pages Reveal hidden pages Watching videos DVDs 14 PAGE 18 PAGE Personal preferences Watch high quality video S VIDEO Switch between video and component signal PC position adjustments Adjust the picture Adjust the sound channel settings etc Basic settings sleep ti...

Page 13: ...itial settings will appear here Select and view a channel When set to Auto the aspect ratio will turn to the ratio obtained from the information the TV received Without receiving aspect information it will be set to 4 3 Auto Aspect P 19 Not available for 1080i 1125i 720p 750p signals In PC mode Regular and Full can be selected Move the picture with or while this bar is displayed select set select ...

Page 14: ...r down a page Bookmark your favourite page LIST MODE Recall your favourite page Press the coloured button as in step 2 2 View sub pages Hold the current page Display hidden information answers to quizzes etc Returns to page 100 or a previously designated page Double the size of the displayed text Leave the current page open while you switch to watch TV Hold the current page HOLD Switch briefly fro...

Page 15: ...cted device and play a video Operate JVC recorders and other devices P 17 CHANNEL VOLUME IN VIDEO 4 CHANNEL MENU OK OVER S VIDEO VIDEO L MONO R AUDIO TV VIDEO Select the video source using the side buttons Select the video source 1 2 MENU OK TV VIDEO 3 1 2 3 select next select next adjust set Display the menu bar Shown only when PC is selected Select Set Up Select PC Position Reset position blue s...

Page 16: ...the sound sources Change the channel Main Sub Watch in multi picture mode MULTI PICTURE set select watch select a channel Not available in PC mode Not available for HDMI 1 or HDMI 2 input Current programme Still picture Take snapshots of the screen FREEZE Not available when the Sub picture below is displayed or when in PC mode You cannot save or export the snapshot Cancel Press again or change the...

Page 17: ...d Hold down for 3 seconds Disappears in a few seconds 1 1 2 1 2 1 2 blue delete Displays a blue screen and mute the sound when the signal is weak BLUE BACK Set the power to turn off if no signal is received and no operation is performed AUTO SHUTOFF Prevent sudden increase or decrease of sound when changing channels AI VOLUME MENU Features Blue Back MENU Features Auto Shutoff MENU Set Up AI Volume...

Page 18: ...ame with Some models of JVC devices cannot be operated with this remote control JVC DVD recorders and HDD recorders are set to code C or 3 by default If the battery is removed the remote control code reverts back to code A or 1 Note Operate the DVD player DVD Operate the home theatre system AUDIO Operate DVD HDD recorder menues Display menu Playback Record etc Back to previous menu OK Display top ...

Page 19: ...minuites P 16 Favourite Setting Clear favourite channel settings P 16 Illumination Change the brightness of the Power lamp P 6 while the TV is on Bright Soft Set Up Auto Program Automatically registers channels P 8 Edit Manual Change registered channels or add new ones P 9 Language Select a language for on screen menus P 8 Video 1 Setting For use with VCRs and other devices P 14 Video 3 Setting Fo...

Page 20: ...ing cinema film Off Function is turned off On Auto Automatically adjusts When the picture loses sharpness Function is always on For natural looking pictures Off Function is turned off On Maintains a natural colour balance Fix bright dark pictures Off Function is turned off On Makes it easier to view bright dark pictures When there is no colour Main Main picture Sub Sub picture in MULTI PICTURE mod...

Page 21: ... the lamp completely cooled Then plug the TV in again Turning on the TV soon may shorten the lamp life Remote control stops working Press to return to your settings Aspect ratio changes unintentionally 12 Unnatural colour Adjust Colour and Bright Check your Colour System If Auto is selected select the specific colour system manually Noise Set to the following functions Picture Mode Standard Super ...

Page 22: ...again If the TV goes into warning mode unplug the TV after the cooling has completed and consult your retailer It may be a malfunction of the internal electrical circuits The power lamp and LAMP indicator blink alternately Keep the TV off for a while and then turn the power on again If the TV goes into warning mode unplug the TV after the cooling has completed and consult your retailer The interna...

Page 23: ...an Estonian Ukrainian Serbian Croatian Slovenian Czech Slovak English German Group 4 Arabic Czech Slovak Hungarian English German French Italian Spanish Portuguese Swedish Finnish Group 5 Farsi Czech Slovak Hungarian English German French Italian Spanish Portuguese Swedish Finnish If the characters are unreadable Select different teletext language group CH Channel US CCIR OIRT AUSTRALIA CH 02 US 0...

Page 24: ...576i 625i 480i 525i Progressive 576p 625p 480p 525p HD 1080i 1125i 720p 750p Audio L R VIDEO 2 RCA connectors x 3 S VIDEO connector x 1 Composite video S video Audio L R VIDEO 3 RCA connectors x 6 Composite video Analogue component 576i 625i 480i 525i Progressive 576p 625p 480p 525p HD 1080i 1125i 720p 750p Audio L R VIDEO 4 RCA connectors x 3 S VIDEO connector x 1 Composite video S video Audio L ...

Page 25: ...2006 Victor Company of Japan Limited 0706TKH MW VP C ...

Reviews: