background image

5

English

ANGLE

AUDIO

1

2

3

4

5

6

7

8

9

10

0

+10

DIMMER

CANCEL

TOP MENU

SET

STROBE

PREV.

FADE

MUTING

BASS/

TREBLE

FM MODE

DIGITAL

ECHO

KEY

CONTROL 

KEY

CONTROL 

3D PHONIC AHB PRO

NEXT

RETURN

SLOW

RM-SUXA7DVDU REMOTE CONTROL

GROUP SKIP

+

SLOW

AUX/MD

DVD

SELECT

FM/AM

VOLUME

SHIFT

TAPE

ENTER

MENU CHOICE

COLOR

ON SCREEN

PLAY MODE

ZOOM

SUB TITLE

REV. MODE

DIGEST

CLOCK/TIMER

STANDBY/ON

DISPLAY

SLEEP

DVD

LEVEL

A.P.

OFF


3

u

1

i

o

;

a

d

g

h

j

/

x

4

6

8

7

5

2

9

q

p

w

r

y

e

t

s

f

k
l

z

c
v

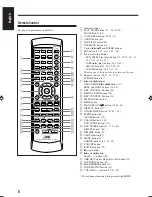
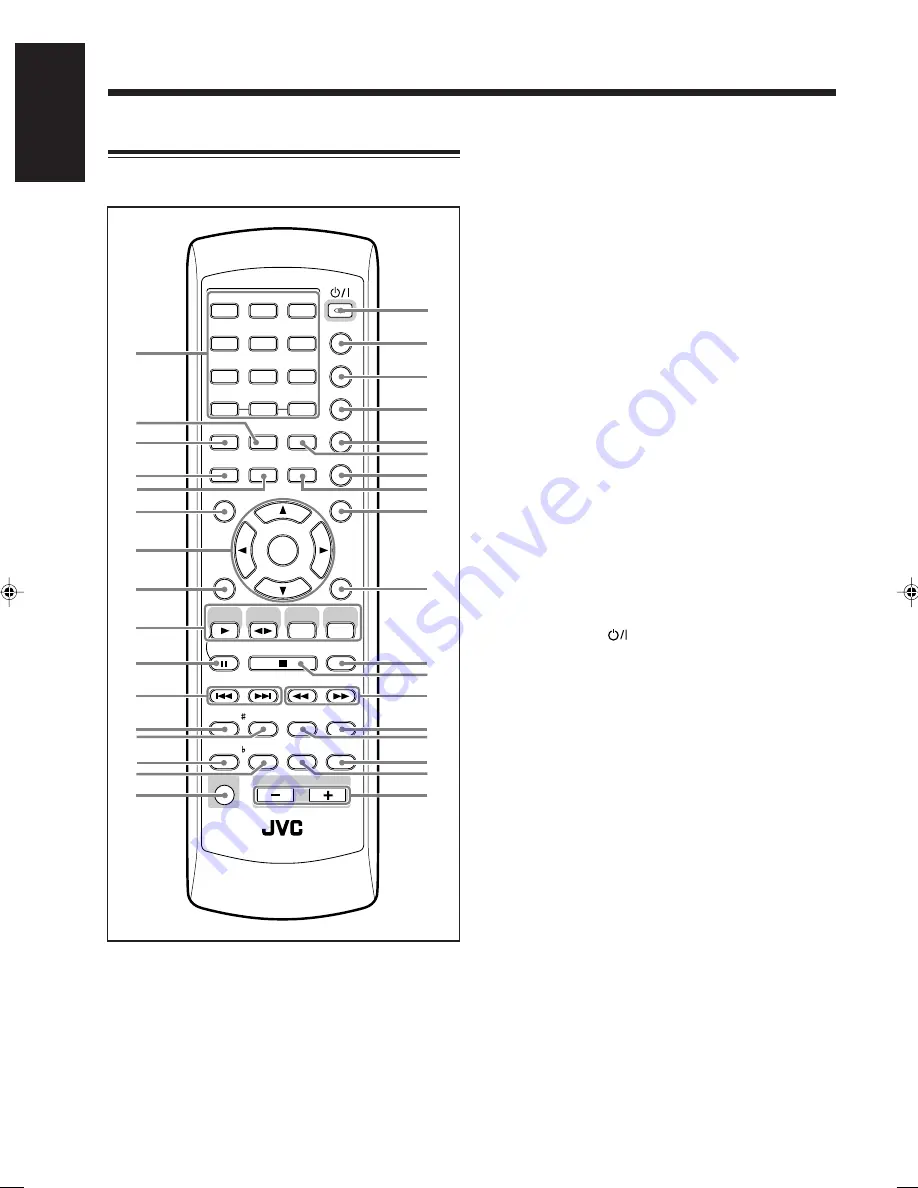
Remote Control

See pages in parentheses for details.

1

Number buttons

2

PLAY MODE button (35 – 39, 43, 44)
ZOOM button* (48)

3

ON SCREEN button (29, 31, 33)

4

AUDIO button (46)

5

SUB TITLE button (46)

6

TOP MENU button (34)

7

Cursor 

2

/

3

/

5

/

 and ENTER buttons

8

SET button (17, 22, 23, 26, 61 – 64)

9

Source selecting buttons
• DVD SELECT 

3

 (play) button (13, 19, 20, 28 – 33,

35, 37, 39, 47, 51, 58)

• TAPE 

2


3

 (play) button (19, 20, 41)

• FM/AM button (19, 20, 25, 26, 52)
• AUX/MD button (19, 20, 23, 52)

Pressing one of these buttons also turns on the unit.

p

8

 (pause) button (29, 31, 32, 47, 51)

STROBE button (47)

q

¢

 and 

4

 buttons

GROUP SKIP 

¢

 / 

4

 buttons* (33)

PREV. and NEXT buttons (34, 44)

w

KEY CONTROL # button (54)

e

DIGITAL ECHO button (54)

r

KEY CONTROL 

I

 button (54)

t

FM MODE button (25)

y

SHIFT button

u

STANDBY/ON 

 button (19, 62, 63)

i

DISPLAY button (17)

o

CLOCK/TIMER button (17, 61 – 63)

;

SLEEP button (64)
A.P.OFF button* (19)

a

COLOR button (12, 22)
DVD LEVEL button* (30)

s

REV. MODE button (41, 51, 52, 61)
DIGEST button* (44)

d

DIMMER button (22)

f

ANGLE button (45)

g

MENU button (34)
CHOICE button* (14 – 16, 56)

h

CANCEL button

j

RETURN button (34)

k

7

 (stop) button

l

¡

 and 

1

 buttons

SLOW + / – buttons (47)

/

AHB PRO (Active Hyper Bass Pro) button (21)

z

3D PHONIC button (48)

x

BASS/TREBLE button (21)

c

FADE MUTING button (20)

v

/ – buttons (20, 21, 54)

* These buttons function while pressed with SHIFT.

EN01_07UX_A7DVD[UF].pm6

03.2.26, 9:28 PM

5

Summary of Contents for 0303MWMMDWJEM

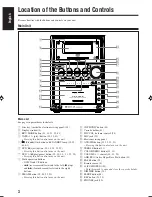
Page 1: ... AUX MD REV MODE BASS FM AM TREBLE M U L T I C O L O R D I S P L A Y 3 W A Y S P E A K E R S Y S T E M 3 W A Y S P E A K E R S Y S T E M ANGLE AUDIO 1 2 3 4 5 6 7 8 9 10 0 10 DIMMER CANCEL TOP MENU SET STROBE PREV FADE MUTING BASS TREBLE FM MODE DIGITAL ECHO KEY CONTROL KEY CONTROL 3D PHONIC AHB PRO NEXT RETURN SLOW RM SUXA7DVDU REMOTE CONTROL GROUP SKIP SLOW AUX MD DVD SELECT FM AM VOLUME SHIFT T...

Page 2: ...s When discarding batteries environmental problems must be considered and local rules or laws governing the disposal of these batteries must be followed strictly Do not expose this apparatus to rain moisture dripping or splashing and that no objects filled with liquids such as vases shall be placed on the apparatus 10 cm 1 cm 1 cm 15 cm 15 cm 15 cm 15 cm 15 cm 15 cm Front view Side view UX A7DVD U...

Page 3: ... or defeated Avoid direct exposure to beam 3 CAUTION Do not open the top cover There are no user serviceable parts inside the unit leave all servicing to qualified service personnel 1 CLASSIFICATION LABEL ON EXTERIOR SURFACE 2 WARNING LABEL INSIDE THE UNIT REPRODUCTION OF LABELS IMPORTANT FOR LASER PRODUCTS ...

Page 4: ...space When the temperature inside the unit increases due to operating the unit at high volume or consecutively the cooling fan activates to lower the temperature Install the unit in a location with adequate ventilation to prevent internal heat buildup in the unit Leave sufficient distance between the unit and the TV Although the speakers are magnetically shielded the TV may be mottled In this case...

Page 5: ...ing the Daily Timer 62 Using the Sleep Timer 64 Using AV COMPU LINK Control System 65 Maintenance 66 Troubleshooting 67 Table of Language Codes 69 Table of Country Area Codes 70 Specifications 72 Location of the Buttons and Controls 3 Main Unit 3 Remote Control 5 About Discs 6 Playable Disc Types 6 Disc Structure 7 Getting Started 8 Unpacking 8 Putting the Batteries into the Remote Control 8 Conne...

Page 6: ...the left 7 stop and forward search fast wind to the right buttons 9 FM AM button 19 20 25 52 Pressing this button also turns on the unit p 3D PHONIC button 48 q Cassette holder 41 w MIC VOL volume control 54 e MIC jack 54 r Electronic swing panel t AUX MD button 19 20 23 52 Pressing this button also turns on the unit y TREBLE button 21 u COLOR DEMO button 12 22 i VOLUME control 20 21 54 o AHB PRO ...

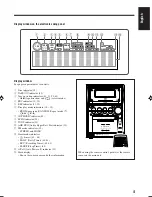
Page 7: ... 2 TAPE indicator 41 3 Tape operation indicators 41 51 52 61 2 3 tape direction and reverse mode 4 PBC indicator 30 34 5 REC indicator 51 52 6 Disc play mode indicators 36 39 PRGM program RANDOM Repeat mode ALL A B 7 3D PHONIC indicator 48 8 ECHO indicator 54 9 TONE indicator 21 0 AHB PRO Active Hyper Bass Pro indicator 21 FM mode indicators 25 STEREO and MONO Timer mode indicators timer 61 64 DAI...

Page 8: ... DVD SELECT 3 play button 13 19 20 28 33 35 37 39 47 51 58 TAPE 2 3 play button 19 20 41 FM AM button 19 20 25 26 52 AUX MD button 19 20 23 52 Pressing one of these buttons also turns on the unit p 8 pause button 29 31 32 47 51 STROBE button 47 q and 4 buttons GROUP SKIP 4 buttons 33 PREV and NEXT buttons 34 44 w KEY CONTROL button 54 e DIGITAL ECHO button 54 r KEY CONTROL I button 54 t FM MODE bu...

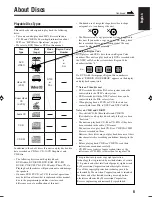
Page 9: ...uctions or cautions carefully CD RWs may require a longer readout time as the reflectance of CD RWs is lower than for regular CDs This product incorporates copyright protection technology that is protected by method claims of certain U S patents and other intellectual property rights owned by Macrovision Corporation and other rights owners Use of this copyright protection technology must be author...

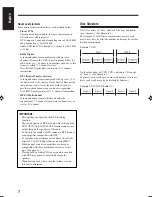
Page 10: ...hannel format rare for home use as well as 5 1 channel IMPORTANT This unit does not provide the DTS decoding function The sound signals of DTS are only output through the DVD OPTICAL DIGITAL OUT terminal and are not output through the speakers of this unit To listen to the sound of DTS connect a DTS decoder or an amplifier compatible with DTS To reproduce the multichannel sounds such as Dolby Digi...

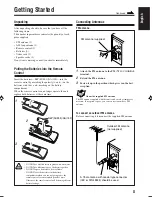
Page 11: ...Insert the batteries R6P SUM 3 AA 15F into the remote control by matching the polarity and on the batteries with the and marking on the battery compartment When the remote control can no longer operate the unit replace both batteries at the same time 1 2 3 R6P SUM 3 AA 15F FM 75 COAXIAL AM LOOP ANTENNA AM EXT FM antenna supplied Connecting Antennas FM antenna 1 Attach the FM antenna to the FM 75 Ω...

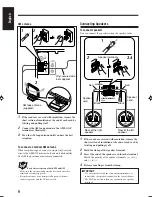
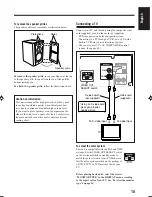
Page 12: ...d it horizontally The AM loop antenna must remain connected For better reception of both FM and AM Make sure the antenna conductors do not touch any other terminals or connecting cords Keep the antennas away from metallic parts of the unit connecting cords and the AC power cord Connecting Speakers To connect speakers You can connect the speakers using the speaker cords 1 If the cords are covered w...

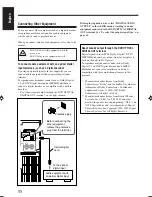
Page 13: ...r an S video cord not supplied DVDs are protected by the copyguard system Connecting to a TV through a VCR or to a TV with a built in VCR may cause distortion of picture You can also use JVC s AV COMPU LINK control system See page 65 To select the color system This unit is compatible with the PAL and NTSC systems Set the VIDEO OUT SELECT switch on the rear panel while in standby mode to match the ...

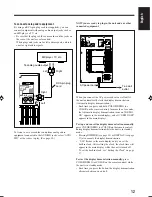
Page 14: ...ier with a built in decorder See About sounds output through the DVD OPTICAL DIGITAL OUT terminal on the right column Before playing back a disc select DIGITAL AUDIO OUTPUT in the AUDIO menu according to audio equipment connected to the DVD OPTICAL DIGITAL OUT terminal See To select the output signal type on page 16 About sounds output through the DVD OPTICAL DIGITAL OUT terminal Digital signals L...

Page 15: ... any other connected equipment When you connect the AC power cord into a wall outlet the unit automatically starts the display demonstration Automatic display demonstration Each time you press and hold COLOR DEMO or COLOR on the remote control for more than 2 seconds the Automatic display demonstration turns on DEMO ON appears in the main display and off DEMO OFF appears in the main display To sto...

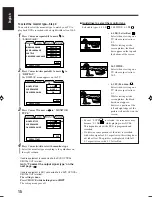
Page 16: ...g menu appears on the TV The screen saver screen see page 28 automatically appears on the TV instead of the setting menu to prevent the TV screen from being damaged To show the setting menu again press CHOICE while holding down SHIFT On the remote control ONLY To select the On screen language for the setting menu Step 1 1 Turn on the TV and select the correct input mode on the TV 2 Press DVD SELEC...

Page 17: ... repeatedly to move to ON SCREEN LANGUAGE 5 Press Cursor 3 2 to select the language you want You can select the language from among ENGLISH Chinese and Spanish ESPAÑOL The language for the setting menu changes to the one you select Ex ENGLISH is selected The language in other indications shown on the TV while you operate the unit also changes to the one you select Continued MENU LANGUAGE AUDIO LAN...

Page 18: ...splayed with full 4 3 aspect ratio or with 4 3 Letter Box To select the monitor type Step 2 You need to select the monitor type to match your TV to play back DVDs recorded with a height width ratio of 16 9 1 Press Cursor 5 repeatedly to move to LANGUAGE 2 Press Cursor 3 2 repeatedly to move to DISPLAY The DISPLAY menu appears on the TV 3 Press Cursor to move to MONITOR TYPE 4 Press Cursor 3 2 to s...

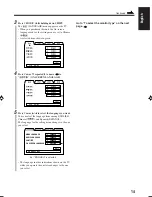
Page 19: ...or 5 to move to DISPLAY 2 Press Cursor 2 to move to AUDIO The AUDIO menu appears on the TV 3 Press Cursor to move to DIGITAL AUDIO OUTPUT 4 Press Cursor 3 2 to select the output signal type Select the output signal type according to the guidelines on the right column To exit from the setting menu press CHOICE while holding down SHIFT The setting menu goes off You can also exit from the setting men...

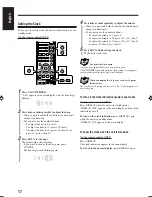
Page 20: ...ress or 4 repeatedly to adjust the minute When you press and hold the button the minute digit changes continuously You can also use the number buttons To adjust the minute to 5 press 5 To adjust the minute to 25 press 10 10 then 5 To adjust the minute to 30 press 10 10 then 10 or press 10 three times then 0 5 Press SET to finish setting the clock The built in clock starts To adjust the clock again...

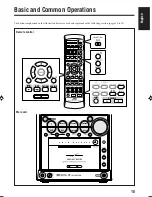
Page 21: ...ONIC AHB PRO NEXT RETURN SLOW RM SUXA7DVDU REMOTE CONTROL GROUP SKIP SLOW AUX MD DVD SELECT FM AM VOLUME SHIFT TAPE ENTER MENU CHOICE COLOR ON SCREEN PLAY MODE ZOOM SUB TITLE REV MODE DIGEST CLOCK TIMER STANDBY ON DISPLAY SLEEP DVD LEVEL A P OFF DIMMER COLOR SLEEP DVD LEVEL A P OFF STANDBY ON SET ENTER 3D PHONIC VOLUME SHIFT FADE MUTING AUX MD DVD SELECT FM AM TAPE BASS TREBLE FM MODE DIGITAL ECHO...

Page 22: ...On the Power When you press one of the source selecting buttons the unit automatically turns on and starts playback if the source is ready On the remote control On the main unit Pressing DVD 0 also turns on the unit To turn on the unit without playing press STANDBY ON or on the main unit The STANDBY lamp on the main unit goes off HELLO appears in the main display To turn off the unit on standby pr...

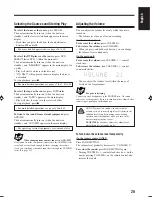
Page 23: ... control also restores the sound Selecting the Sources and Starting Play To select the tuner as the source press FM AM The unit automatically turns on when the unit is in standby and the last selected band appears in the main display Each time you press the button the band alternates between FM and AM For more detailed operations see pages 24 to 26 To select the DVD player as the source press DVD ...

Page 24: ...vel You can adjust the tone level within the range from 1 to 5 by 1 step 0 is the initial setting To increase the tone level turn VOLUME control clockwise To decrease the tone level turn VOLUME control counterclockwise Reinforcing the Bass Sound The richness and fullness of the bass sound is clearly maintained regardless of how low you set the volume Active Hyper Bass Pro This function also affect...

Page 25: ...is is a characteristic of this unit and is not a malfunction When a strong light strikes the unit it may become dark but this is not a malfunction While using the unit the electronic swing panel becomes warm but this is not a malfunction To create your favorite colors You can create two favorite colors and store them in memory as MANUAL1 and MANUAL2 There is a time limit in doing the following ste...

Page 26: ...ect when the sound is not loud enough If you change the audio input level through the AUX MD jacks The recording level through the AUX MD jacks also changes Selecting LEVEL 2 rather than LEVEL 1 makes the sound recorded louder Prohibiting Disc Ejection You can prohibit disc ejection from the unit and can lock discs Disc Lock On the main unit ONLY To prohibit disc ejection press and hold 7 then pre...

Page 27: ...FADE MUTING BASS TREBLE FM MODE DIGITAL ECHO KEY CONTROL KEY CONTROL 3D PHONIC AHB PRO NEXT RETURN SLOW RM SUXA7DVDU REMOTE CONTROL GROUP SKIP SLOW AUX MD DVD SELECT FM AM VOLUME SHIFT TAPE ENTER MENU CHOICE COLOR ON SCREEN PLAY MODE ZOOM SUB TITLE REV MODE DIGEST CLOCK TIMER STANDBY ON DISPLAY SLEEP DVD LEVEL A P OFF 1 2 3 4 5 6 7 8 9 10 0 10 SET PREV NEXT GROUP SKIP FM AM FM MODE DVD TAPE AUX MD...

Page 28: ...ates between FM and AM 2 Press and hold or 4 or UP or DOWN on the main unit until the station frequencies start changing continuously in the main display UP Increases the frequencies 4 DOWN Decreases the frequencies The unit starts searching for stations and stops when a station of sufficient signal strength is tuned in If an FM program is broadcast in stereo the STEREO indicator lights up on the ...

Page 29: ...number 20 press 10 then 10 For preset number 30 press 10 10 then 10 You can also select the preset number by pressing or 4 4 Press SET again STORED appears in the main display for a while The tuned station in step 1 is stored in the preset number selected in step 3 Storing a new station on an already assigned number erases the previously stored one When you unplug the AC power cord or if a power f...

Page 30: ...LE FM MODE DIGITAL ECHO KEY CONTROL KEY CONTROL 3D PHONIC AHB PRO NEXT RETURN SLOW RM SUXA7DVDU REMOTE CONTROL GROUP SKIP SLOW AUX MD DVD SELECT FM AM VOLUME SHIFT TAPE ENTER MENU CHOICE COLOR ON SCREEN PLAY MODE ZOOM SUB TITLE REV MODE DIGEST CLOCK TIMER STANDBY ON DISPLAY SLEEP DVD LEVEL A P OFF 1 2 3 4 5 6 7 8 9 10 0 10 ON SCREEN PLAY MODE ZOOM REV MODE DIGEST TOP MENU SET STROBE PREV NEXT SLOW...

Page 31: ...ccept an operation you have tried to do or information required for that operation is not recorded on the disc More about the on screen guide icons In some cases without showing operations will not be accepted If you do not want the on screen guide icons to appear see page 58 The disc indicator rotates while a disc is being played The disc indicator goes off when there is no disc in the disc tray ...

Page 32: ... information Off No indication DVD Basic Operations Available for DVD DVD To play back a SVCD VCD or Audio CD see page 30 To play back an MP3 disc see page 32 Playback will stop when a disc menu appears on the TV screen If a menu appears while playing see Playing Back by Using the Disc Menu on page 34 1 Load a disc With some DVDs playback starts automatically after you close the disc tray by press...

Page 33: ...is selected When you purchased this unit the DVD sound level is set to MIDDLE TITLE 3 CHAP 2 TIME 1 33 33 BITRATE 3 3 Mbps 1 2 3 4 2 3 4 1 1 2 1 2 1 5 ENGLISH ENGLISH NORMAL MIDDLE HIGH V D V D SVCD VCD Audio CD Basic Operations Available for SVCD SVCD VCD VCD Anduio CD Audio CD To play back a DVD see page 29 To play back an MP3 disc see page 32 While playing a SVCD or VCD with the PBC function th...

Page 34: ... stopped Resume play RESUME appears on the display To use the Resume play you need to turn on the Resume function See page 58 The Resume function does not work for Audio CDs When using Resume play on SVCD or VCD with the PBC function playback starts a little before the position where you have stopped To stop completely when you use the Resume function press 7 twice To go to another track Press 4 o...

Page 35: ...ny group folder the unit recognizes them as belonging to a particular group The unit does not output a digital audio signal from the DVD OPTICAL DIGITAL OUT terminal when playing back an MP3 disc The unit plays back groups tracks on an MP3 disc in alphabetical order Ex When there are three title groups one two and three on a disc The playback order on this unit is one three then two Tracks in a gr...

Page 36: ... button the search speed increases To go back to normal play press DVD SELECT 3 or DVD 8 on the main unit To go to another group On the remote control ONLY Press GROUP SKIP 4 or GROUP SKIP while holding down SHIFT during playback GROUP SKIP 4 Goes back to the previous groups GROUP SKIP Skips to the beginning of the next or succeeding groups While playback is stopped You can select a group by press...

Page 37: ... more than one title will list the titles in a title menu Press TOP MENU to show the title menu Some DVD discs may also have a different menu which is shown by pressing MENU See the instructions of each DVD disc for its particular menu 2 Use Cursor 2 3 5 to select a desired item then press ENTER Playback of the selected item starts With some discs you can also select items by entering the correspo...

Page 38: ... of disc s contents as follows For DVD You can repeat the current title or chapter The repeat play cannot be used on some DVD discs For DVD you can select REPEAT only during playback For SVCD VCD Audio CD You can repeat a track or all tracks You can only use the repeat play on SVCD or VCD without the PBC function For MP3 disc You can repeat a group or all groups On the remote control ONLY 1 Press ...

Page 39: ... 1 ALL No indication canceled VCD CONTROL REPEAT A BREPEAT TIMESEARCH PBCCALL REPEAT ALL 1 ALL No indication canceled 7 A B repeat play Available for DVD DVD SVCD SVCD VCD VCD Anduio CD Audio CD While playing you can select a portion you want to repeat During the program play see page 37 random play see page 39 or repeat play you cannot perform the A B repeat play You cannot perform the A B repeat...

Page 40: ... play For MP3 disc You can arrange the order in which the groups play You can program up to 18 steps You cannot perform the program play while the random play is activated See page 39 On the remote control ONLY 1 Load a disc 2 Press DVD SELECT 3 then 7 The source is changed to the DVD player and playback is stopped 3 Press PLAY MODE The play mode screen appears on the TV 4 Press Cursor 3 2 to move...

Page 41: ...e or after playing To show the program screen 1 Press PLAY MODE while the program play is stopped The program screen appears on the TV If you press the button during playback the program screen appears on the TV but you cannot modify your program 2 Press Cursor 3 2 to move to PROGRAM Now you can modify your program To erase the last step press CANCEL Each time you press the button the last program...

Page 42: ...random play mode turns on and off Ejecting the disc or turning off the unit will also cancel the random play Playing at Random Random Play Available for DVD DVD SVCD SVCD VCD VCD Anduio CD Audio CD MP3 MP3 MP3 You can play disc s contents in random order For DVD You can play the titles in random order The random play cannot be used on some DVD discs For SVCD VCD Audio CD You can play the tracks in...

Page 43: ...AUDIO 1 2 3 4 5 6 7 8 9 10 0 10 DIMMER CANCEL TOP MENU SET STROBE PREV FADE MUTING BASS TREBLE FM MODE DIGITAL ECHO KEY CONTROL KEY CONTROL 3D PHONIC AHB PRO NEXT RETURN SLOW RM SUXA7DVDU REMOTE CONTROL GROUP SKIP SLOW AUX MD DVD SELECT FM AM VOLUME SHIFT TAPE ENTER MENU CHOICE COLOR ON SCREEN PLAY MODE ZOOM SUB TITLE REV MODE DIGEST CLOCK TIMER STANDBY ON DISPLAY SLEEP DVD LEVEL A P OFF REV MODE ...

Page 44: ...also play back type II and type IV tapes however the sound quality tone may not be reproduced properly Playing Back a Tape You can play back type I tapes 1 Push PUSH OPEN The cassette holder opens 2 Put a cassette in with the exposed part of the tape down 3 Push PUSH OPEN gently to close the cassette holder When the unit is turned on the TAPE indicator appears on the display 4 Press TAPE 2 3 Playb...

Page 45: ...ANGLE AUDIO 1 2 3 4 5 6 7 8 9 10 0 10 DIMMER CANCEL TOP MENU SET STROBE PREV FADE MUTING BASS TREBLE FM MODE DIGITAL ECHO KEY CONTROL KEY CONTROL 3D PHONIC AHB PRO NEXT RETURN SLOW RM SUXA7DVDU REMOTE CONTROL GROUP SKIP SLOW AUX MD DVD SELECT FM AM VOLUME SHIFT TAPE ENTER MENU CHOICE COLOR ON SCREEN PLAY MODE ZOOM SUB TITLE REV MODE DIGEST CLOCK TIMER STANDBY ON DISPLAY SLEEP DVD LEVEL A P OFF 1 2...

Page 46: ...ning of the selected chapter To erase the on screen indication press PLAY MODE again DVD CONTROL REPEAT A BREPEAT TIMESEARCH CHAP SEARCH REPEAT CHAPTER REPEAT CHAPTER DVD CONTROL REPEAT A BREPEAT TIMESEARCH CHAP SEARCH REPEAT CHAPTER GO TO CHAPTER Locating a Position by Selecting the Playing Time Time Search Available for DVD DVD SVCD SVCD VCD VCD Anduio CD Audio CD You can play a disc from the po...

Page 47: ...n the current title appear For SVCD or VCD The opening scenes of each track appear 2 Press Cursor 2 3 5 to move to a scene you want to start playback If there are more than nine scenes you can move to the next digest screen page To show other pages of the digest screen To show the next page press NEXT To show the previous page press PREV 4 Continued next page 3 Enter the playing time by pressing t...

Page 48: ...ayback starts at the selected view angle While the angle list is shown on the TV You cannot listen to the sound You can also show other pages as follows To show the previous page press Cursor 2 3 5 to select the left top scene then press Cursor 2 To show the next page press Cursor 2 3 5 to select the right bottom scene then press Cursor 3 3 Press ENTER Playback starts with the selected scene With ...

Page 49: ... FRENCH 3 3 SPANISH STEREO 1 STEREO 1 R 2 L 1 STEREO 2 L 2 R 1 STEREO STEREO R L 1 3 ENGLISH To erase the on screen indication press ENTER When selecting a language for some DVDs Its abbreviation will be shown See page 69 Selecting the Subtitle Language Available for DVD DVD SVCD SVCD While playing a disc containing subtitles in different languages you can select the subtitle to be displayed on th...

Page 50: ...utton next nine still pictures appear To cancel the strobe play press and hold STROBE so that a still picture resumes then press DVD SELECT 3 to go back to normal play Nine screens of the same pictures appear and is played frame by frame at normal speed in following cases If you press and hold STROBE for more than 1 second during normal playback If you press DVD SELECT 3 after pressing and holding...

Page 51: ...m sound You can enjoy movies in a relaxed mood THEATER You can enjoy sound effects like in a major theater in Hollywood When a DVD recorded in Dolby Digital containing more than 3 channels ACTION does not appear When the 3D PHONIC function is activated the 3D PHONIC indicator lights up on the display To erase the on screen indication press ENTER If no operation is done for about 5 seconds the on s...

Page 52: ...R ON SCREEN PLAY MODE ZOOM SUB TITLE REV MODE DIGEST CLOCK TIMER STANDBY ON DISPLAY SLEEP DVD LEVEL A P OFF REV MODE DIGEST STROBE AUX MD DVD SELECT FM AM TAPE RETURN DVD TAPE AUX MD REV MODE BASS FM AM TREBLE A U T O R E V E R S E U X A 7 DV D The buttons emphasized in the illustration below are used and explained in the following section pages 50 to 52 For recording operations you primarily use ...

Page 53: ... to protect against unexpected erasure or recording To protect your recording remove these tabs To re record on a protected tape cover the holes with adhesive tape Do not use type II and type IV tapes since the unit is not compatible with such tapes The use of the C 120 or thinner tape is not recommended since characteristic deterioration may occur and this tape easily jams in the pinch rollers an...

Page 54: ...track Recording a Disc onto a Tape Disc Synchronized Recording Available for DVD DVD SVCD SVCD VCD VCD Anduio CD Audio CD MP3 MP3 Using the disc synchronized recording method you can start and stop disc play and recording at the same time During the disc synchronized recording some operations which would affect the recording both audio and video are prohibited You can use only type I tapes for rec...

Page 55: ...cording starts from the point where you press the button and does not stop after the current chapter or track is recorded Playback also continues When you press REC while pausing a track Recording starts from that point Recording Other Sources onto a Tape You can record from FM or AM broadcasts or the sound from external equipment connected to the AUX MD jacks onto a tape You can use only type I t...

Page 56: ...ECHO KEY CONTROL KEY CONTROL 3D PHONIC AHB PRO NEXT RETURN SLOW RM SUXA7DVDU REMOTE CONTROL GROUP SKIP SLOW AUX MD DVD SELECT FM AM VOLUME SHIFT TAPE ENTER MENU CHOICE COLOR ON SCREEN PLAY MODE ZOOM SUB TITLE REV MODE DIGEST CLOCK TIMER STANDBY ON DISPLAY SLEEP DVD LEVEL A P OFF DVD SELECT FADE MUTING BASS TREBLE FM MODE DIGITAL ECHO KEY CONTROL KEY CONTROL 3D PHONIC AHB PRO VOLUME SHIFT DVD TAPE ...

Page 57: ... voice ECHO LEVEL 1 ECHO LEVEL 2 ECHO LEVEL 3 ECHO LEVEL OFF Canceled V C D ECHO 1 ECHO indicator To adjust the key You can adjust the key of the sound to fit to your voice This function is available while playing back DVDs SVCDs VCDs or Audio CDs loaded on the DVD player On the remote control ONLY Press KEY CONTROL or KEY CONTROL I to adjust the key The following display appears You can also chec...

Page 58: ...DE MUTING BASS TREBLE FM MODE DIGITAL ECHO KEY CONTROL KEY CONTROL 3D PHONIC AHB PRO NEXT RETURN SLOW RM SUXA7DVDU REMOTE CONTROL GROUP SKIP SLOW AUX MD DVD SELECT FM AM VOLUME SHIFT TAPE ENTER MENU CHOICE COLOR ON SCREEN PLAY MODE ZOOM SUB TITLE REV MODE DIGEST CLOCK TIMER STANDBY ON DISPLAY SLEEP DVD LEVEL A P OFF 1 2 3 4 5 6 7 8 9 10 0 10 TOP MENU SET ENTER MENU CHOICE SHIFT CANCEL DVD TAPE AUX...

Page 59: ...he remote control ONLY 1 Press CHOICE while holding down SHIFT The LANGUAGE menu appears on the TV 2 Press Cursor 3 2 to move to the menu you want LANGUAGE AUDIO DISPLAY or SYSTEM Ex When selecting LANGUAGE menu 3 Press Cursor 5 to move to an item you want to set A selected item shows in green Ex When selecting MENU LANGUAGE 4 Press Cursor 3 2 to select a proper setting you want 5 To set other ite...

Page 60: ... you can change the following sound settings DIGITAL AUDIO OUTPUT Set the output signal type through the DVD OPTICAL DIGITAL OUT terminal See also page 16 Select STREAM PCM when connecting an amplifier or a decoder compatible with Dolby Digital DTS and MPEG Multichannel Select PCM ONLY when connecting an amplifier compatible only with Linear PCM or a digital recording device such an MD recorder DA...

Page 61: ...OMPRESSION When listening to the sound with only Dolby Digital you can produce a powerful sound even at a low volume level by compressing the dynamic range difference between the maximum and minimum sound levels Select ON when you want to apply the compression effect useful late at night Select OFF when you want surround sound with its full dynamic range no effect applied More about COMPRESSION Th...

Page 62: ...C N PRESS KEY ENTER EXIT 1 2 3 4 8 7 6 5 5 Press the number buttons 0 9 to enter a new password 4 digits then press ENTER moves to EXIT 6 Press ENTER The parental lock level is set and the PARENTAL LOCK screen disappears To exit from the PARENTAL LOCK screen any time during the above procedure press ENTER while holding down 7 When you set the parental lock If you exit from the PARENTAL LOCK screen...

Page 63: ...0 DIMMER CANCEL TOP MENU SET STROBE PREV FADE MUTING BASS TREBLE FM MODE DIGITAL ECHO KEY CONTROL KEY CONTROL 3D PHONIC AHB PRO NEXT RETURN SLOW RM SUXA7DVDU REMOTE CONTROL GROUP SKIP SLOW AUX MD DVD SELECT FM AM VOLUME SHIFT TAPE ENTER MENU CHOICE COLOR ON SCREEN PLAY MODE ZOOM SUB TITLE REV MODE DIGEST CLOCK TIMER STANDBY ON DISPLAY SLEEP DVD LEVEL A P OFF 3 6 9 10 COLOR REV MODE DIGEST CLOCK TI...

Page 64: ...stations in advance see page 26 Using the Recording Timer With the Recording Timer you can make an unattended recording You can set the Recording Timer whether the unit is turned on or in standby mode To correct a misentry any time during the setting process press CANCEL To exit from the timer setting mode during the setting process press CLOCK TIMER repeatedly until the source indication appears ...

Page 65: ...ng on the display Each time you press the button the timer mode changes as follows 2 Press SET The source name flashes in the main display Continued next page 6 Set the timer off time 1 Press or 4 repeatedly to adjust the hour You can adjust the hour using the number buttons 2 Press SET The minute digit starts flashing 3 Press or 4 repeatedly to adjust the minute You can adjust the minute using th...

Page 66: ...be canceled and the unit will not turn off automatically in the following cases When you change the source When you turn off the Daily Timer 3 Select the source to play back 1 Press or 4 repeatedly to select the source Each time you press the button the source changes as follows You can also use the source selecting buttons When you select DVD CD or TAPE prepare it for playing back When you select...

Page 67: ... other timer settings When you adjust the clock The Sleep Timer and the Auto Power Off see page 19 can be used at the same time To sleep with the Sleep Timer and wake up with the Daily Timer The unit turns off when the shut off time comes set by the Sleep Timer and turns on when the timer on time set by the Daily Timer comes 1 Set the Daily Timer as explained on pages 62 and 63 2 Start playing bac...

Page 68: ...ied To AV COMPU LINK jack One touch DVD play Simply by starting playback on the unit the TV automatically turns on and changes the input mode to the appropriate position so that you can view the playback picture The TV does not automatically turn off even if you turn off the unit When the main power of the TV is off or the power cord of the TV is unplugged you cannot use the one touch play You can...

Page 69: ...TV or speaker Near a magnet Maintenance To get the best performance of the unit keep your discs tapes and mechanism clean General Notes In general you will have the best performance by keeping your discs tapes and the mechanism clean Store discs and tapes in their cases and keep them in cabinets or on shelves Keep the electronic swing panel closed when not in use Cleaning the unit Stains on the un...

Page 70: ...e AM loop antenna is too close to the unit The FM antenna is not properly extended and positioned The main AC power cord is not plugged in The Disc Lock function is in use The disc is upside down The unit and disc Region Code numbers are incompatible Parental lock is in use You are trying to play a CD R RW which has not been finalized The disc is dirty or scratched A VCR is connected between the u...

Page 71: ...ome DVDs are programed always to use the original language initially The audio sound of DVD is recorded at a lower level than the sounds of other discs such as VCDs or Audio CDs Files other than MP3 are included in the disc For MP3 discs some functions do not work The tape head is dirty and magnetized Power supply from the AC power cord has been cut off while the tape was running Small tabs on the...

Page 72: ...wati ST Sesotho SU Sundanese SV Swedish SW Swahili TA Tamil TE Telugu TG Tajik TH Thai TI Tigrinya TK Turkmen TL Tagalog TN Setswana TO Tonga TR Turkish TS Tsonga TT Tatar TW Twi UK Ukrainian UR Urdu UZ Uzbek VI Vietnamese VO Volapuk WO Wolof XH Xhosa YO Yoruba ZU Zulu Table of Language Codes This table is used when you select an audio language or a subtitle language see page 46 and when you selec...

Page 73: ...BD Bangladesh BE Belgium BF Burkina Faso BG Bulgaria BH Bahrain BI Burundi BJ Benin BM Bermuda BN Brunei Darussalam BO Bolivia BR Brazil BS Bahamas BT Bhutan BV Bouvet Island BW Botswana BY Belarus BZ Belize CA Canada CC Cocos Keeling Islands CF Central African Republic CG Congo CH Switzerland CI Côte d Ivoire CK Cook Islands CL Chile Table of Country Area Codes This table is used when you set a c...

Page 74: ...union RO Romania RU Russian Federation RW Rwanda SA Saudi Arabia SB Solomon Islands SC Seychelles SD Sudan SE Sweden SG Singapore SH Saint Helena SI Slovenia SJ Svalbard and Jan Mayen SK Slovakia SL Sierra Leone SM San Marino SN Senegal SO Somalia SR Suriname ST Sao Tome and Principe SV El Salvador SY Syrian Arab Republic SZ Swaziland TC Turks and Caicos Islands TD Chad TF French Southern Territor...

Page 75: ...IDEO Super Video CD Video CD Audio CD Dynamic range 98 dB Horizontal resolution 500 lines Wow and flutter Immeasurable Specifications Design and specifications are subject to change without notice Cassette deck Frequency response Normal type I 60 Hz 14 000 Hz Wow and flutter 0 15 WRMS General Power requirement AC 220 V 50 Hz Power consumption At operation 95 W On standby 14 W 1 5 W in power save m...

Page 76: ...J VC 0303MWMMDWJEM EN CS 2003 VICTOR COMPANY OF JAPAN LIMITED Registered Trademark owned by VICTOR COMPANY OF JAPAN LTD ...

Reviews: