Record your performance
Record quickly
You can record pad performances and the Drums as accompaniment.
KIT01 POP01
SONG01 DRUM ON
CLICK=4/4 TEMPO=100
1. Press [RECORD]. Recording LED lights up,
2.
Strike pad to record or record the drum section
of the song.
3.
Press [RECORD] again to stop recording.
Recording LED lights off. Your performance or
the drum section has been recorded.
(Note: when recording, you need to turn on DRUM ON, that is to switch DRUM OFF to DRUM ON)
19
Play back performance
1. Press [PLAY].LED flashes once. It plays the recorded performance.
2. Press [PLAY] again to stop playing.
3. If you are unsatisfied with the recorded performance, press [RECORD] to record once again.
(Note: it can record the performance but can not save. This means the recorded performance
will cover the former recorded performance)
20
MIDI connection
This device is compatible with various MIDI devices. When it is used as trigger device or audio
source, it is compatible with GM standard, and can be used with many sequencer software
MIDI IN: inputs MIDI signal when connecting with external MIDI device
MIDI OUT
:
outputs MIDI signal when connecting with external MIDI device
USB: standard USB2.0 interface
,
connect with USB of MIDI device or PC. The operation system
has relative driver without the need to install again. Compatible with the PC system, e.g. Xp
,
Win7,Vista,Mac OSX . After connection, the system recognizes this device as USB AUDIO DEVICE
。
(USB only used for MIDI connection
)
via USB
Note: when USB connects with PC, all MIDI data can transfer
MIDI setting
Connect with external audio device
This device automatically via channel 10 transfers drum signal to other MIDI device, including notes,
forces, pedal performance, etc.
(Note:
)
Song playback data and metronome notes are not transferred
Record your performance with external sequencer
1
.
Connect with external sequencer or PC via MIDI OUT or USB interface.
2
.
Use the sequencer or the software to set channel 10 as a device to start recording.
3
.
Play the drum pads.
4
.
Stop performance and recording. Playback the recording.
Setting MIDI note number to be transferred/received by each pad
1
.
Press VOICE button to enter the VOICE menu.
2
.
Strike the relative pad, use direction key to select MIDI PITCH
3
.
Use the left/right key to MIDI value for a pad.
4
.
Press save button to save USER drum kit.
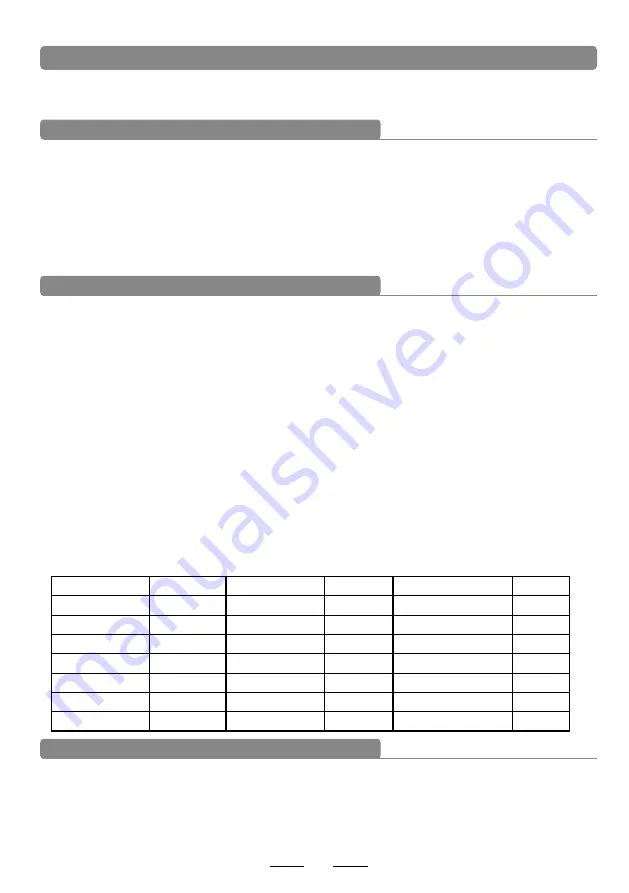
Default factory setting as below
:
When MIDI OUT or USB cable is connected with MIDI device or sequencer, it receives MIDI output
signal and this device can play this signal. The voice changes while drum kit changes. This device
has most part of the GM drum kit. User can create the own drum kits for performance.
Refer to the MIDI list for the support and limitation
Change pad voice
TRIGGER
NOTE
TRIGGER
NOTE
TRIGGER
NOTE
KICK
36
TOM3
43
CRASH2 RIM
52
SNARE
38
TOM3 RIM
58
RIDE
51
SNARE RIM
37
TOM4
41
RIE RIM
59
TOM1
48
TOM4 RIM
39
HI-HAT PEDAL
44
TOM1 RIM
50
CRASH1
49
HI-HAT OPEN
46
TOM2
45
CRASH1 RIM
55
HI-HAT CLOSED
42
TOM2 RIM
47
CRASH2
57
Summary of Contents for JED700M
Page 1: ...Module SKD203 OWNER S GUIDE JustIn JED700M E Drumset ...
Page 24: ...21 MIDI list BEND 99H ...
Page 25: ...22 Position On Off Sensing ...
Page 31: ...Demo Song list 28 ...


