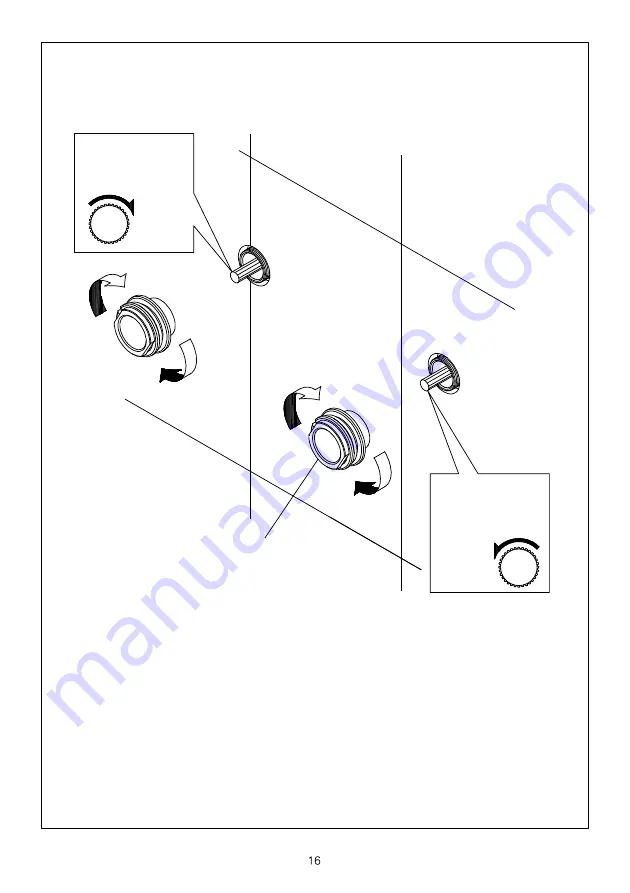
* Screw the
Base of Handle
to the shanks of
hot and cold valves
till against finished wall.
將冷熱水開關轉至關水位置,熱水開關順時鐘轉到底關閉,冷水開
關逆時鐘轉到底關閉。接著取把手座鎖入左右牙管並鎖緊。
close
hot valve
熱水開關
cold valve
冷水開關
關
B. Base of Handle
把手座
Page 1: ...www justime com MADE IN TAIWAN 040917 000 INSTALLATION INSTRUCTIONS Wall Mounted Basin Mixer Two Handle Valve Applicable Product Number 6777 92 81CP 6777 9H 81CP 6777 9H 82CP...
Page 2: ...ing to the entire surface 3 Wipe surfaces clean and rinse completely with water immediately after applying cleaner Do not soak with cleaners Rinse and dry any overspray that lands on nearby surfaces 4...
Page 3: ...A Valve Body X 1 with sleeve FIXING CONTENTS B Base of Handle 2 with Packing C Handle 1 with Red Mark D Handle 1 with Blue Mark OR OR...
Page 4: ...FIXING CONTENTS E Connector X 1 with Gasket H Spout X 1 F Nipple X 2 G Flange X 1 with O Ring O ring J Key for Aerator X 1 I Hex Key 2 5mm X 1 2 5mm 6777 92 81CP FIXING CONTENTS For 6777 92 81CP...
Page 5: ...y and keep the distance between 2 5cm minimum and 3 7 6cm maximum from the Finished Wall to the center of Valve Body or keep the distance be 0 4 1 1cm to 1 5 3 7cm between top of cartridge and Finishe...
Page 6: ...Finished Wall 2 5cm MIN 3 7 6cm MAX Water Supplies...
Page 7: ...Valve Body Cover Use Sleeves to protect the cartridge and thread before installation and Sleeves could be removed only after complete the finished wall Remove the Covers of cold and hot inlets before...
Page 8: ...6cm maximum from the Finished Wall to the center of Valve Body or keep the distance be 0 4 1 1cm to 1 5 3 7cm between top of cartridge and Finished Wall for necessary conditions 2 5cm 3 7 6cm 0 4 1 1c...
Page 9: ...7 1 9cm or Available distance for different Nipple Available distance from Finished Wall for Nipple Long is 0 3 0 8cm 0 7 1 9cm for Nipple Short is 0 7 1 9cm 1 3 3 4cm Nipple Long Nipple Short Finish...
Page 10: ...pe compound or thread sealant tape and then screw it to the Valve Body Screw and tighten Connector with Gasket to the Nipple In case of forgetting the choosing parts it could be checked again by the d...
Page 11: ...3 6cm 1 4 3 6cm 1 8 4 6cm or Available distance for different Nipple Available distance from Finished Wall for Nipple Short is 0 8 2 1cm 1 4 3 6cm for Nipple Long is 1 4 3 6cm 1 6 4 6cm Nipple Long N...
Page 12: ...t I Hex Key 3 0mm 3 0mm Set Screw X2 Insert the Spout into the Valve Body confirm the direction of Spout tighten the set screws of Connector to fix the Spout and then screw Flange with O Ring to the C...
Page 13: ...Screw the Base of Handle to the shanks of hot and cold valves till against finished wall close hot valve cold valve close B Base of Handle...
Page 14: ...rk D Handle 1 with Blue Mark Confirm Hot Valve and Cold Valve have been turned to closed position before install the Handle Press both hot and cold Handles onto valve spindles until hear the click sou...
Page 15: ...cold water supply hot water supply outlet Install hot and cold water supply pipes and outlet Installation Steps For 6777 9H 81CP...
Page 16: ...Install hot and cold water supply pipes and outlet cold water supply hot water supply outlet Installation Steps For 6777 9H 82CP...
Page 17: ...Screw the Base of Handle to the shanks of hot and cold valves till against finished wall close hot valve cold valve close B Base of Handle...
Page 18: ...rk D Handle 1 with Blue Mark Confirm Hot Valve and Cold Valve have been turned to closed position before install the Handle Press both hot and cold Handles onto valve spindles until hear the click sou...
Page 19: ...Finish Installation 6777 92 81CP 6777 9H 81CP 6777 9H 82CP...
Page 20: ...stuck in faucet water way Using water not adhered to the regulations of national standard Deficiency caused by freeze Not showing this warranty card Not filling out in the blank of name of customer d...