


7
2. Safety instructions
2.1 Warnings
Children are unaware of the dangers that electrical machines
represent. Therefore children should never be left unsupervised
with electrical machines.
This machine should only be used by people who have read and
understood the operating instructions.
Never use a faulty machine or one with a damaged power cable.
Never immerse the machine in water.
2.2 Safety precautions
Never expose the machine to the effects of rain, snow or frost
and never operate it with wet hands.
Place your machine on a solid level surface. Never leave it on a
surface that is warm or hot (hob etc.). Choose a location that is
inaccessible for children or pets.
Remove plug from power socket if an absence for a longer
period of time (holidays etc.) is planned.
Always remove plug from power socket before cleaning.
When removing plug from power socket, never tug on the cord
or on the machine itself.
Never repair or open the machine yourself. All repairs should be
performed by authorised service centres only using original Jura
spare parts and accessories.
The machine is connected to the mains power socket via an
electric cable. Ensure that no-one trips over this cable and pulls
down the machine. Keep children and animals at a distance to
the machine.
Never put the machine or even parts of it in the dishwasher.
To prevent overheating place the machine in an airy place.
Important information for the user
Thank you for choosing this Jura product.
Please study these instructions carefully before using your new
machine and keep them in a safe place for easy reference in the
future.
Should you require further information or should particular pro-
blems occur that are not dealt with in these operating instructions
in sufficient detail for you, then please ask your local dealer for
the information you require or contact Jura Elektroapparate AG
directly.
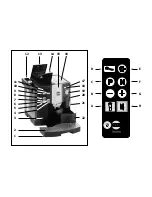
1. Description
This fully-automatic espresso/coffee machine impresses because of
its user-friendly operational mode and its ingenious technology. In
just one brewing-process it can prepare 1 or 2 cups of excellent,
professional-quality espresso/coffee with guaranteed froth. Origi-
nating from professional sectors and having been refined and fur-
ther developed by Jura, the Intelligent Pre Brew Aroma System
(I.P.B.A.S
©
) ensures full coffee aroma. The Impressa S70 enables
you to adapt the resulting coffee to your personal taste due to the
possibility of programming coffee-powder and water quantities as
well as the brewing temperature.
The machine works fully-automatically at the press of a key. A
decoded text-display shows messages and simplifies the operation
considerably. Because of the integrated rinsing, cleaning and
decalcifiying programs care and maintenance is quick and easy.
E


