


SSG 20 Hardware Installation and Configuration Guide
14
Connect the Device to a Network
Connect an SSG Device to an Untrusted Network
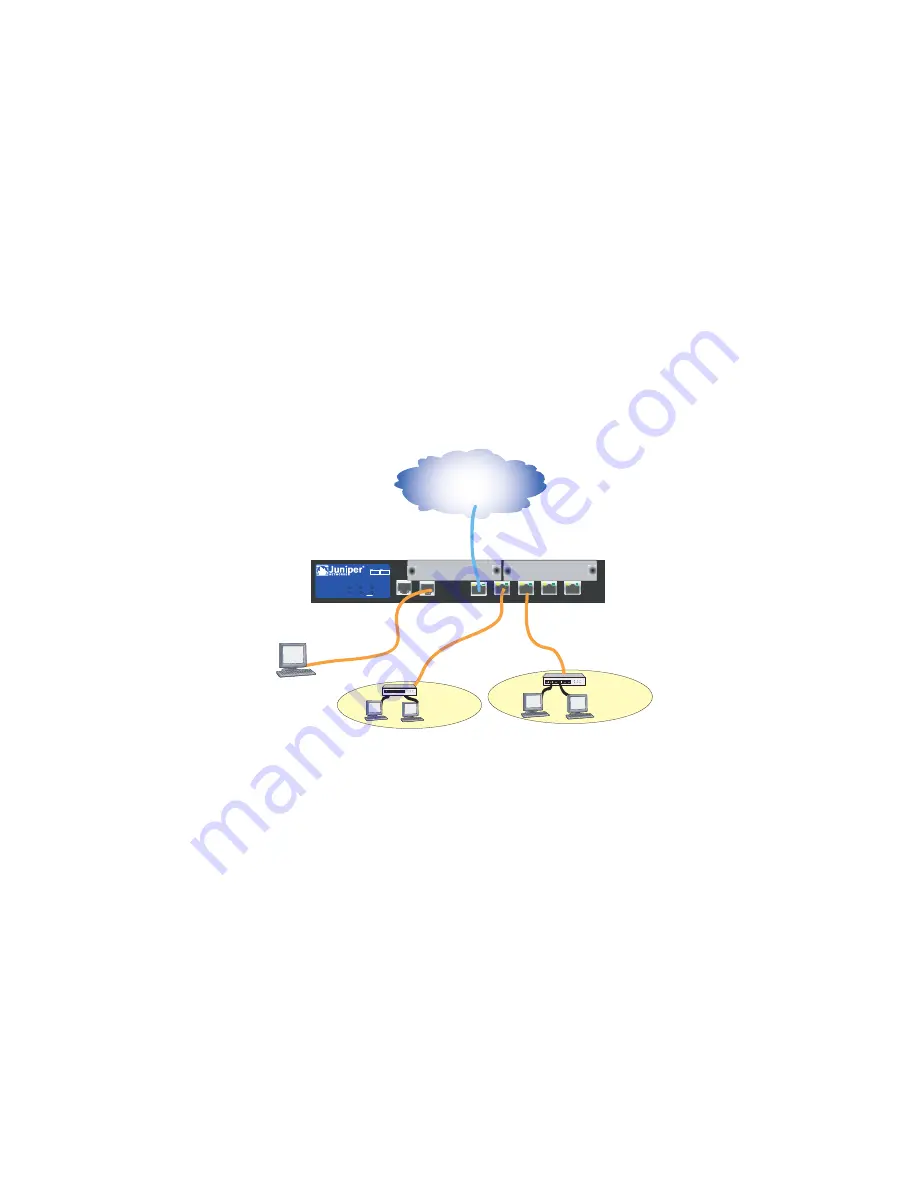
Figure 5 shows basic network cabling connections for a device. This figure shows
two blank PIMs and the 10/100 Ethernet ports are cabled as follows:
The port labeled 0/0 (ethernet0/0 interface) is connected to the untrust
network.
The port labeled 0/1 (ethernet0/1 interface) is connected to a switch that
connects workstations on the DMZ LAN.
The ports labeled 0/2 through 0/4 (ethernet0/2 through ethernet0/4 interfaces)
are connected to a switch that connects workstations to the trusted network.
The console port is connected to a serial terminal for management access.
Figure 5: Basic Networking Example
Connect Mini PIMs to an Untrusted Network
This section explains how to connect the device mini PIMs to an untrusted network.
Connecting the ADSL2/2+ Mini PIM
Connect the provided ADSL cable from the ADSL2/2+ mini PIM to your telephone
outlet. The ADSL port on the Annex A version of the device uses an RJ-11 connector,
while the Annex B version uses an RJ-45 connector. In the case of Annex B models,
the cable you connect from the ADSL port to the telephone outlet is identical in
appearance and wiring to a straight through 10 Base-T Ethernet cable.
Connecting Splitters and Microfilters
A
signal splitter
divides the telephone signal into low-frequency voice signals for
voice calls and high-frequency data signals for data traffic. Your service provider
usually installs the splitter as part of the equipment that connects your site
telephone lines to the provider network.
There are also splitters that you may be able to install yourself, depending upon
your service-provider equipment. If you are installing such a splitter yourself,
AUX
0 / 0
10 /100
AUX
0 /0
10/100
0 /0
10/100
0/ 0
10 /100
0/ 0
10 /100
LINK
STATUS
POWER
PIM 2
PIM 1
b/g
802.11a
WLAN
SSG 20
1
2
Internet
bgroup0interface (ethernet0/2 —ethernet0/4)
Trust Zone
DMZ Zone
console
untrust interface
Summary of Contents for SSG 20-WLA
Page 5: ...Table of Contents Table of Contents v Index IX 1...
Page 6: ...vi Table of Contents SSG 20 Hardware Installation and Configuration Guide...
Page 20: ...SSG 20 Hardware Installation and Configuration Guide 10 Back Panel...
Page 50: ...SSG 20 Hardware Installation and Configuration Guide 40 Reset the Device to Factory Defaults...
Page 56: ...SSG 20 Hardware Installation and Configuration Guide 46 Memory Upgrade...
Page 60: ...SSG 20 Hardware Installation and Configuration Guide IV Connectors...
Page 80: ...SSG 20 Hardware Installation and Configuration Guide XX...
Page 82: ...2 Index SSG 20 Hardware Installation and Configuration Guide...


