


CHAPTER 15
Replacing Gigabit-Backplane Physical
Interface Modules
•
Replacing Gigabit-Backplane Physical Interface Modules on the SRX300 Series and
SRX550 High Memory Services Gateways
•
Removing a Gigabit-Backplane Physical Interface Module on page 99
•
Installing a Gigabit-Backplane Physical Interface Module on page 100
•
Removing a Blank Gigabit-Backplane Physical Interface Module Faceplate on page 102
•
Installing a Blank Gigabit-Backplane Physical Interface Module Faceplate on page 102
Removing a Gigabit-Backplane Physical Interface Module
To remove a GPIM from the services gateway:
1.
Attach an electrostatic discharge (ESD) grounding strap to your bare wrist, and connect
the strap to one of the ESD points on the chassis. For more information about ESD,
see
“Preventing Electrostatic Discharge Damage to the SRX300 Series and SRX550
High Memory Services Gateway” on page 94
.
2.
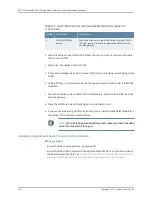
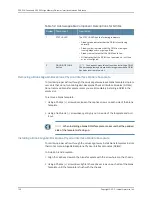
Push the OFFLINE button to turn the GPIM offline. After the STATUS LED light turns
off, it is safe to remove the GPIM. See
for a description of LED
indications for hot-swappable GPIM components.
Table 51: LED Indications for Hot-Swappable GPIM Components
Description
Component
Number
The STATUS LED has the following indicators:
•
Solid green indicates that the GPIM is functioning normally.
•
Solid yellow indicates that the GPIM is starting up, running
diagnostics, or going offline.
•
Solid red indicates that the GPIM has failed.
•
Off indicates that the GPIM is not powered on, is offline,
or is not configured.
STATUS LED
1
99
Copyright © 2017, Juniper Networks, Inc.