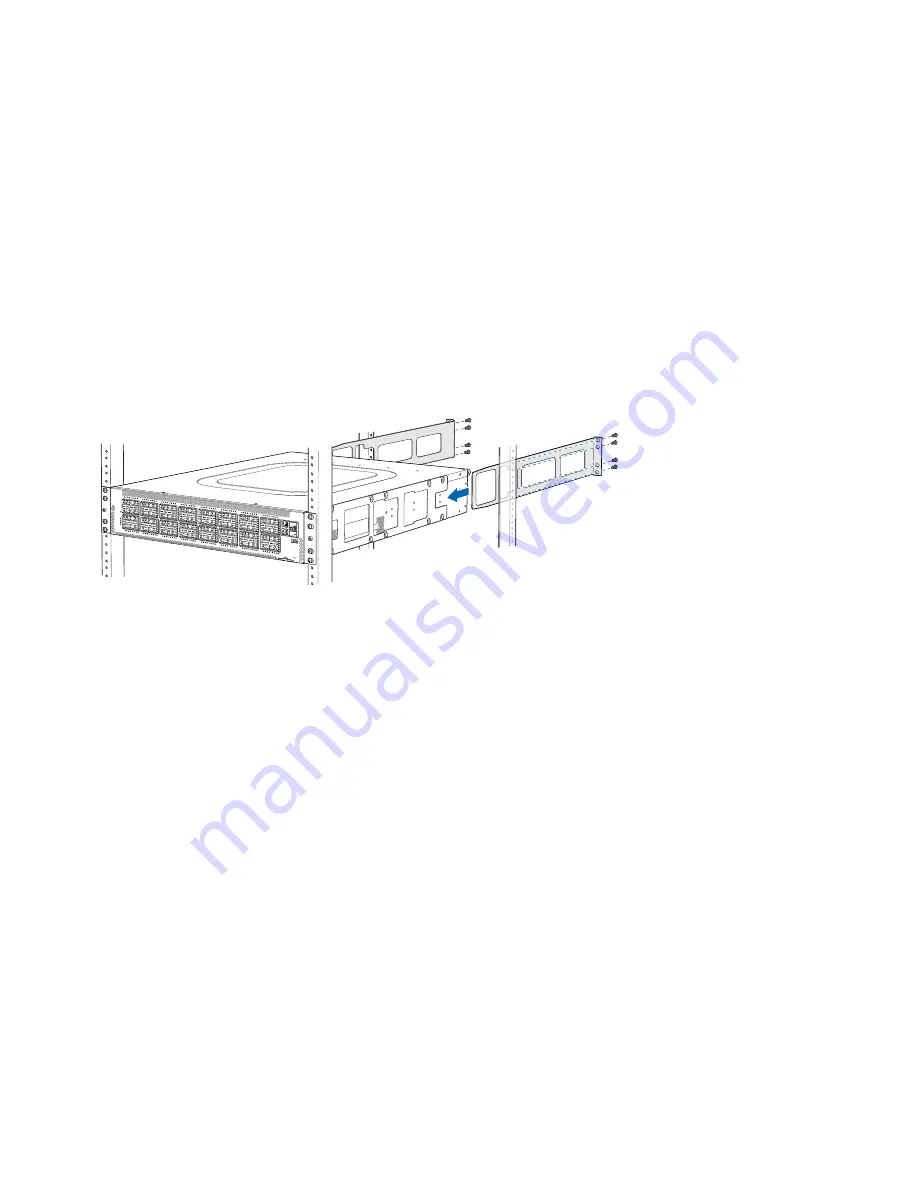
Juniper QFX5210 Quick Start Manual Download Page 3

6. Repeat steps

4

and

5

on the opposite side of the device.

7. Have one person grasp both sides of the unit, lift it, and position it in the rack so that the mounting rail is aligned with

the rack holes.

8. Have a second person secure the front of the device to the rack using four mounting screws (and cage nuts and washers

if your rack requires them). Tighten the screws.

9. Continue to support the device while sliding the mounting blades into the channel of the mounting rails and securing

the blades to the rack. Use the four mounting screws (and cage nuts and washers if your rack requires them) to attach

each blade to the rack. Tighten the screws. See

Figure 2

.

Figure 2: Slide Blades into Mounting Rails and Attach to the Rack

g050834

10. Ensure that the chassis is level by verifying that all the screws on the front of the rack are aligned with the screws at

the back of the rack.

11. Attach a grounding cable to earth ground and then attach it to the chassis grounding points.

Connect Power to the Device

The device is supplied with two factory-installed power supplies. To connect power to an AC-powered switch:

1. If the AC power source outlet has a power switch, set it to the OFF (0) position.

2. Insert the coupler end of the power cord into the AC power cord inlet on the AC power supply faceplate.

3. Push the power cord retainer onto the power cord.

4. Insert the power cord plug into the power source outlet.

3

Summary of Contents for QFX5210

Page 1: ...64C is available in AC and DC power models Mount QFX5210 64C models only in a four post rack This procedure describes the installation into a four post rack and connecting AC power For DC connection procedures see the complete QFX5210 hardware documentation at https www juniper net documentation To install a Juniper Networks QFX5210 you need Electrostatic discharge ESD grounding strap not provided...

Page 2: ...int NOTE If you are mounting multiple units in the rack mount the heaviest device at the bottom and mount the others from bottom to top in order of decreasing weight The QFX5210 64C weighs approximately 31 09 lb 14 1 kg with power supplies and fans installed Installing these devices in a rack or cabinet requires two people to lift the switch and secure it to the rack 2 Place the rack in its perman...

Page 3: ...each blade to the rack Tighten the screws See Figure 2 Figure 2 Slide Blades into Mounting Rails and Attach to the Rack g050834 10 Ensure that the chassis is level by verifying that all the screws on the front of the rack are aligned with the screws at the back of the rack 11 Attach a grounding cable to earth ground and then attach it to the chassis grounding points Connect Power to the Device The...

Page 4: ... are stored For more information about using ZTP for provisioning the device see Understanding Zero Touch Provisioning Before you begin connecting and configuring a QFX5210 set the following parameter values on the console server or PC Baud Rate 9600 Flow Control None Data 8 Parity None Stop Bits 1 DCD State Disregard To connect and configure the switch from the console 1 Connect the console port ...

Page 5: ...0 family inet address address prefix length NOTE The management port em0 C0 is found on the FRU end of the QFX5210 switch 9 Optional Configure the static routes to remote prefixes with access to the management port edit root set routing options static route remote prefix next hop destination ip retain no readvertise 10 Enable telnet service edit root set system services telnet NOTE When Telnet is ...

Page 6: ...the hardware guide Manually installing the device in a rack or cabinet at a height above 60 in 152 4 cm requires two people to lift the unit and install mounting screws To prevent injury keep your back straight and lift with your legs not your back If the rack or cabinet has stabilizing devices install them in the rack before mounting or servicing the switch in the rack or cabinet Before installin...

Page 7: ...United States and other countries All other trademarks service marks registered marks or registered service marks are the property of their respective owners Juniper Networks assumes no responsibility for any inaccuracies in this document Juniper Networks reserves the right to change modify transfer or otherwise revise this publication without notice Copyright 2019 Juniper Networks Inc All rights ...

Reviews: