background image

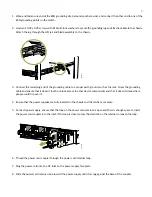
1. Wrap and fasten one end of the ESD grounding strap around your bare wrist, and connect the other end to one of the

ESD grounding points on the switch.

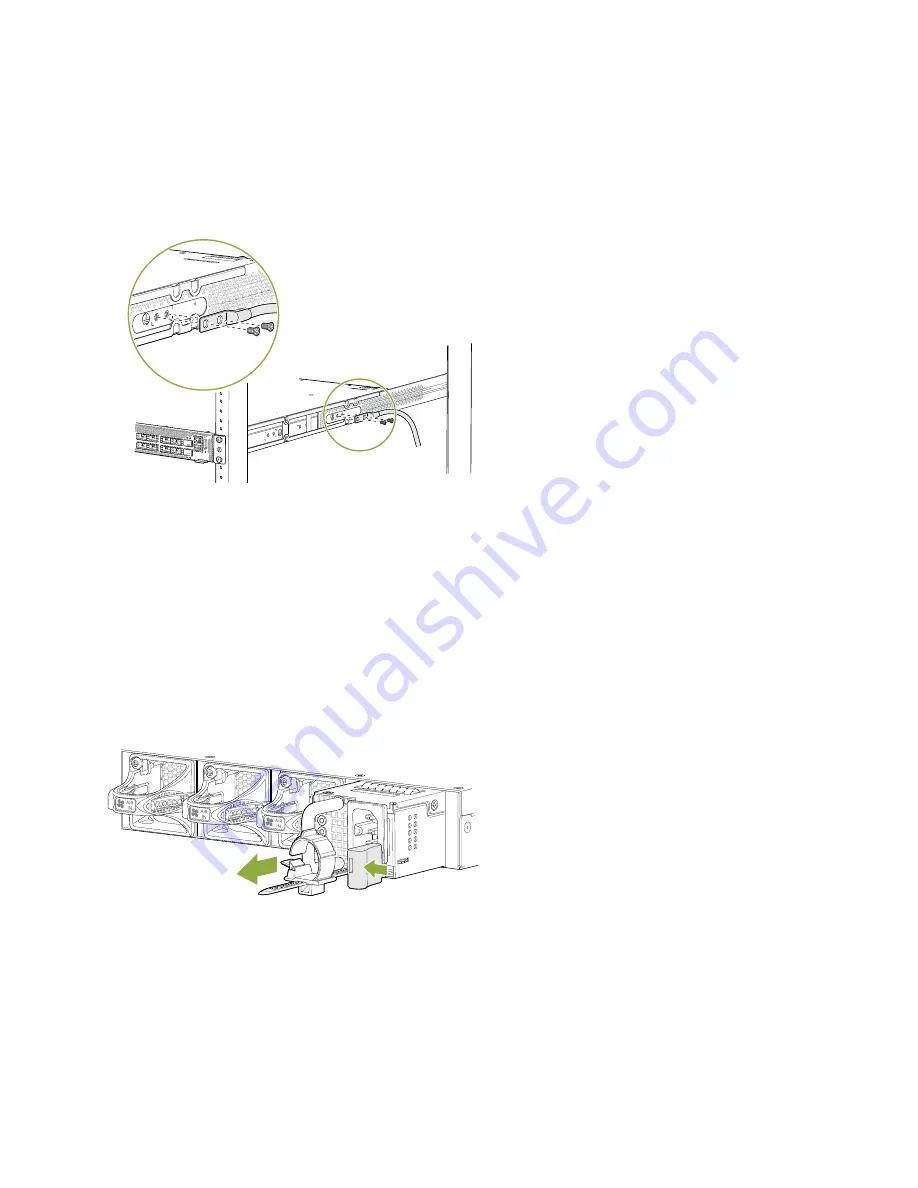
2. Use two 10-32 x 0.25 screws with #10 split-lock washers to secure the grounding lug and attached cable to the chassis.

Attach the lug through the left rail and blade assembly to the chassis.

g051317

3. Connect the remaining end of the grounding cable to a proper earth ground, such as the rack. Dress the grounding

cable and ensure that it doesn’t touch or block access to other device components and that it doesn’t drape where

people could trip over it.

4. Ensure that the power supplies are fully inserted in the chassis and the latches are secure.

5. For each power supply, ensure that the loop on the power cord retainer is open and there’s enough space to insert

the power cord coupler into the inlet. If the loop is closed, press the small tab on the retainer to loosen the loop.

g051289

6. Thread the power cord coupler through the power cord retainer loop.

7. Plug the power cord into the AC inlet on the power supply faceplate.

8. Slide the power cord retainer loop toward the power supply until it is snug against the base of the coupler.

5

Summary of Contents for QFX5130

Page 1: ...ng with your new QFX5130 32CD switch We ve simplified and shortened the installation and configuration steps and included how to videos You ll learn how to install the QFX5130 in a rack power it up and deploy it on your network NOTE Are you interested in getting hands on experience with the topics and operations covered in this guide Visit Juniper Networks Virtual Labs and reserve your free sandbo...

Page 2: ...0 Gbps 25 Gbps 40 Gbps 100 Gbps and 400 Gbps speeds The QFX5130 32CD switches are available with either a front to back or back to front airflow and with dual AC power supplies Install the QFX5130 32CD IN THIS SECTION What s in the Box 2 What Else Do I Need 3 Install the QFX5130 32CD in a Four Post Rack 3 What s in the Box QFX5130 32CD switch Two power cords appropriate for your geographic locatio...

Page 3: ... rack 1 Review the General Safety Guidelines and Warnings 2 Wrap and fasten one end of the ESD grounding strap around your bare wrist and connect the other end to a site ESD point 3 Decide which end of the switch you want to place at the front of the rack Position the switch so that the AIR IN labels are next to the cold aisle and the AIR OUT labels are next to the hot aisle 4 Attach the mounting ...

Page 4: ...h in place and have the second person slide the mounting blades into the channel of the mounting rails 8 Screw the mounting blades to the rack using the rack mount screws and cage nuts and washers if your rack requires them g051312 9 Check that the mounting brackets on each side of the rack are level NOTE If you have unused ports plug them using dust covers to prevent dust from entering the switch...

Page 5: ...n t touch or block access to other device components and that it doesn t drape where people could trip over it 4 Ensure that the power supplies are fully inserted in the chassis and the latches are secure 5 For each power supply ensure that the loop on the power cord retainer is open and there s enough space to insert the power cord coupler into the inlet If the loop is closed press the small tab ...

Page 6: ...u connect it to power It doesn t have a power switch 11 Plug in the power cord to the AC power source outlet 12 If the AC power source outlet has a power switch turn it on 13 Verify that the AC LEDs on each power supply are lit green Step 2 Up and Running IN THIS SECTION Plug and Play 7 Customize the Basic Configuration 7 Now that the QFX5130 32CD is powered on let s do some initial configuration ...

Page 7: ... switch Hostname Root authentication password Management port IP address Default gateway IP address Optional SNMP read community location and contact information 1 Verify that your laptop or desktop PC has these default serial port settings Baud Rate 9600 Flow Control None Data 8 Parity None Stop Bits 1 DCD State Disregard 2 Connect the console port on the QFX5130 32CD to a laptop or desktop PC us...

Page 8: ...on the right side of the port panel and is labeled MGMT NOTE Although the CLI permits you to configure two management Ethernet interfaces within the same subnet only one interface is usable and supported at any point of time edit root set interfaces re0 mgmt 0 unit 0 family inet address address prefix length 9 Create a routing instance edit root edit routing instances mgmt_junos root set routing i...

Page 9: ...h as root through SSH include the root login statement edit system services ssh root root login allow deny deny password NOTE By default users are not allowed to log in to the switch as root through SSH 15 Commit the configuration Your changes become the active configuration for the switch edit root commit Step 3 Keep Going IN THIS SECTION What s Next 10 Learn With Videos 10 Congratulations Your Q...

Page 10: ...and reserve your free Junos Day One Experience sandbox today You ll find the sandbox in the stand alone category Get hands on experience with the procedures covered in this guide Learn With Videos Our video library continues to grow We ve created many many videos that demonstrate how to do everything from install your hardware to configure advanced Junos OS network features Here are some great vid...

Page 11: ...ervice marks registered marks or registered service marks are the property of their respective owners Juniper Networks assumes no responsibility for any inaccuracies in this document Juniper Networks reserves the right to change modify transfer or otherwise revise this publication without notice Copyright 2021 Juniper Networks Inc All rights reserved Rev 03 December 2021 11 ...

Reviews: