background image

NFX350 Front Panel and Rear Panel

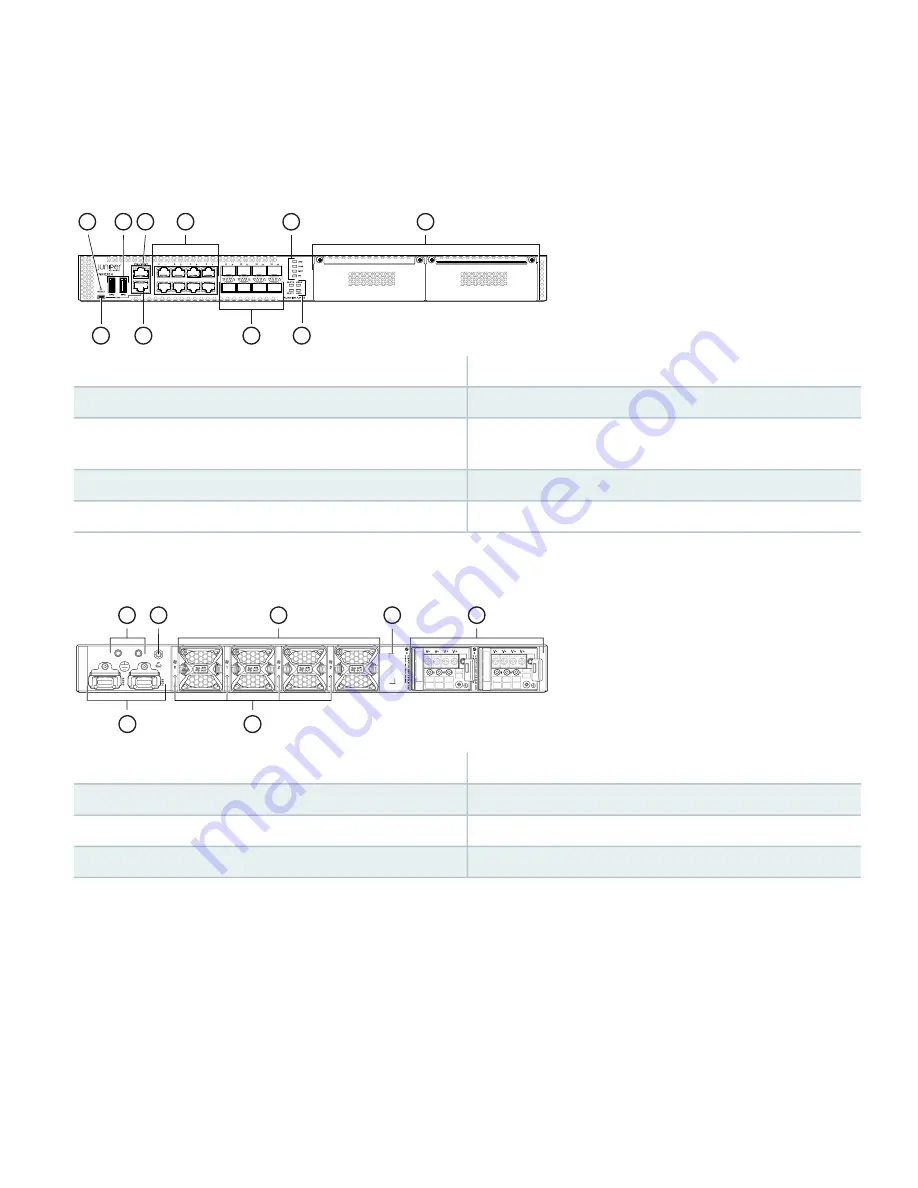
Figure 1: Front Panel Components of NFX350

g100800

6

5

4

1

3

2

8

7

10

9

6

1

Two expansion slots

Reset button

7

2

SSD and slot status LEDs

Two USB 3.0 ports

8

3

Eight 1-Gigabit Ethernet/10-Gigabit Ethernet SFP+ WAN

ports

One 10/100/ 1000BASE-T RJ-45 management port

9

4

RJ-45 console port

Eight 10/100/ 1000BASE-T RJ-45 LAN ports

10

5

Mini-USB console port

System status LEDs

Figure 2: Rear Panel Components of NFX350

g100802

4

3

5

1

2

7

6

5

1

Two power supply units

Grounding point

6

2

Fan status LEDs

Electrostatic discharge (ESD) point

7

3

Two SSD trays

Four fans

4

CLEI code

Mounting an NFX350 Device on Four Posts in a Rack or
Cabinet

To mount an NFX350 device on a rack, you require the parts that are shipped with the device along with the following

additional parts and equipment. These are not shipped with the device.

3

Summary of Contents for NFX350

Page 1: ...versal customer premises equipment uCPE platform that delivers virtualized network and security services on demand Leveraging Network Functions Virtualization NFV and built on the Juniper Cloud CPE solution NFX350 enables service providers to deploy and chain multiple secure high performance virtualized network functions VNFs on a single device The NFX350 is suited for large and extra large deploy...

Page 2: ...mbers on the Juniper Networks website and update the installation base data if there is any addition or change to the installation base or if the installation base is moved Juniper Networks will not be held accountable for not meeting the hardware replacement service level agreement for products that do not have registered serial numbers or accurate installation base data Register your product at ...

Page 3: ...10 100 1000BASE T RJ 45 LAN ports 10 5 Mini USB console port System status LEDs Figure 2 Rear Panel Components of NFX350 g100802 4 3 5 1 2 7 6 5 1 Two power supply units Grounding point 6 2 Fan status LEDs Electrostatic discharge ESD point 7 3 Two SSD trays Four fans 4 CLEI code Mounting an NFX350 Device on Four Posts in a Rack or Cabinet To mount an NFX350 device on a rack you require the parts t...

Page 4: ...lips screwdriver number 2 Management host such as a PC or laptop with a serial port Two 10 32 x 25 inch screws with 10 split lock washer Two 10 flat washers Grounding cable minimum 14 AWG 2 mm minimum 90 C wire grounding lug Panduit LCC10 14BWL or equivalent a pair of 10 32x 25 in screws and a pair of flat washers 4 ...

Page 5: ...decreasing weight CAUTION Wrap and fasten one end of the ESD grounding strap around your wrist and connect the other end to a site ESD point To mount the device on a rack 1 Align the mounting brackets along the front or rear of the side panels of the chassis depending on whether you will front mount or rear mount the device and attach the mounting brackets to the chassis by using the mounting brac...

Page 6: ...nd connect the other end to a site ESD point NOTE Ensure that you ground AC powered systems by attaching one end of the grounding cable to earth ground and the other end to the chassis grounding points To connect the device to the power supply 1 Set the power switch on the device to the off O position 2 Insert the power cord plug into the power source outlet and power cord coupler into the chassis...

Page 7: ...68 1 1 24 N A N A fxp0 MGMT Table 3 LTE Interfaces IP Address Security Zone Interface N A N A cl 1 1 0 ISP assigned untrust dl0 logical The NFX350 device is shipped with the following services enabled by default DHCP HTTPS and TFTP To provide secure traffic a basic set of screens are configured on the untrust zone Access the NFX350 Device 1 Ensure that the NFX350 device is powered on 2 Connect to ...

Page 8: ...se any terminal emulation program such as HyperTerminal to connect to the device console The CLI displays a login prompt 4 Log in as root If the software completes booting before you connect to the console you might need to press the Enter key for the prompt to appear login root 5 Start the CLI root cli root 6 Enter configuration mode root configure edit root 7 Change the password for the root adm...

Page 9: ...ss by the ISP through DHCP Figure 4 Connecting the Interfaces on an NFX350 Device g100816 Internet NOTE The LTE expansion module must be purchased separately Optionally you can obtain a SIM card from the ISP and connect the device through LTE For more information about SIM card activation see the How to Configure NFX350 available at https www juniper net documentation en_US release independent jun...

Page 10: ...I see the How to Configure NFX350 available at https www juniper net documentation en_US release independent junos information products pathway pages nfx series product Safety Warnings Summary This is a summary of safety warnings For a complete list of warnings including translations see the NFX350 documentation at https www juniper net documentation en_US release independent junos information pro...

Page 11: ...back straight and lift with your legs not your back If the rack has stabilizing devices install them in the rack before mounting or servicing the device in the rack Before installing or after removing an electrical component always place it component side up on an antistatic mat placed on a flat stable surface or in an antistatic bag Do not work on the device or connect or disconnect cables during...

Page 12: ...service marks registered marks or registered service marks are the property of their respective owners Juniper Networks assumes no responsibility for any inaccuracies in this document Juniper Networks reserves the right to change modify transfer or otherwise revise this publication without notice Copyright 2020 Juniper Networks Inc All rights reserved Rev 01 March 2020 12 ...

Reviews:

Related manuals for NFX350