Configuring Secure Web Access
Before You Begin
Before you begin initial configuration, complete the following tasks:
Establish basic connectivity. See “Establishing Basic Connectivity” on page 93.
Obtain an SSL certificate from a trusted signing authority. See “Generating SSL
Certificates” on page 117.
Generating SSL Certificates
To enable secure Web access, you must first generate a digital SSL certificate,
and then enable HTTPS access on the Services Router.
To generate an SSL certificate:
1.
Enter the following
openssl
command in your Secure Shell command-line
interface. The
openssl
command generates a self-signed SSL certificate in
the privacy-enhanced mail (PEM) format. It writes the certificate and an
unencrypted 1024-bit RSA private key to the specified file.
% openssl req –x509 –nodes –newkey rsa:1024 –keyout
filename
.pem -out
filename
.pem
Replace
filename
with the name of a file in which you want the SSL certificate
to be written—for example,
new.pem
.
2.
When prompted, type the appropriate information in the identification form.
For example, type
US
for the country name.
3.
Display the contents of the file
new.pem
.
cat new.pem
Copy the contents of this file for installing the SSL certificate.
Use can use either J-Web Quick Configuration or a configuration editor
to install the SSL certificate and enable HTTPS.
Configuring Secure Web Access with Quick Configuration
Use the Secure Access Quick Configuration page to enable HTTP and HTTPS access
on interfaces for managing Services Routers through the Web interface. You can also
install SSL certificates and enable JUNOScript over SSL with the Secure Access page.
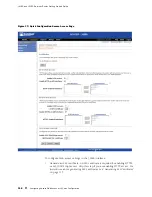
Figure 37 shows the Secure Access Quick Configuration page.
Configuring Secure Web Access with Quick Configuration
117
Summary of Contents for J4350
Page 14: ...J4350 and J6350 Services Router Getting Started Guide xiv Table of Contents...
Page 22: ...2 J series Overview...
Page 68: ...J4350 and J6350 Services Router Getting Started Guide 48 Field Replaceable PIMs...
Page 75: ...Services Router User Interface Overview Figure 25 J Web Layout Using the J Web Interface 55...
Page 88: ...J4350 and J6350 Services Router Getting Started Guide 68 Using the Command Line Interface...
Page 90: ...70 Installing a Services Router...
Page 100: ...J4350 and J6350 Services Router Getting Started Guide 80 Site Preparation Checklist...
Page 112: ...J4350 and J6350 Services Router Getting Started Guide 92 Powering a Services Router On and Off...
Page 144: ...J4350 and J6350 Services Router Getting Started Guide 124 Verifying Secure Web Access...
Page 162: ...142 Maintaining Services Router Hardware...
Page 194: ...J4350 and J6350 Services Router Getting Started Guide 174 Troubleshooting Hardware Components...
Page 204: ...184 J series Requirements and Specifications...
Page 220: ...J4350 and J6350 Services Router Getting Started Guide 200 ISDN RJ 45 Connector Pinout...
Page 267: ...Part 5 Index Index 247...
Page 268: ...248 Index...

