


CHAPTER 14
Upgrading Components for Memory Upgrades
IN THIS CHAPTER
Upgrading CTP2000 Series Components for Memory Upgrades | 106
Upgrading CTP2000 Series Components for Memory Upgrades
Certain CTP2000 Series components need to be upgraded when RAM memory is increased, as required
by certain JUNOS version updates. The affected modules and other components can be:
•
Processor module that contains the RAM card
•
CompactFlash card
•
Rear transition module (RTM) in case of the PP310 and PP332 processors
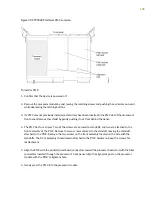
To install a CTP module:
1. Ground yourself by using an antistatic wrist strap or other device, and connect it to one of the ESD
grounding jacks, if available, or another grounding device.
2. Choose the slot where you want to insert the module.
3. With a Phillips screwdriver, loosen the screws that secure the blank filler panel covering the empty
chassis slot, if present, and remove the filler panel.
4. Remove the module from its antistatic bag, being careful not to touch module components, pins, leads,
or solder connections.
5. Verify that the ejectors are in the open position (facing outward).
6. Guide the module into the chassis by placing it between the guides of the selected slot and pushing
the module until it stops.
The module stops sliding when the ejectors make contact with the chassis.
106
Summary of Contents for CTP2000 Series
Page 1: ...CTP2000 Series Circuit to Packet Platforms Hardware Guide Published 2020 08 31 ...
Page 8: ...1 PART Overview CTP2000 Series Platform Overview 2 CTP2000 Series Interface Modules 11 ...
Page 112: ...Installing SFPs in a CTP2000 Module 102 105 ...
Page 127: ...5 PART Configuration Accessing the CTP2000 Platform 121 ...
Page 144: ...7 PART Troubleshooting Troubleshooting Power Failures 138 Contacting Customer Support 140 ...


