Jump n Carry JNC345 Operator'S Manual Download Page 5

5

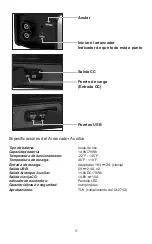
Jump Starter Specifications

Battery Type:


Lithium Ion 


Battery Capacity:

 14.8V/79Wh 

Operating Temperature:


-22˚F - 140˚F 


Charging Temperature:


40˚F - 110˚F 


Recharge Input:

 18V 

 2A Adapter (Pin Jack) 


USB Output:

 5V 

 2.4A x 2 (Max 4A total) 

Jump Starting Output:


14.8VDC/79Wh 


DC Pin Output:

 14.8V 

 10A 

Power Indicator:


LED Display 

Safety Features:

 Built-in 

Approvals:


TUV (Conforms to UL2743)

UNIT STATUS AND RECHARGING PROCEDURES

Note:

 Upon initial purchase, your Jump Starter should be charged for a minimum of 6 

hours. The Jump Starter should be charged every three months when not in use.


Unit Status Indication

Press the Status/Power Button on the front of the unit to power the battery status LEDs 

and see the unit’s state of charge. The unit’s state of charge status is indicated by the 

number of status LEDs lit:  1 LED - 25%; 2 LEDs – 50%; 3 LEDs – 75%; 4 LEDs – at 

or near 100%.

– If the unit has below 75% state of charge, it should be charged soon. 

– If the unit has below 50% state of charge, it should be charged immediately.

It is recommended that the unit be at or near 100% state of charge when using as a 
jump starter. This will greatly improve your jump starting success.   


Recharging Your Jump Starter 


WARNING: 

Never use a charger other than the one that was included with your unit. 

Using an incompatible charger could damage the internal battery, which could result in 
property damage or injury.

WARNING: 

When charging the internal battery, work in a well ventilated area and do 

not restrict ventilation in any way.

1.  Connect the pin jack at the end of the included AC adapter cord to the jump 

starter through the input port marked “DC Input.”

2.    Connect the male end of the AC adapter to the AC outlet.

3.  Using this method, the unit will be brought to full charge automatically without 

overcharging.

Summary of Contents for JNC345

Page 1: ...cause damage or explosion always shield eyes Read entire instruction manual before use WARNING WARNING This product can expose you to chemicals including Vinyl Chloride Styrene and Acrylonitrile which...

Page 2: ...ty information provided by the car truck boat or equipment manufacturer Following all manufacturers instructions and safety procedures will reduce the risk of accident Working around lead acid batteri...

Page 3: ...sion cord Replace them immediately WARNING To reduce risk of fire or burns do not disassemble crush or puncture internal battery short external contacts or dispose of in fire or water The Jump Starter...

Page 4: ...powering and or recharging small electronics connected through its USB power port It can recharge multiple devices on a single charge The Jump N Carry can also supply DC power 12V nominal 15V actual t...

Page 5: ...status LEDs lit 1 LED 25 2 LEDs 50 3 LEDs 75 4 LEDs at or near 100 If the unit has below 75 state of charge it should be charged soon If the unit has below 50 state of charge it should be charged imm...

Page 6: ...ot shine into the eyes of people or animals Keep away from children To turn on the LED Flashlight press and release the light button Successive pushes of the button will change the light pattern from...

Page 7: ...ump starting readiness indicator LED continues to flash green after the vehicle connection has been made this indicates that the vehicle s battery is too low to allow the unit to activate 1 0V or a po...

Page 8: ...above 130 C 265 F TROUBLESHOOTING Problem I charged the unit when the charged display indicated that the unit s charge was low but after several hours there is no change in status Answer Suspect a fa...

Page 9: ...arted before using your jump starter Question How long should I charge the unit Answer It should be charged for a minimum of 6 hours when new When recharging the unit should be charged until full char...

Page 10: ...NSTITUTE THE BUYER S SOLE AND EXCLUSIVE REMEDY THE IMPLIED WARRANTIES OF MERCHANTABILITY AND FITNESS FOR A PARTICULAR PURPOSE ARE LIMITED IN DURATION TO THIS EXPRESS WARRANTY AFTER 1 YEAR FROM DATE OF...

Page 11: ...service under this warranty Jump Starter Repair 8600 NE Underground Drive Pillar 248 Kansas City MO 64161 800 328 2921 913 310 1050 For best service and to receive periodic product updates follow the...

Page 12: ...ormales Lea con cuidado y siga estas instrucciones para un uso sin peligros Siga siempre las instrucciones espec ficas de este manual y las que se hallan en la unidad Jump N Carry cada vez que vaya a...

Page 13: ...ar un anillo u objeto similar al metal causando una quemadura grave Use el Arrancador Auxiliar solo para asistir el arranque de bater as de plomo cido No lo utilice para cargar bater as secas o pilas...

Page 14: ...o de entrar en contacto con el l quido lave la parte afectada con abundante agua Si el l quido entra en contacto con los ojos despu s de lavarlos con agua busque atenci n m dica El l quido que sale de...

Page 15: ...F 110 F Entrada de recarga Adaptador 18V 2A clavija Salida USB 5V 2 4A x 2 Salida Arranque Auxiliar 14 8VDC 79Wh Salida clavija CC 14 8V 10A ndicador de encendido Pantalla LED Caracter sticas de segur...

Page 16: ...ranque C mo recargar este Arrancador Auxiliar ADVERTENCIA Never use a charger other than the one that was included with your unit Using an incomNunca utilice un cargador que no sea el incluido con la...

Page 17: ...o cuando lo utilice como arrancador auxiliar no lo guarde en un lugar a menos de 10 C 50 F Nunca recargue ni arranque una bater a que est congelada Nota Cuando utilice el aparato como arrancador auxil...

Page 18: ...bater a del veh culo est demasiado baja para permitir que la unidad se active 1 0V o una posible conexi n en cortocircuito Desconecte el veh culo y determine cu l es la causa del problema antes de act...

Page 19: ...tados Hay que vigilar para evitar el aplastamiento o perforaci n de la unidad as como evitar exponerla al fuego o a temperaturas por encima de los 130 C 265 F RESOLUCI N DE PROBLEMAS Problema Cargu la...

Page 20: ...como las instrucciones del manual del veh culo que vaya a arrancar antes de utilizar el arrancador auxiliar Pregunta Durante cu nto tiempo tengo que cargar la unidad Respuesta Hay que cargarla durante...

Page 21: ...RECURSO NICO Y EXCLUSIVO DEL COMPRADOR LAS GARANT AS IMPL CITAS DE COMERCIABILIDAD E IDONEIDAD PARA UN DETERMINADO FIN QUEDAN LIMITADAS EN EL TIEMPO A LA DURACI N DE ESTA GARANT A EXPL CITA AL CABO D...

Page 22: ...ner el mejor servicio y recibir las actualizaciones peri dicas del producto siga las instrucciones a continuaci n y registre su compra Visite la p gina www cloreregistration com Haga clic en el logo d...

Page 23: ...23...

Page 24: ...ructions pour une utilisation en toute s curit Suivez toujours les instructions de ce manuel et celles qui figurent sur le survolteur chaque utilisation Toute batterie au plomb acide auto camion et ba...

Page 25: ...rs des br lures graves Uniquement utiliser le d marreur d appoint pour d marrer des batteries au plomb Ne pas utiliser pour charger des batteries s ches commun ment utilis es avec des appareils lectro...

Page 26: ...Dans des conditions dangereuses le liquide peut s chapper de la batterie viter tout contact En cas de contact accidentel rincer l eau Si le liquide entre en contact avec les yeux consultez galement un...

Page 27: ...e 40 F 110 F Entr e de charge Adaptateur 18V 2A Prise broche Sortie USB 5V 2 4A x 2 Sortie de d marrage d appoint 14 8VDC 79Wh Sortie broche CC 14 8V 10A Indicateur de puissance Affichage LED Fonction...

Page 28: ...ur recharger votre d marreur d appoint ATTENTION Ne jamais utiliser un chargeur autre que celui fourni avec votre appareil L utilisation d un chargeur incompatible peut endommager la batterie interne...

Page 29: ...appoint Ne jamais charger ni faire d marrer une batterie gel e Remarque Lors de son utilisation comme d marreur d appoint il est recommand que l appareil soit 100 de charge ou presque comme indiqu sur...

Page 30: ...terminez la cause du probl me avant de proc der Remarque Avant de passer aux tapes ci dessous veuillez noter que l activation de la fonction de contournement d sactive toutes les s curit de l appareil...

Page 31: ...veau de charge faible cependant apr s plusieurs heures le niveau de charge est rest inchang R ponse Suspectez un chargeur d faillant Probl me Lorsque je charge l appareil le voyant indique que la batt...

Page 32: ...t dans le manuel du propri taire de tout v hicule d marrer avant d utiliser votre d marreur d appoint Question Pendant combien de temps faut il charger l appareil R ponse L appareil neuf doit tre char...

Page 33: ...ES DE QUALIT MARCHANDE ET D AD QUATION UN USAGE PARTICULIER SONT LIMIT ES LA DUR E DE CETTE GARANTIE EXPLICITE APR S 1 AN PARTIR DE LA DATE D ACHAT TOUS LES RISQUES DE PERTE DEVIENNENT LA RESPONSABILI...

Page 34: ...recevoir des mises jour p riodiques sur nos produits suivez les consignes ci dessous pour enregistrer votre achat veuillez vous rendre sur www cloreregistration com Cliquez sur le logo Jump N Carry Sa...

Page 35: ...35...

Page 36: ...2020 Clore Automotive 842 346 100 Operator s Manual Model No JNC345 12V Jump Starter and Power Supply...

Reviews: