JUKI IP-200 Setup Manual Download Page 7

– 5 –

3)  When the setting of the card is completed, close the smart media card cover. It is not possible 

to receive or send the data with the smart media card with the cover opened. For the operating 
procedure, refer to "USING COMMUNICATION FUNCTION of the Instruction Manual.

  If the smart media card comes in contact with the cover and the cover is not closed, check the 

following matters.

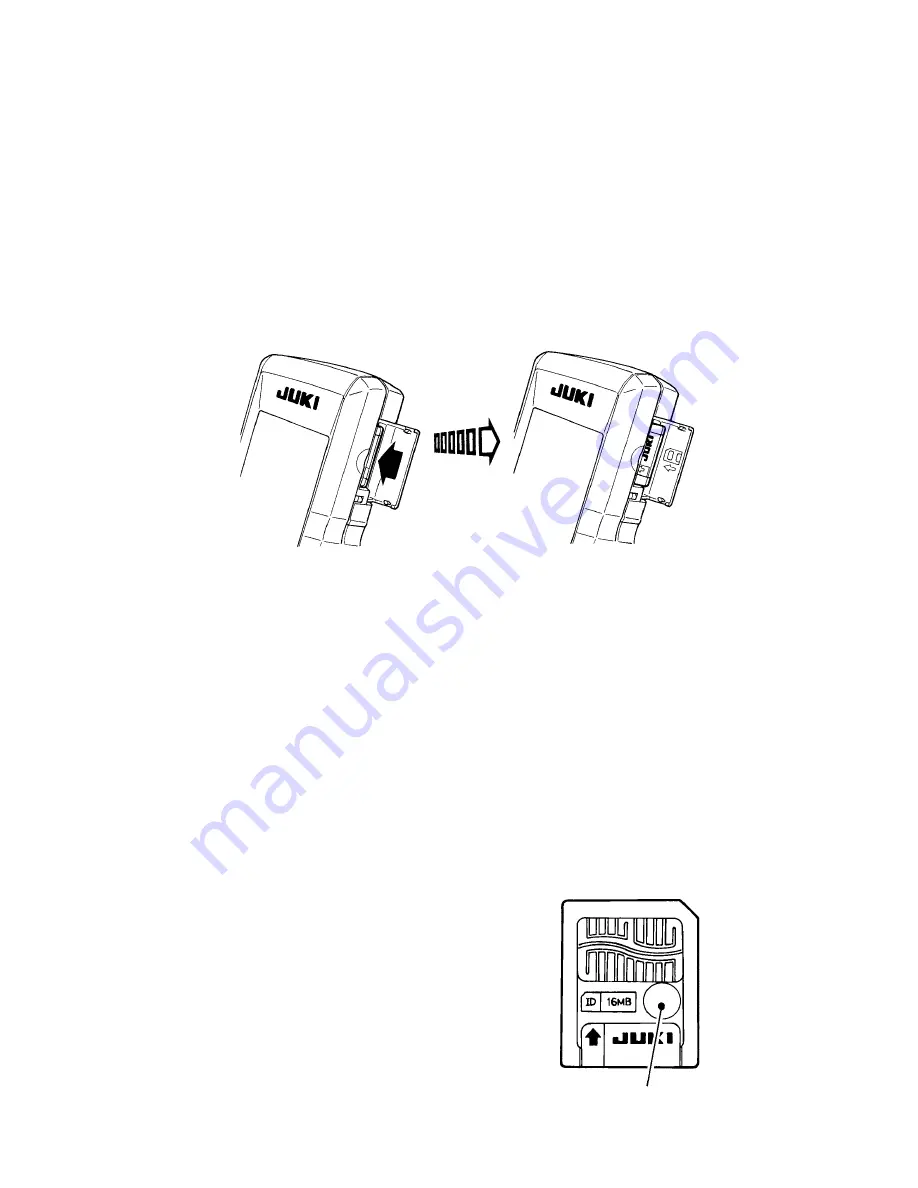
   • Check that inserting is stopped in the state that the card protrudes by approximately 10 mm.
   • Check that the coantact part is faced downward and inserted.
   • Check that the smart media card other than 3.3V voltage type is used.

(2) Removing procedure

1)  Open the smart media cover, press the card until it goes no further and reduce the force. The card 

returns by approximately 10 mm by reversing order at the time of setting.

2)  Then drawing up the card completes removing.

< Handling the smart media card >

• Smart media is a precision instrument. Do not bend or shock it.
• It is recommended to periodically save the data saved in the smart media into the other vehicle for the 

accident.

• When initializing data, perform it after checking that there is no necessary data in the card. When the 

data is initialized, the internal data is deleted.

• Avoid using or keeping the card in a high temperature or high humidity place.
• Avoid using the card near heating or combustible articles.
• When the contact part becomes dirty, contact failure will be caused. Control so that the card is not 

touched by hand, or that dust, oil or other foreign material does not adhere to the card. Besides, be 
careful of handling the card since the internal data is broken by the static electricity or the like.

• Smart media has the life, and writing and deletion cannot be performed after an extended period of 

use. In this case, replace the smart media with a new one.

< Prevention of memory error >

•  When write prohibition seal 

1

 is pasted, the card 

becomes exclusive for reading and writing cannot 
be performed.

•  Strip off the seal when you desire to record 

again.

•  Do not use again the seal which was pasted once 

and stripped off. The trouble of the main unit will 
be caused.

< 3.3V type >

1

Summary of Contents for IP-200

Page 1: ...ENGLISH IP 200 SET UP MANUAL...

Page 2: ...power 2 EXPLANATION OF THE OPERATION PANEL 3 CONNECTING PROCEDURE OF OPERATION PANEL WITH EXTERNAL VEHICLE 4 1 Smart media card 4 2 RS 232C 6 3 Input of signal by means of the connector for external...

Page 3: ...ed to control box are packed together 2 For those who have purchased the single unit of IP 200 operation panel 1 IP 200 operation panel main unit 1 set 2 Operation panel installing base 1 set 3 Operat...

Page 4: ...t near the operation panel 2 Connecting the cord and turning ON the power 1 Pass the cord of the operation panel through the hole for wiring in the table and connect it with the control box under the...

Page 5: ...communication by RS 232C 9 Variable resistor for Color LCD screen contrast regulation 0 Connector for external input EXPLANATION OF THE OPERATION PANEL Explanation of the respective parts of the opera...

Page 6: ...es dirty contact failure will be caused Control so that the contact part is not touched by hand or that dust oil or other foreign material does not adhere to the contact part Besides be very careful o...

Page 7: ...ed to periodically save the data saved in the smart media into the other vehicle for the accident When initializing data perform it after checking that there is no necessary data in the card When the...

Page 8: ...Besides be careful of handling the contact part since the internal element is broken by the static electricity or the like 1 Setting procedure 1 When the lower side cover located on the side of operat...

Page 9: ...be connected When the contact part becomes dirty contact failure will be caused Control so that the contact part is not touched by hand or that dust oil or other foreign material does not adhere to th...

Page 10: ...the program from the smart media is shown below Besides it is regarded that the program to perform setup has already entered the smart media card 1 First turn ON the power Normally the sewing ready sc...

Page 11: ...unication screen 2 6 Press key 6 File selection screen 7 Press key 7 and select the download program at display 8 8 Press key 9 Communication screen 3 9 Press key 0 Start of communication d d d d d 6...

Page 12: ...ng Checking items below d d d d Do not turn OFF the power and close open the smart media cover during the work The main unit may be broken The procedure above completes the replacing work of applicati...

Page 13: ...de by using this smart media card It is necessary that the main program and panel program have to match with each other If not there is a possibility that trouble such as Error E703 or E704 occurs Be...

Page 14: ...mmunication screen 2 6 Press key 6 File selection screen 7 Press key 7 and select download program at display 8 8 Press key 9 Communication screen 3 9 Press key 0 Start of communication d d d d d 6 7...

Page 15: ...edure above completes the replacing work of application software If the screen below is displayed quickly turn OFF the power and perform the set up again after checking Checking items below Checking i...

Page 16: ...h main program and an error occurs Perform the work by the procedure below when replacing the main program in case trouble such as Error E703 E704 etc occurs 1 First turn ON the power Error screen E70...

Page 17: ...unication screen 2 6 Press key 5 File selection screen 7 Prees key 6 and select the download program at display 7 8 Press key 8 Communication screen 3 9 Press key 9 Start of communication d d d d d 5...

Page 18: ...d u r e a b o v e completes the replacing work of application software If the screen below is displayed quickly turn OFF the power and perform the set up again after checking Checking items below Che...

Page 19: ...low when rewriting the servo program in the same way of RE SETUP OF MAIN PROGRAM 1 When main program matches with servo program Perform the work by the procedure below when making the servo program ve...

Page 20: ...unication screen 2 6 Press key 6 File selection screen 7 Press key 7 and select the download program at display 8 8 Press key 9 Communication screen 3 9 Press key 0 Start of communication d d d d d 6...

Page 21: ...edure above completes the replacing work of application software If the screen below is displayed quickly turn OFF the power and perform the set up again after checking Checking items below Checking i...

Page 22: ...h main program and an error occurs Perform the work by the procedure below when replacing the main program in case trouble such as Error E703 E704 etc occurs 1 First turn ON the power Error screen E70...

Page 23: ...unication screen 2 6 Press key 5 File selection screen 7 Press key 6 and select the download program at display 7 8 Press key 8 Communication screen 3 9 Press key 9 Start of communication d d d d d 5...

Page 24: ...d u r e a b o v e completes the replacing work of application software If the screen below is displayed quickly turn OFF the power and perform the set up again after checking Checking items below Che...

Page 25: ...ter formatting the smart media to be the copy destination with IP 200 For the formatting procedure of the smart media read USING COMMUNICATION FUNCTION of Instruction Manual Save program file prg and...

Reviews: