11
TROUBLESHOOTING
PROPELLER REPLACEMENT
• You will need to activate the self-calibration mode (p. 6) if your Aerobot does not fly properly
or moves too far away from the objects.
• When there are few projectiles left inside the projectile launcher, it is advisable to tilt it
downwards so that the vacuum effect of the load correctly pushes on the projectile.
• If your Aerobot falls to the ground during flight, check the battery, it may be empty.
WARNING: Any changes to accessories, including propellers, must be carried out by an adult.
Propellers must be positioned in a specific direction, as the way in which they push out the airflow
depends on this and, therefore, on the force they may exert against the ground in order to lift off and fly.
If after a small impact due to which you had to change the propellers, either because they have come
loose or because they broke, you notice some of the following symptoms, it means they have been
placed incorrectly.
• The drone does not take off, although it appears to have power.
• It raises the nose or the tail, but it doesn't take off. The drone moves forwards or backwards but
does not take off.
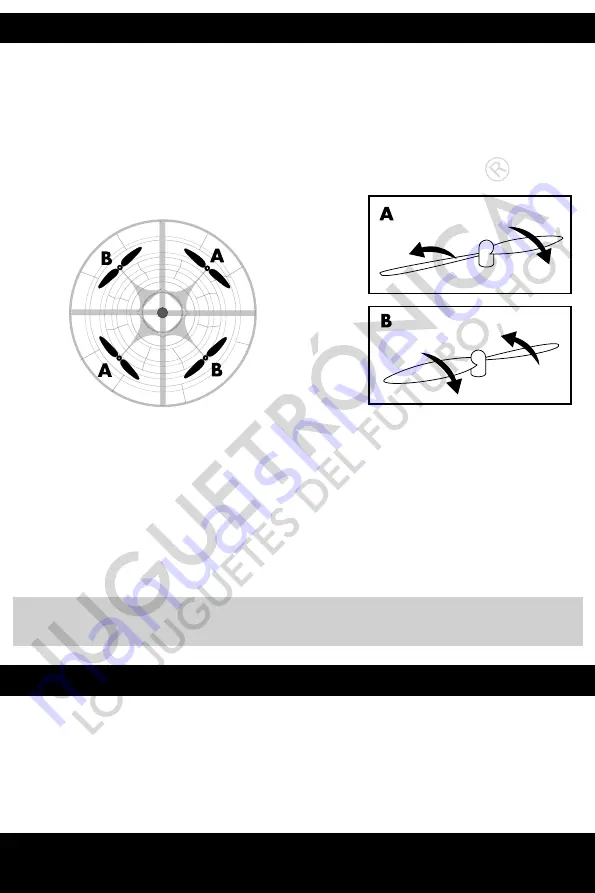
To solve this, take a close look to this illustration:
There are 2 different types of propellers (marked on the propeller itself as A and B) and these must be
placed crossways (as shown in the illustration above). Make sure to place the drone as shown in the
picture before replacing the propellers. As a reference, check that the text CHARGE is displayed on
the front and ON/OFF on the back:
The front left and rear right should be Model B
The front right and rear left should be Model A
Pay attention to the propeller torque of each model shown. The arrows indicate the blade tilt direction.
ON/ OFF
CHARGE
B
A


