background image


GQ15D-AS32D 

EN/1906.V01


EN 

36 

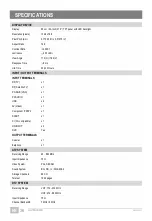
SPECIFICATIONS 


DISPLAY DEVICE


Display 

80 cm / 32-Inch (31.5”) TFT panel with LED backlight 

Resolution (pixels) 

1366 x 768 

Pixel Pitch (mm) 

0.17025 (H) x 0.51075 (V) 

Aspect Ratio 

16:9 

Contrast Ratio 

 4000:1 

Luminance 

 250 cd/m

2


View Angle 

170 (H) / 160 (V) 

Response Time 

 6 ms 

Life Time 

30,000 Hours 

INPUT / OUTPUT TERMINALS 
INPUT TERMINALS


RF (TV) 

x 1 

RF (Satellite TV) 

x 1 

PC-RGB (VGA) 

x 1 

PC AUDIO 

x 1 

USB 

x 2 

AV (Video) 

x 1 

Component (YPbPr) 

x 1 

SCART 

x 1 

CI (CI+ compatible) 

x 1 

HD-INPUT 

x 3 

DVD 

Yes 

OUTPUT TERMINALS


Coaxial 

x 1 

Earphone 

x 1 

ATV SYSTEM


Receiving Range 

45 - 863 MHz 

Input Impedance 

75 Ω 

Video System 

PAL, SECAM 

Sound System 

BG, DK, I, L; NICAM/A2 

Storage Channels 

99 CH 

Teletext 

1000 pages 

DTV SYSTEM


Receiving Range 

VHF: 174 - 230 MHz 


UHF: 474 - 862 MHz 

Input Impedance 

75 Ω 

Channel Bandwidth 

7 MHz / 8 MHz 

Summary of Contents for Atlantis 3.2D

Page 1: ......

Page 2: ...N 14 AV COMPOSITE VIDEO CONNECTION 14 YPbPr CONNECTION 15 COAXIAL CONNECTION 15 INSERT CI CARD 16 CONNECT EARPHONE TO THE UNIT 16 USB 1 2 CONNECTION 16 BASIC OPERATIONS 17 DVD MODE 17 1 Basic Playback 17 2 Stop Playing 17 3 Skip Chapter Forward or Backward 17 4 Fast Forward Fast Backward 17 5 Pause Play 17 6 MP3 Playback 18 7 MPEG4 Playback 18 8 JPEG Playback 18 9 Enjoying Video CD with Playback C...

Page 3: ...TALLATION 26 DTV MODE 27 1 Channel 27 2 Picture 28 3 Sound 29 4 Time 29 5 Lock 30 6 Setup 30 ATV AND OTHER MODES 31 SATELLITE MODE 32 1 Auto Tuning 32 2 Dish Setup 32 PC VGA MODE 34 MAINTENANCE 35 WALL MOUNTING 35 SPECIFICATIONS 36 GENERAL TROUBLESHOOTING 38 ...

Page 4: ... EXPOSE THIS APPLIANCE TO RAIN OR MOISTURE CAUTION LASER RADIATION WHEN OPEN DO NOT STARE INTO BEAM VENTILATION WARNING THE NORMAL VENTILATION OF THE PRODUCT SHALL NOT BE IMPEDED FOR INTENDED USE The lightning flash and arrow head within the triangle is a warning sign alerting you of dangerous voltage inside the product CAUTION To reduce the risk of electric shock DO NOT remove the cover or back N...

Page 5: ...es other than those specified herein may result in hazardous laser light beam exposure This compact disc player should not be adjusted or repaired by anyone except qualified service personnel The laser mechanism in the set corresponds to the stylus needle of a record player Although this product uses a laser pick up lens it is completely safe when operated according to directions NOTES The manufac...

Page 6: ... lint free cloth before using the disc Improper disc storage You may damage discs if you store them in the following places Areas exposed to direct sunlight Humid or dusty areas Areas directly exposed to a heat outlet or heating appliance FEATURES 80 cm 32 Inch 31 5 TFT DISPLAY This unit has a built in 80 cm 32 Inch 31 5 TFT display to provide clear vision and low radiation BUILT IN DVD PLAYER AUT...

Page 7: ...o the instructions below Step 1 Place the TV faced down on a soft cloth or cushion to prevent the panel from being damaged Step 2 Align the stand and the bottom of this TV Step 3 Tighten the included screws with a screw driver NOTES 1 Unplug the power cord first when installing or removing the TV Stand 2 Contact one or more partner for assistance when installing or removing the TV stand ...

Page 8: ... blue color 3 Stand Holder 4 VOL Button To increase decrease the volume level or move left right 5 CH Button To select next previous channel or move up down 6 MENU Button To enter menu setting page 7 SOURCE Button To select the input source 8 To play or pause playing DVD 9 Eject disc 10 POWER Button To turn ON OFF the TV 11 Disk Slot To insert a disk according to the direction shown on the side of...

Page 9: ...na DVB S2 6 RF input terminal To connect the external TV antenna DVB T DVB T2 DVB C 7 HD INPUT 1 terminal NOTE HD INPUT 1 can support ARC function 8 EARPHONE output terminal 9 USB 1 2 input slot For multimedia files playback 10 CI input terminal CI compatible 11 Mini YPbPr input terminal 12 Mini AV input terminal 13 COAXIAL output terminal 14 HD INPUT 2 3 terminals Back View ...

Page 10: ...tton TV A B DVD Repeat playing between A and B 6 YELLOW Button TV REPEAT DVD Change repeat mode 7 Display the favorite channels list 8 Display the available Teletext 9 EPG DTV Display electronic program guide D MENU DVD Display the main disc menu 10 HOLD Hold the Teletext FREEZE Hold the picture 11 Enable disable subtitles 12 SIZE TV Switch Teletext size ZOOM DVD Shrink enlarge the picture 13 Ente...

Page 11: ...ext index 33 Number Buttons 0 9 Input the number information such as channel number and so on 22 Play the previous file 23 Call out the main menu or return to previous menu 34 Switch the digit when watching TV programs 24 AUDIO TV Switch the available sound track 35 Return to previous channel LANG DVD Switch the available sound track language 36 Select desired input source 25 Confirm selection 37 ...

Page 12: ...Point the remote control from no more than about 6 m from the remote control sensor and within about 60 of the front of the player Fig 2 NOTES The operating distance may vary according to the brightness of the room Do not point bright light at remote control sensor Do not place objects between the Remote control and the remote control Sensor Do not use this remote control while simultaneously oper...

Page 13: ...er source Read through the instructions before connecting other equipment CONNECTING TO AC POWER SOURCE CONNECT EXTERNAL ANTENNA TO UNIT Install external antenna into antenna jack for best picture Main Unit To power outlet Antenna Outdoor antenna amplifier Indoor antenna amplifier Power plug of antenna amplifier 75 OHM antenna plug ...

Page 14: ... Cable Not included VGA Cable Not included Use VGA cable and Audio cable not included to connect the unit with TV or PC and use this product as a monitor Use HD INPUT cable not included to connect the unit with other devices to receive High Definition multimedia signal NOTE Up to 3 HD devices can be connected simultaneously ...

Page 15: ... AV COMPOSITE VIDEO CONNECTION Back of BD DVD VCR Back of BD DVD VCR AV Cable Not included SCART Cable Not included For basic connection use the composite Audio L R white red and CVBS yellow cable not included to connect the unit with other devices ...

Page 16: ...PBPR CONNECTION COAXIAL CONNECTION Back of BD DVD VCR YPbPr Cable Not included Audio Cable Not included Use coaxial cable not included to connect the unit with amplifier or other audio decoding devices for coaxial audio signal output ...

Page 17: ...arphone Cable Not included Insert your CI card Conditional Access Module to watch special digital channels in your area Insert an USB memory device not included to playback MOVIE MUSIC PHOTO Multimedia files USB Stick Not included CI Card Not included Make sure all the equipment and power cords are connected properly and the unit is set in correct mode before operation ...

Page 18: ...en appears on the unit press the navigation buttons or press the number buttons to select preferred track number then press OK button to confirm d To stop playing and return to the menu screen press TITLE or D MENU button 2 STOP PLAYING Press STOP button to stop playing NOTE When player is stopped the player records the point where STOP was pressed RESUME function Press PLAY button again playback ...

Page 19: ...n to confirm c The files in this folder are displayed and select the desired file by navigation buttons then press the PLAY or OK button to start playback d During normal playing press or button the player will play the next or previous file e Press YELLOW REPEAT button to change play mode SHUFFLE All the files will be randomly sorted and played by the order RANDOM Randomly select any file to play...

Page 20: ...onds it will skip to next picture automatically Rotating pictures Press RIGHT navigation button to rotate the picture clockwise Press LEFT navigation button to rotate the picture counter clockwise Flipping pictures Press UP navigation button to flip the picture vertically Press DOWN navigation button to flip the picture horizontally Picture Shrink Zoom Press ZOOM button repeatedly to enlarge or sh...

Page 21: ...on during play it will repeat play one chapter or one title for DVD disc or repeat play track for VCD CD DVD DISC VCD CD DISC In the PBC OFF mode A B repeat play Repeating sections between two specific points A B repeat a Press BLUE A B button during playing at the point where repeat playing is to be started A b Press BLUE A B button at the point where repeat playing is to be ended B Repeat playin...

Page 22: ...is button will not work When the power is turned on or the disc is removed the language heard is the one selected at the initial settings 17 INITIAL SETTINGS Once the initial programming is entered it is retained in memory until changed the player can always be operated under the same conditions Common procedure for initial settings Press D SETUP button on remote control Use the navigation buttons...

Page 23: ...E Press POWER button on unit or remote control to power ON the unit indicator will glow blue press it again to power OFF standby mode the unit indicator will glow red Press SOURCE button on unit or remote control to set the unit in DTV or TV mode SELECT DESIRED PROGRAM Press CH button to play next channel Press CH button to play previous channel Press number buttons on remote control directly to s...

Page 24: ...s UP or DOWN navigation buttons to select preferred channel Press OK button to confirm the selection NOTE To add a favorite channel please refer to the operations of DTV Mode Channel Programme Edit QUICK SELECT When viewing an available channel press OK button on remote control to enter Channel List menu page Press UP or DOWN navigation buttons to select preferred channel Press LEFT RIGHT navigati...

Page 25: ...ingly Use navigation buttons to select a file and press OK button to add to play list Press button to start playback Press DISPLAY button to call out the tool bar Use navigation buttons to select desired option and press OK to confirm Press EXIT button to dismiss the tool bar MUSIC Press LEFT RIGHT navigation buttons to select Music in the main menu and press OK button to enter Use navigation butt...

Page 26: ...ing files press RED button to enter submenu and you can delete a file accordingly Use navigation buttons to select a file and press OK button to add to play list Press button to start playback Press DISPLAY button to call out the tool bar Use navigation buttons to select desired option and press OK to confirm Press EXIT button to exit menu page Remote operations when playing multimedia files Press...

Page 27: ...ss MENU button to save current setting and return to previous menu page Press EXIT button to exit menu page FIRST TIME INSTALLATION Connect to power source and turn on the TV and below installation menu page will display on the screen Press UP DOWN navigation button to move the cursor Press LEFT RIGHT navigation button to select an option Language select the on screen menu language Country select ...

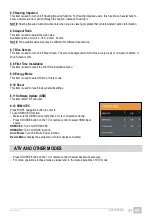
Page 28: ...d following items are adjustable only when Antenna is DVB C Then press OK to start program tuning 1 3 ATV Manual Tuning Press OK or RIGHT navigation button to enter Current CH Select current channel Color System Select available color system Sound System Select available sound system Fine Tune Fine tunes the frequency AFC Turn on off Automatic Frequency Control Search Search available programs Whe...

Page 29: ...7 CI Information Works under available TV signals When an available CAM Conditional Access Module card is connected to the CI slot the users can view related information or manage your CAM card 2 PICTURE Press UP DOWN LEFT RIGHT navigation buttons to select an option 2 1 Picture Mode Available options Standard Mild Personal Dynamic 2 2 Contrast The contrast value of picture can be adjusted from 0 ...

Page 30: ...und sound 3 7 SPDIF Mode This item is used to select desired SPDIF audio output type Available options Auto PCM Off 3 8 AD Switch This item is used to turn on off Audio Description function For Visually Impaired users this function can help to know a certain scene or action through the narration instead of see it NOTE AD Switch function works only when you are viewing programs that contain related...

Page 31: ... System 5 2 Set Password Input the old password using number buttons on remote control and then input your private password twice to finish it 5 3 Channel Lock Press OK or RIGHT navigation button to enter Press UP DOWN navigation button to select the channel which you want to lock Press GREEN button repeatedly to lock unlock the highlighted channel 5 4 Parental Guidance This item is used to select...

Page 32: ...ion if Blue Screen is ON 6 8 First Time Installation This item is used to recall the First Time installation menu 6 9 Energy Mode This item is used to select Home or Store mode 6 10 Reset This item is used to recall factory default settings 6 11 Software Update USB This item is NOT for end user 6 12 HDMI CEC Press RIGHT navigation button to enter it To use HDMI CEC function Make sure the HDMI devi...

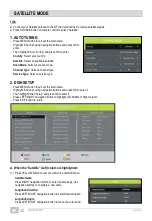
Page 33: ...nel type Service Type Select a service type 2 DISH SETUP Press MENU button to call out the main menu Highlight Channel using navigation buttons and press OK to enter it Then highlight Dish Setup and press OK to enter it Press LEFT RIGHT navigation button to highlight Left Middle or Right column Press EXIT button to return A When the Satellite Left column is highlighted 1 Press YELLOW button on rem...

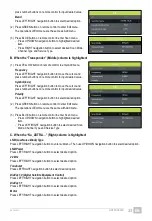
Page 34: ...ired value Polarity Press LEFT RIGHT navigation button to select desired option 2 Press GREEN button on remote control to enter Edit menu The operations of Edit menu are the same with Add menu 3 Press BLUE button on remote control to enter Scan menu Press UP DOWN navigation button to highlighted desired item Press LEFT RIGHT navigation button to select desired Scan Mode Channel Type and Service Ty...

Page 35: ...t Press UP DOWN navigation button to select preferred item Press OK or RIGHT navigation button to enter submenu Press LEFT RIGHT navigation button to adjust the value 1 Auto Adjust This item is used to adjust the PC screen automatically 2 H Offset This item is used to adjust the value of horizontal position 3 V Offset This item is used to adjust the value of vertical position 4 Size This item is u...

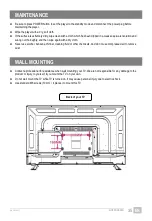
Page 36: ...rung out thoroughly and then wipe again with a dry cloth Never use alcohol benzene thinner cleaning fluid or other chemicals And do not use compressed air to remove dust WALL MOUNTING Contact a professional for assistance when wall mounting your TV We are not responsible for any damage to the product or injury to yourself if you mount the TV on your own Do not wall mount the TV while TV is turned ...

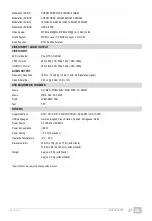
Page 37: ...ours INPUT OUTPUT TERMINALS INPUT TERMINALS RF TV x 1 RF Satellite TV x 1 PC RGB VGA x 1 PC AUDIO x 1 USB x 2 AV Video x 1 Component YPbPr x 1 SCART x 1 CI CI compatible x 1 HD INPUT x 3 DVD Yes OUTPUT TERMINALS Coaxial x 1 Earphone x 1 ATV SYSTEM Receiving Range 45 863 MHz Input Impedance 75 Ω Video System PAL SECAM Sound System BG DK I L NICAM A2 Storage Channels 99 CH Teletext 1000 pages DTV SY...

Page 38: ... 576p 720p 1080i 1080p AUDIO OUTPUT Frequency Response 100 Hz 15 kHz 3 dB 1 kHz 0 dB reference signal Class D Amplifier 8 W x 2 8 Ohm THD 10 USB MULTIMEDIA FORMATS Movie AVI MPG MPEG MKV MOV WMV TS RMVB Music WMA AAC AC3 MP3 Photo JPEG BMP PNG Text TXT OTHERS Supported Discs DVD CD CD R CD RW DVD R DVD RW VCD SVCD OSD Languages German English French Italian Spanish Portuguese Dutch Power Source AC...

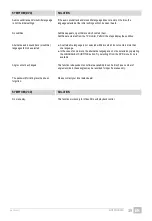
Page 39: ...rate the remote control unit at a distance of no more than 6m from the remote control sensor Remove the obstacles between the remote control and remote control sensor No key operation by the main unit and or the remote control unit is effective Disconnect the power plug and then reconnect it The player may not be operating properly due to lightning static electricity or some other factors SYMPTOM ...

Page 40: ...languages fail to be selected An alternative language is not selected with discs which do not contain more than one language In the case of some discs the alternative language can not be selected by operating the LANGUAGE or SUBTITLE button Try selecting it from the DVD menu if one is available Angle cannot be changed This function is dependent on software availability Even if a disc has a number ...

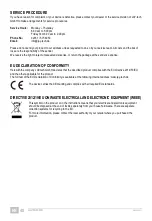
Page 41: ...s expense EU DECLARATION OF CONFORMITY Herewith the company JAY tech GmbH declares that the described product complies with the EU directive 2014 53 EU and the other applicable for the product The full text of the EU Declaration of Conformity is available at the following Internet address www jay tech de The device carries the CE marking and complies with all required EU standards DIRECTIVE 2012 1...

Page 42: ......

Reviews: