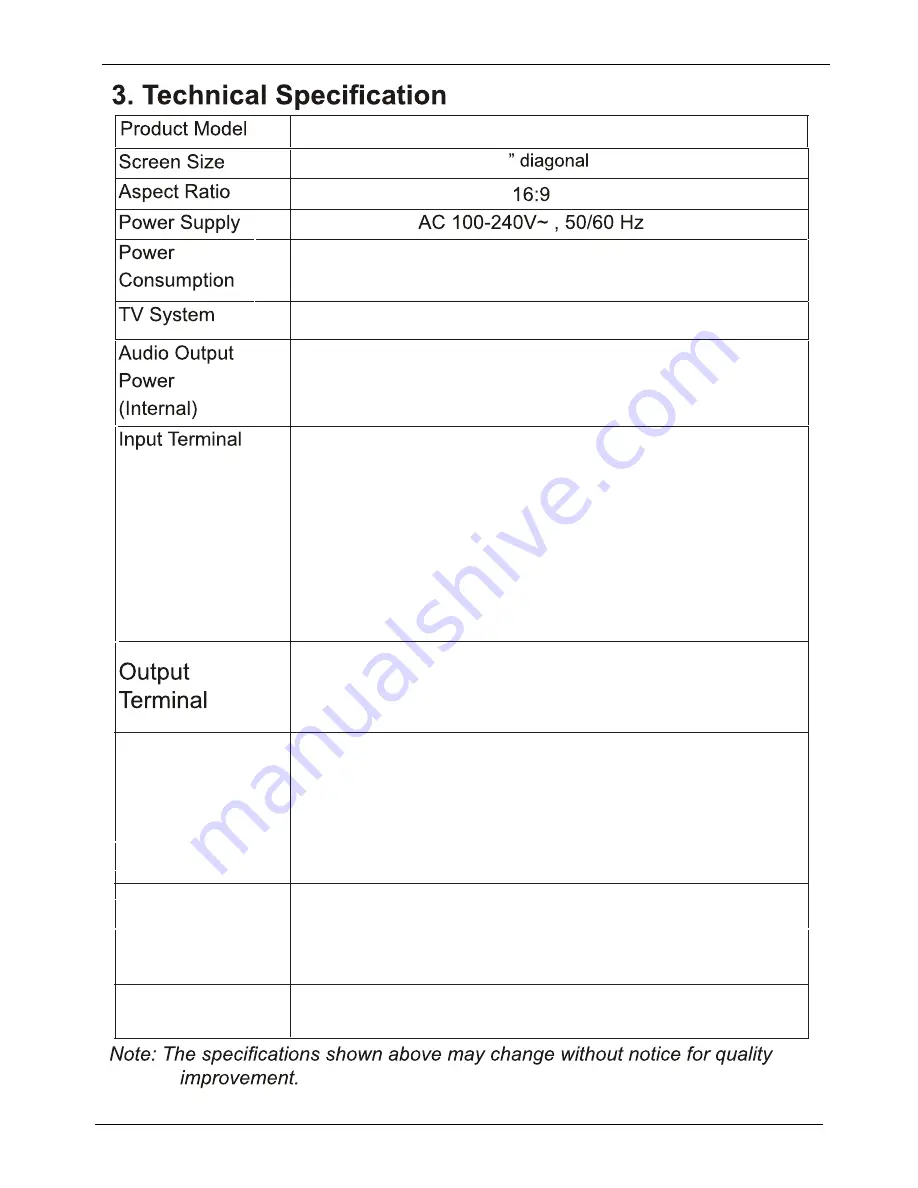
JPE E32D7212 Operating Instruction Download Page 27

NTSC M

Outline Size

(LxWxH)(mm)

without stand

with stand

Working 

Temperature

 0

ć

~35

ć

Working 

Humidity

20% ~ 80% Non-condensing

8Wx2

Antenna Input (F Type) x 1


VGA (D-Sub 15 Pin Type) x 1


HDMI Connector x 3


Y Pb Pr Input Terminals x 1


Video Input RCA Terminals x 1


Stereo Audio x 1 RCA,x1(Phone J

  ack for VGA

)


USB x 1


)

1 set of Audio Output Terminals (RCA, L&R)


32

60W

738.9x90.5x453
738.9x185.2x499

E32D7212

Summary of Contents for E32D7212

Page 1: ...Operating Instruction Please read these instructions before operating your set and retain them for future reference SACL00 Exxx E32D7212 LED COLOR TV...

Page 2: ...acles and at the point where they exit from the apparatus 11 Only use attachments accessories specified by the manufacturer 12 Use only with the cart stand tripod bracket or table specified by the man...

Page 3: ...This lightning flash with arrowhead symbol within an equilateral triangle is intended to alert the user to the presence of non insulated dangerous voltage within the product s enclosure that may be o...

Page 4: ...ed and used in accordance with the instructions may cause harmful interference to radio communications However there is no guarantee that interference will not occur in a particular installation If th...

Page 5: ...peciication 23 4 Supported Signal Modes 24 5 Simple Troubleshooting 25 8 1 1 Accessories 2 1 2 Installation of Stand 2 1 4 Keys and Interfaces 3 1 5 Remote Control 4 1 6 Installation of Batteries 5 1...

Page 6: ...LED COLOR TV...

Page 7: ...witch 5 Menu key 6 Program key 7 Program key 8 Volume key 9 Volume key 10 Source key 11 Standby key 12 Power plug input 17 HDMI1 18 HDMI2 20 D SUB VGA input 23 USB 19 HDMI3 21 PC AUDIO input 16 YPbPr...

Page 8: ...shuffle and folder 26 ADD ERASE Add current channel to favorite list 27 FAV Select the favorite channel forward CH LIST CH LIST SLEEP SLEEP INFO INFO MTS MTS CCD CCD AUTO AUTO S MODE S MODE FAV FAV AD...

Page 9: ...TV in standby mode for a long period of time 2 3 Selection of Input Mode This set has different signal source modes you may continue to press the Source button to select a signal source 1 6 Installat...

Page 10: ...option adjustment include Menu Enter buttons Press the Menu button to open the OSD Menu then press button to select the pages The pages are displayed in the following sequence circular display Press...

Page 11: ...and press ENTER button to go Select Time Press button on the remote control to select the time zone daylight saving time and time format you want to Press button on the remote control to adjust Press...

Page 12: ...er the input source Press EXIT button to quit SELECT INPUT SOURCE Main Menu Press MENU to display the main menu or return to the previous menu or close the main menu Press to highlight the desired men...

Page 13: ...button to select Standard Dynamic Soft User Brightness Press button to adjust Contrast Press button to adjust Adjust the visual perception output of the entire picture it will effect the iuminousness...

Page 14: ...o adjust Normal Normal Automatically adjust Aspect Ratio based on TV size and TV program Wide Use to watch wide screen 16 9 content Zoom Expands image to fill screen Top and button maybe cut off Cinem...

Page 15: ...sounds Adjust the balance between left and right speakers to adapt to your listening position Note The bass and treble are only available in User mode you can adjust as you like Standard Produces a b...

Page 16: ...o select Press to enter ENU again to exit or back to parent menu button to select among Sleep Timer Time Zone Daylight Saving Time Time Format Auto Clock Clock Press to enter Press button to adjust EN...

Page 17: ...s M ENTER M ENTER M Menu language Press button to select language English Fran ais Espa ol Transparent Adjust the transparency of the OSD on screen display menu Press button to select 0 25 50 75 100 O...

Page 18: ...e Raised Depressed Uniform Left Shadow Right Shadow Adjust the color of the digital Closed Captioning box Press button to select Default Black White Red Green Blue Yellow Magenta Cyan Adjust the color...

Page 19: ...from one channel to another Press button to select On Off Audio Only Play the audio with the picture turned off When you turn the Audio Only on and exit the OSD menu the panel will be dark and then p...

Page 20: ...Off On Input Block Block or unblock the input sources Press button to enter Press button to select Unblock Block System Lock Input Block US Canade RRT Setting Reset RRT d Restrict movie and TV progra...

Page 21: ...ack to parent menu Press Press Press Press M ENTER M ENTER M Air Cable Press button to select Air Cable Auto Scan Automatically search for channels Press ENTER button to enter Select signal type Favor...

Page 22: ...stripes in the screen image Press button to adjust Phase Minimize horizontal distortion Press button to adjust Auto Press button to enter Reset PC Settings Reset Computer Settings to factory mode Pres...

Page 23: ...B device then press INPUT button to set the Input Source to Media Press button to select Media in the Source menu then press Enter button to enter Press button to select the option you want to adjust...

Page 24: ...want to watch in the file selecting menu then press media button to display picture Press button to select the file folder you want to search in the file selecting menu Press button to select the fil...

Page 25: ...o select the file you want to watch in the file selecting menu then press Enter button to add the file to play list press media button to display and operate file details Press button to select menu i...

Page 26: ...nt the bottom When highlighting the option you select the file information will appear on the right and picture will be previewed in the center Press Menu button to back to the previous menu and exit...

Page 27: ...y 20 80 Non condensing 8Wx2 Antenna Input F Type x 1 VGA D Sub 15 Pin Type x 1 HDMI Connector x 3 Y Pb Pr Input Terminals x 1 Video Input RCA Terminals x 1 Stereo Audio x 1 RCA x1 Phone Jack for VGA U...

Page 28: ...0 B YPbPr Mode C HDMI Mode Resolution Horizontal Frequency KHz Vertical Frequency Hz 480i 15 734 59 94 480p 720x480 31 468 59 94 576i 15 625 50 00 576p 720x576 31 25 50 00 720p 1280x720 37 50 50 00 45...

Page 29: ...that there are no emission Car HV cable or Neon lamp or other possible interference sources Image colour or quality deteriorates Check that all the video settings are adjusted appropriately such as br...

Reviews: