Notes
This device is not a toy. Make sure that the user knows how to handle the device, as well as
the main cable safely. Incorrect use may result in injury. To download this product’s user guide,
please go to:
www.jpik.com//files/ws_editorials/LEAP_W501r_UserGuide.pdf
For more information and technical support:
Declaration of Compliance
JP Sá Couto S.A. located in Rua da Guarda, 675, 4455-466 Perafita, Portugal, declares that the
LEAP W501r, with model reference SF40KB6, complies with the basic requirements and other
relevant provisions of EU Directive 2014/53/EU. This declaration can be downloaded on:
www.jpik.com//files/ws_editorials/LEAP_W501r_UserGuide.pdf
Only use the bundled power adapter. Unplug your device from the power supply once it is fully charged. Theses devices are not designed to be left
connected to the power supply for long periods of time. Do not use the charger on other devices.
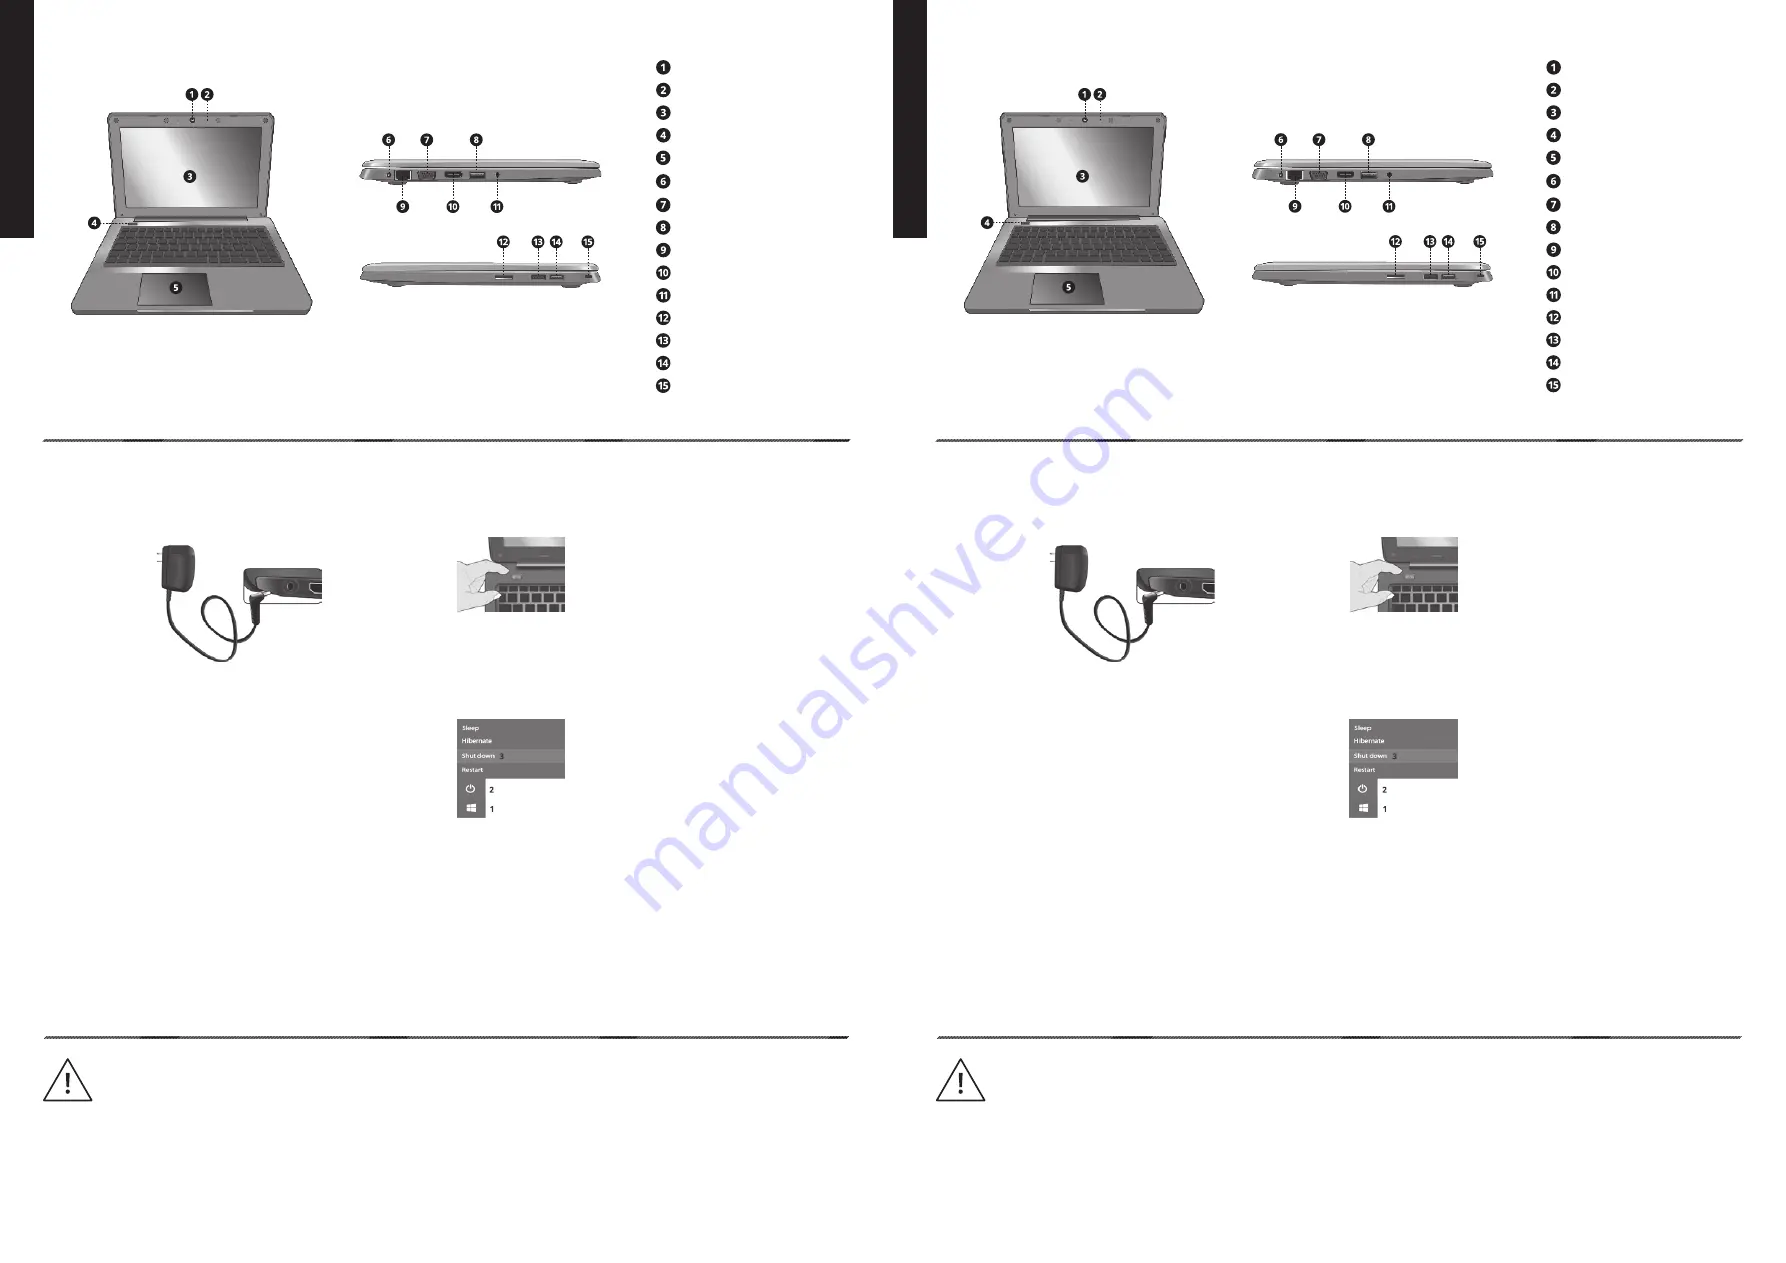
Webcam
Microphone
LCD screen
Power button
USB 3.1 port Gen1 (Type A)
Giga-LAN port
HDMI
Audio jack
Micro SD card slot
USB 2.0
VGA port
DC-in
Touchpad
USB 3.1 port Gen1 (Type A)
Kensington lock slot
ES
GUÍA RÁPIDA EN
ESPAÑOL
EN
QUICK GUIDE IN ENGLISH
Notas
Este dispositivo no es un juguete. Certifíquese de que el usuario sabe cómo manejar el
dispositivo y el cable de alimentación de manera segura. El uso indebido puede causar heridas.
Para descargar este manual de usuario del producto, acceda a:
www.jpik.com//files/ws_editorials/LEAP_W501r_UserGuide.pdf
Para más información y soporte técnico:
Declaración de conformidad
JP Sá Couto S.A., ubicada en la Rua da Guarda, 675, 4455-466 Perafita, Portugal, declara que el LEAP
W501r, con el modelo de referencia SF40KB6, cumple con los requisitos básicos y otras disposiciones
relevantes de la Directiva de la UE 2014/53/EU. Esta declaración se puede descargar en:
www.jpik.com//files/ws_editorials/LEAP_W501r_UserGuide.pdf
Utilice únicamente el adaptador de corriente suministrado. Desconecte el dispositivo de la fuente de alimentación una vez que esté
completamente cargado. Estos dispositivos no están diseñados para permanecer conectados a la fuente de alimentación durante largos
períodos de tiempo. No utilice el cargador en otros dispositivos.
Charging the device
If this is the first time you turn this computer on, connect the AC
adapter and fully charge the battery.
1.
Plug the adapter into the DC-in, which you can find on the left side
of your laptop;
2.
Plug the adapter into a wall-socket;
3.
If your laptop is in power-off state and your battery is not full, you
shall see the battery indicator lights in blue;
4.
When the battery is fully charged, the battery indicator will go off.
While system is off, it takes around 2/3 hours to fully charge the
battery.
Notes:
•
Never use a damaged charger, damaged power cords or loose
electrical sockets. Unsecured connections can cause electric
shock or fire.
• Use only the power adapter that comes with your device. Using a
different power adapter may damage your device.
•
Connecting the charger improperly may cause serious damage to
the device. Do not use the charger on other devices, such as tablets
or cellphones, since it can cause damage.
Turning the device on or off
To power on the device:
To turn on the device, press the power button
(normally 1 to 2 seconds) until you see the power
indicator light up in blue.
To power off the device:
Save all your data before powering your computer off. To power off
your system, follow the steps below:
1.
Click the Windows icon in the low-left corner of
the Desktop. Or, press on the Windows key in the
keyboard;
2.
In the Start menu, click the Power icon;
3.
Select Shut down from the power option menu,
as shown in the illustration.
Webcam
Micrófono
Pantalla
Botón de encendido
USB 3.1 (Type-A)
Giga-LAN
HDMI
Entrada de audio
Lector de tarjetas Micro SD
USB 2.0
VGA
DC-in
Panel táctil
USB 3.1 (Type-A)
Kensington lock
Cargar el dispositivo
Si es la primera vez que enciende el dispositivo, conecte el
adaptador de CA y cargue completamente la batería.
1.
Conecte el adaptador al DC-in, que se encuentra en el lado izquierdo
del dispositivo;
2.
Conecte el adaptador a una toma de corriente;
3.
Si el dispositivo está apagado y la batería no está llena, verá las
luces indicadoras de batería en azul;
4.
Cuando la batería esté completamente cargada, el indicador de
batería se apagará. Mientras el sistema está apagado, se necesitan
aproximadamente 2/3 horas para cargar completamente la batería.
Notas:
•
Nunca use un cargador dañado, cables de alimentación dañados
o enchufes sueltos. Las conexiones inseguras pueden provocar
descargas eléctricas o incendios.
• Use solo el adaptador de corriente que viene con el dispositivo. El uso
de un adaptador de corriente diferente puede dañar el dispositivo.
•
La conexión incorrecta del cargador puede causar daños graves
al dispositivo. No utilice el cargador en otros dispositivos, como
tabletas o celulares, ya que puede causar daños.
Encender o apagar el dispositivo
Para encender el dispositivo:
Para encender el dispositivo, presione el botón de
encendido / apagado (generalmente de 1 a 2
segundos) hasta que el indicador de encendido se
ilumine en azul.
Para apagar el dispositivo:
Guarde todos sus datos antes de apagar su dispositivo. Para colgar,
siga los pasos a continuación:
1.
Haga clic en el icono de Windows en la esquina
inferior izquierda del escritorio. O presione la tecla
de Windows en el teclado;
2.
En el menú Inicio, haga clic en el icono Encender/
Apagar;
3.
Seleccione Apagar en el menú de opciones de
energía, como se muestra en la ilustración.


