Joy-it JDS2915 Manual Download Page 9

9. USING THE SOFTWARE

You can connect the signal generator to your computer either with a USB cable 

or with a USB-TTL cable.


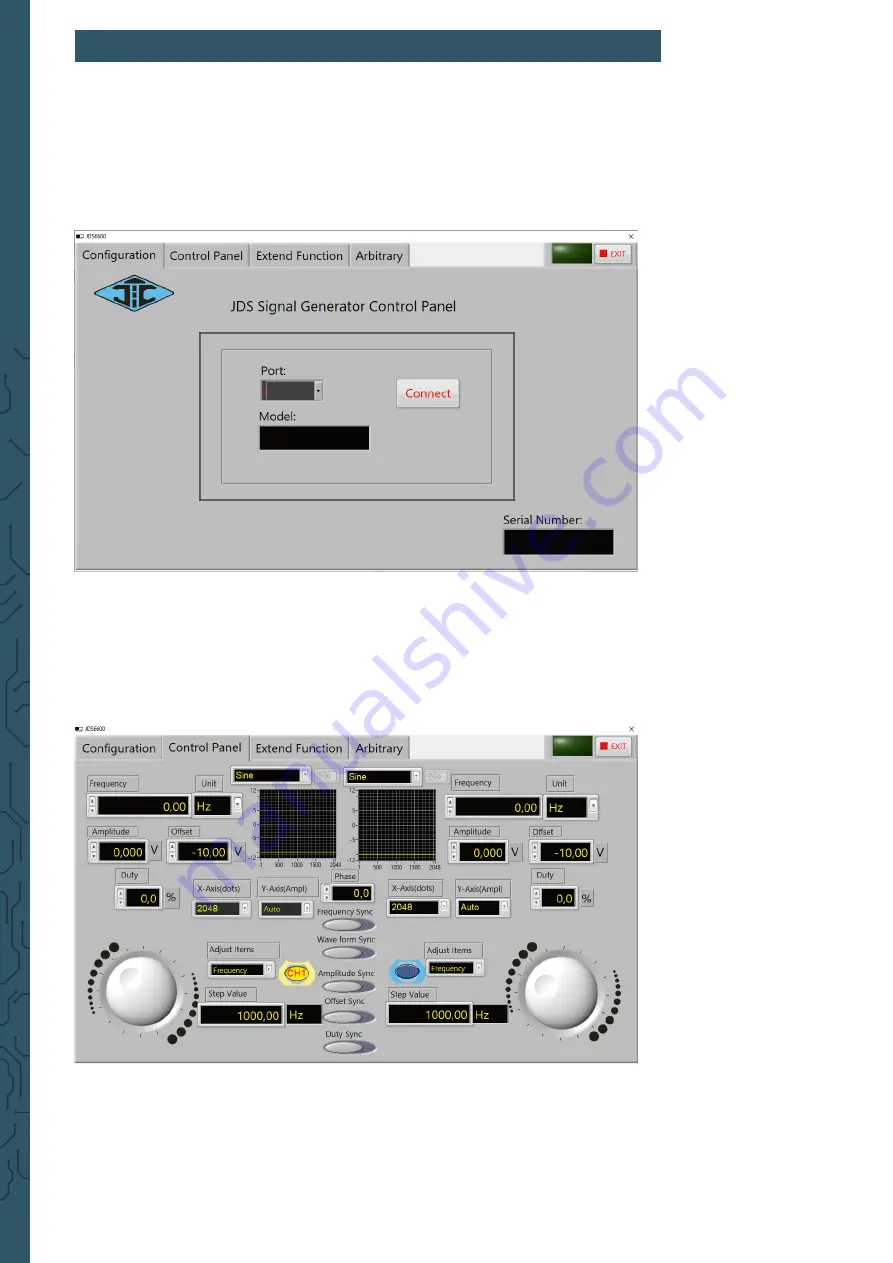
Now start the JDS6600 software. Here you can first select the port where you 

have connected the signal generator to your computer. If you are not sure which 

COM port you have connected your signal generator to, open the Device Manager 

and check the connection in the Connections tab (COM & LPT).

Then establish the connection with 

Connect

.

In the 

Control Panel

, which you can reach via the tab at the top of the 

software, you can output the standard waveforms and function signals.

Summary of Contents for JDS2915

Page 1: ...ENERAL INFORMATION Dear customer thank you for purchasing our product In the following we have listed what you should consider during commissioning Should you encounter any unexpected problems during...

Page 2: ...H1 output CH2 output short cuts 2 4 TFT LCD function keys rotary button power supply 5 V DC USB interface on off switch CH1 parameter CH2 parameter waveform display status of output channel menu bar d...

Page 3: ...waveforms and the presettings Use the multifunctional button 1 to highlight the frequency para meter Then use the arrow keys to move the cursor to the value which should be edited Press the rotary bu...

Page 4: ...multifunctional button to change between the coun ting frequency and the counting period Measurement parameters Frequency period positive pulse width negative pulse width duty cycle After you have set...

Page 5: ...each parameter After all settings are adjusted you can use the multifunctional button to start each function and to end it 7 SYSTEM SETTINGS Press the button to open the setup menu Use the multifuncti...

Page 6: ...point which has to be synchronized Use the multifunctional button to select and to quit the process Settings of the arbitrary wave display The amount of wave forms in the main interface can be adjust...

Page 7: ...Next enter the installation path and confirm with Next The selection of the modules to be installed must also be confirmed with Next...

Page 8: ...y causes problems in connection with the installation and removal of new hardware and should therefore be disabled Confirm the deactivation with Next Alternatively you can leave the system quick start...

Page 9: ...ere you have connected the signal generator to your computer If you are not sure which COMportyouhaveconnectedyoursignalgeneratorto opentheDeviceManager and check the connection in the Connections tab...

Page 10: ...on and redemption obligation according to the electro law ElektroG Symbol on electrial and electronic products This crossed out bin means that electrical and electronic products do not belong into the...

Page 11: ...ance free of charge For this possibility you must contact us via e mail at service joy it net or via telephone Information about packaging Please package your old appliance safe during transport Shoul...

Reviews: