background image

English---15

115300326 Rev. 2 7/15/10

MAINTENANCE

Carburetor

Your Jonsered product has been designed
and manufactured to specifications that re-
duce harmful emissions. After the engine
has used 8--10 tanks of fuel, the engine will
be run--in. To ensure that it continues to run
at peak performance and to minimize harm-
ful exhaust emissions after the run--in peri-
od, ask your servicing dealer to adjust your
carburetor.

The owner is responsible for the perfor-
mance of all required maintenance as
defined in the operator’s manual.

WARNING:

The complete clutch,

clutch cover, and shaft must be
fitted before the machine is started,
otherwise parts could come loose
and cause personal injury.

Function

S

The carburetor governs the engine’s
speed via the throttle control. Air and fuel
are mixed in the carburetor.

S

The T--screw regulates the throttle setting
at idle speed. If the T--screw is turned
clockwise this gives a higher idle speed;
turning it counterclockwise gives a lower
idle speed.

Basic setting

S

The basic carburetor settings are ad-
justed during testing at the factory. Fine
adjustment should be carried out by a
skilled technician.

Rec. idle speed:
See “Technical data” section.
Recommended max. speed:
See “Technical data” section.

Fine adjustment of the idle speed--T

Adjust the idle speed using the idle adjust-
ment screw--T if it is necessary to readjust.
First, turn the idle adjustment screw--T
clockwise until the cutting attachment starts
to rotate. Then, turn the screw counter-
clockwise until the cutting attachment stops.
The idle speed is correctly adjusted when
the engine will run smoothly in every posi-
tion. The idle speed should also be well
below the speed at which the cutting attach-
ment starts to rotate.

CAUTION! If the cutting attachment rotates
when the engine is idling the idle adjustment
screw T should be turned counterclockwise
until the cutting attachment stops.

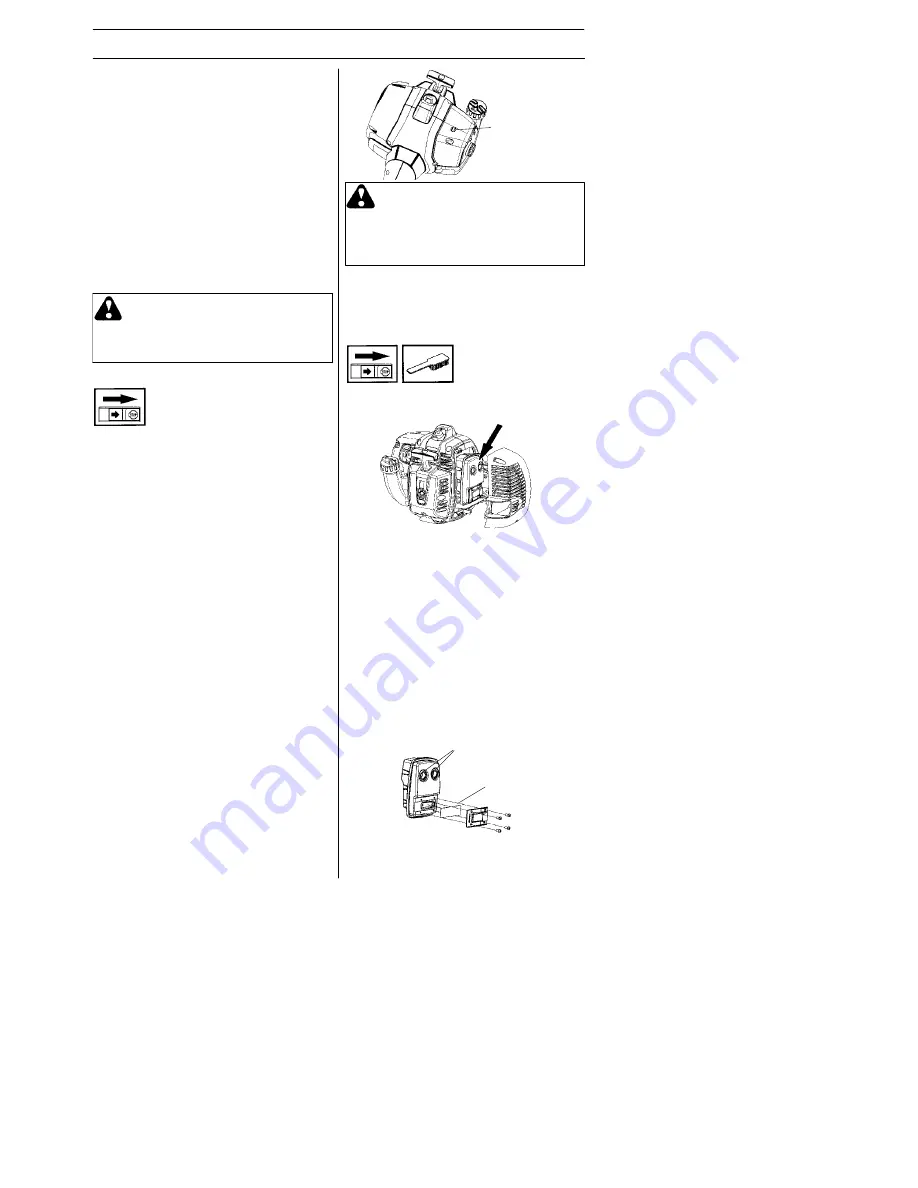
Idle Speed
Screw--T

WARNING:

If the idle speed can-

not be adjusted so that the cutting
attachment stops, contact your ser-
vicing dealer. Do not use the ma-
chine until it has been correctly ad-
justed or repaired.

Unit/Maintenance Safety

Disconnect the spark plug before perform-
ing maintenance, except carburetor adjust-
ments.

Muffler

CAUTION! Muffler is fitted with a catalytic
converter designed to reduce harmful ex-
haust gases.

The muffler is designed to reduce the noise
level and to direct the exhaust gases away
from the operator. The exhaust gases are
hot and can contain sparks, which may
cause fire if directed against dry and com-
bustible material.
Mufflers are equipped with a special spark
arrestor mesh. You should clean the mesh
at least once a month. This is best done
with a wire brush. If the mesh is damaged
it should be replaced. 
If the mesh is fre-
quently blocked, this can be a sign that the
performance of the catalytic converter is
impaired. Contact your dealer to inspect
the muffler. A blocked mesh will cause the
machine to overheat and result in damage
to the cylinder and piston.

Muffler bolts

CAUTION! Never use a machine that has
a faulty or loose muffler. Ensure the muffler
bolts are tight.

Spark arrestor mesh

Summary of Contents for GT 2128

Page 1: ... Please read these instructions and make sure you understand them before using the machine Lire attentivement et bien assimiler le manuel d utilisation avant d utiliser la machine Lea detenidamente el manual de instrucciones y asegúrese de entender su contenido antes de utilizar la máquina ...

Page 2: ...orming maintenance Regular cleaning is required Visual check Approved eye protection must always be used Symbols WARNING Clearing saws brush cutters and trimmers can be dan gerous Careless or incorrect use can result in serious or fatal injury to the operator or others Please read the operator s manual carefully and make sure you understand the instructions before using the machine Always wear S A...

Page 3: ...of conformity Applies to Europe only 19 Note the following before starting Jonsered has a policy of continuous prod uct development and therefore reserves the right to modify the design and appearance of products without prior notice Long term exposure to noise can result in permanent hearing impairment Always use approved hearing protection WARNING A clearing saw brushcutter or trimmer can be dan...

Page 4: ...Starter handle 2 Cutting attachment guard 9 Fuel tank 3 Shaft 10 Choke control 4 Loop handle 11 Air purge 5 Throttle control 12 Air filter cover 6 Stop switch 13 Handle adjustment 7 Cylinder cover 14 Operator s manual What is what 3 7 4 1 2 12 1 6 8 11 10 5 9 14 13 ...

Page 5: ...l protective equipment See in structions under the heading Personal protective equipment Never use a machine that has been modified in any way from its original specification Never use a machine that is faulty Carry out the checks maintenance and service instruc tions described in this manual Some mainte nance and service measures must be carried out by trained and qualified specialists See instru...

Page 6: ...the retailer who sells your machine is not a servicing dealer ask him for the address of your near est service agent Check that the guard is undamaged and not cracked Replace the guard if it has been exposed to impact or is cracked Always use the recommended guard for the cutting at tachment you are using See the Technical data section Use of incorrectly wound trimmer line or an incorrect cutting ...

Page 7: ...eleased Ensure that the cutting attachment has stopped completely and disconnect the lead from the spark plug before you start to work on it WARNING A faulty cutting at tachment may increase the risk of accidents Trimmer head S Only use the recommended cutting at tachments See the section on Technical data IMPORTANT Always ensure the trimmer line is wound tightly and evenly around the drum other w...

Page 8: ...he diagram S Tighten the wing nut Fitting the trimmer guard and trimmer head S Fit the correct trimmer guard A for use with the trimmer head Hook the trimmer guard combination guard onto the fitting on the shaft and secure with the nut B A C B S Fit the dust cup C on the shaft The nut must be completely covered by the dust cup S Hold the dust cup with a wrench to pre vent the shaft from rotating S...

Page 9: ...troke engine oil It is important to accurately mea sure the amount of oil to be mixed to ensure that the correct mixture is obtained When mixing small amounts of fuel even small inaccuracies can drastically affect the ratio of the mixture Petrol CAUTION Always use a good quality pet rol oil mixture at least 90 octane Use low emission petrol also known as alkylate petrol if it is available S The lo...

Page 10: ... especially when working near flammable substances and or vapors Fueling WARNING Taking the following precautions will lessen the risk of fire Do not smoke or place hot objects near fuel Always shut off the engine before refueling Always stop the engine and let it cool for a few minutes before refu elling When refueling open the fuel cap slowly so that any excess pressure is released gently Tighte...

Page 11: ...old the body of the machine on the ground using your left hand CAUTION Not with your foot Firmly grip the starter rope handle with your right hand DO NOT squeeze throttle trigger Slowly pull out the cord until you feel some resistance the starter pawls grip then quickly and powerfully pull the cord Never wrap the starter cord around your hand Repeat pulling the cord until the engine attempts to st...

Page 12: ... CAUTION Do not put any part of your body in marked area Contact can result in burns to the skin or electrical shock if the spark plug cap has been damaged Always use gloves Do not use a machine with dam aged spark plug cap Stopping Stop the engine by pushing and holding the stop switch in the STOP position until the engine stops CAUTION The stop switch automatically returns to the start position ...

Page 13: ...e engine to idle speed after each working operation Long periods at full throttle without any load on the engine can lead to serious engine damage Grass trimming with a trimmer head Trimming S Hold the trimmer head just above the ground at an angle It is the end of the trimmer line that does the work Let the trimmer line work at its own pace Never press the trimmer line into the area to be cut S T...

Page 14: ...he trimmer head to con stantly come into contact with the ground during normal cutting Constant contact of this type can cause damage and wear to the trimmer head Sweeping S The fan effect of the rotating line can be used for quick and easy clearing up Hold the trimmer line parallel to and above the area to be swept and move the tool to and fro S When cutting and sweeping you should use full throt...

Page 15: ...urn the screw counter clockwise until the cutting attachment stops The idle speed is correctly adjusted when the engine will run smoothly in every posi tion The idle speed should also be well below the speed at which the cutting attach ment starts to rotate CAUTION If the cutting attachment rotates when the engine is idling the idle adjustment screw T should be turned counterclockwise until the cu...

Page 16: ...tion If the spark plug is dirty clean it and check that the electrode gap is 0 6 mm The spark plug should be replaced after about a month in operation or earlier if necessary CAUTION Always use the recommended spark plug type Use of the wrong spark plug can damage the piston cylinder 0 6 mm Air filter The air filter must be regularly cleaned to remove dust and dirt in order to avoid S Carburetor m...

Page 17: ...has been exposed to impact or is cracked Check that the trimmer head is undamaged and not cracked Replace the trimmer head if necessary Check that nuts and screws are tight Check that there are no fuel leaks from the engine tank or fuel lines Check the starter and starter cord Clean the outside of the spark plug Re move it and check the electrode gap Adjust the gap to 0 6 mm or replace the spark p...

Page 18: ...ent vibration levels ahv eq at handles measured according to EN ISO 11806 and ISO 22867 m s2 Equipped with trimmer head original left right 4 8 6 4 Note 1 Noise emissions in the environment measured as sound power LWA in conformi ty with EC directive 2000 14 EC Reported sound power level for the machine has been measured with the original cutting attachment that gives the highest level The differe...

Page 19: ...er 2004 relating to electromagnetic compatibility 2004 108 EC andapplicable supplements and of 8 May 2000 relating to the noise emissions in the environment in accordance with Annex V of 2000 14 EC For information relating to noise emissions see Technical data section The following standards have been applied EN ISO 12100 1 A1 2009 EN ISO 12100 2 A1 2009 CISPR 12 2007 EN 11806 2008 SMP The Swedish...

Page 20: ...English 20 115300326 Rev 2 7 15 10 Trimmer Head Line Loading Instructions 20i 10i 3 m 6 m 1 2 3 4 5 6 7 8 9 ...

Reviews: