background image

VFD68 Variable Frequency Drives 

12

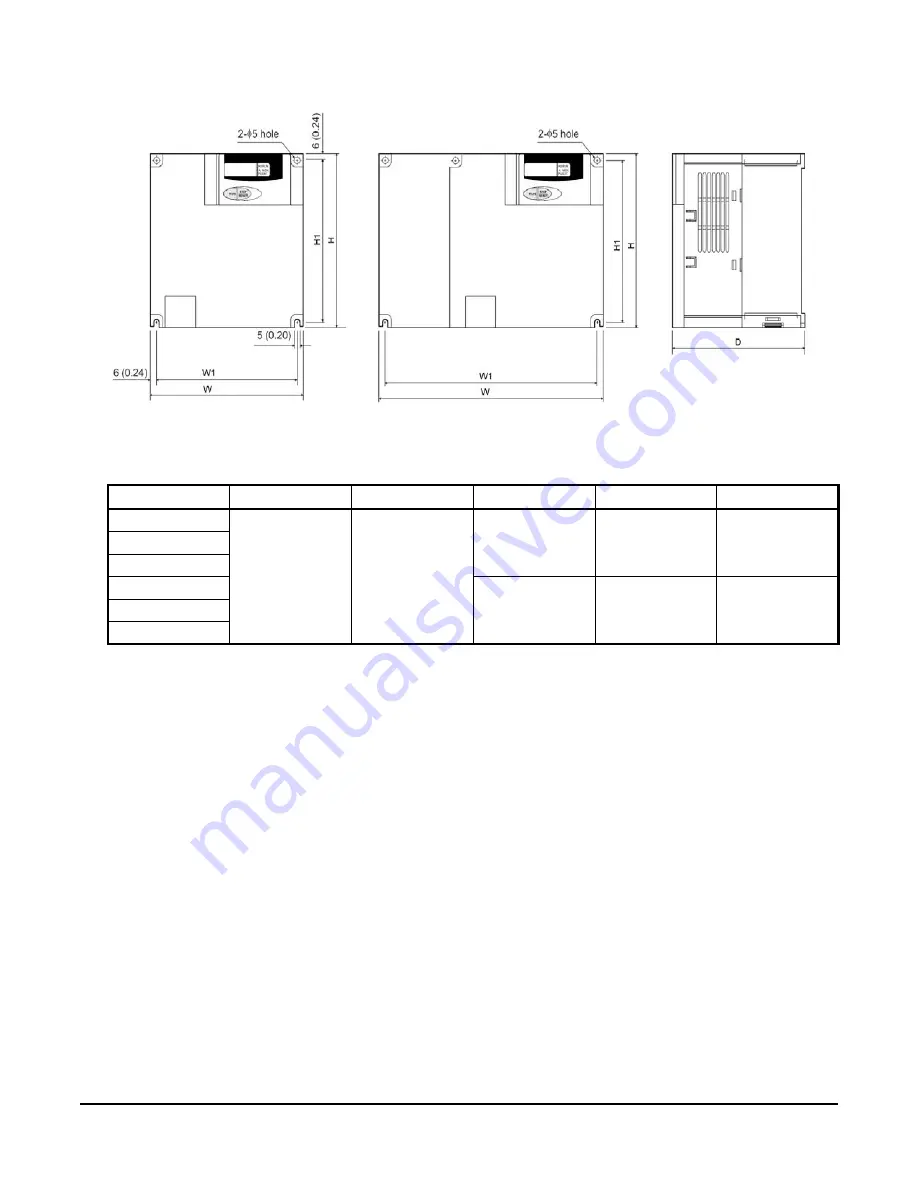
Dimensions for VFD68Dxx Drives 

Table 9: Dimensions for VFD68Dxx Drives, mm (in.)

VFD Model

H

H1

W

W1

D

VFD68DFM

150 (5-15/16)

138 (5-7/16)

140 (5-1/2)

128 (5-1/16)

136 (5-3/8)

VFD68DGM

VFD68DHM

VFD68DJN

228 (8-11/16)

208 (8-3/16)

148 (5-13/16)

VFD68DKN

VFD68DLN

Figure 4: Dimensions for VFD68Dxx Drives, mm (in.)

Summary of Contents for Penn VFD68BBB

Page 1: ...Controlling Multiple Motors 7 Selecting a VFD68 Drive for Use with Single Phase Supplied Power 7 Location Considerations 8 Dimensions for VFD68Bxx and VFD68Cxx Drives 11 Dimensions for VFD68Dxx Drive...

Page 2: ...VFD68Bxx and VFD68Cxx Operation Panel 39 Operation Modes 39 RUN MON PRM LEDs 39 VFD68Dxx Drives Operation Panel 41 Mode of Operation Icons 41 Display Code 41 VFD68Bxx and VFD68Cxx Drive Basic and Adva...

Page 3: ...68Dxx Drives 70 Advanced Troubleshooting 71 Technical Specifications 76 VFD68Bxx or VFD68Cxx Variable Frequency Drive 230 or 460 VAC 76 VFD68Dxx Variable Frequency Drive 575 VAC 76 Appendix 1 Check Fa...

Page 4: ...Read Holding Register Data H03 or 03 96 Write Holding Register Data H06 or 06 98 Function Diagnosis H08 or 08 99 Write Multiple Holding Register Data H10 or 16 100 Read Holding Register Access Log H4...

Page 5: ...d maintain other devices such as supervisory or alarm systems or safety or limit controls intended to warn of or protect against failure or malfunction of the VFD68 Drive IMPORTANT Utiliser ce VFD68 V...

Page 6: ...x 133 5x 2 11 16 x 5 1 4 F 0 75 1 128 x 108 x 130 5 x 4 1 4 x 5 1 8 G 1 5 2 128 x 108 x 136 5 x 4 1 4 x 5 5 16 H 2 2 3 128 x 108 x 156 5 x 4 1 4 x 6 1 8 J 3 7 5 128 x 108 x 166 5 x 4 1 4 x 6 1 2 K 5 5...

Page 7: ...to create three phase power for the motor Therefore you must select a VFD68 drive with a higher maximum output current rating as follows R Current Ampere rating of the controlled single phase motor o...

Page 8: ...c arc across contaminated terminals AVERTISSEMENT Risque de d charge lectrique ou incendie Installer l appareil dans un environnement pr sentant une quantit r duite de contaminants tels que de la pous...

Page 9: ...imit given is for standard operation of the VFD For operation at higher altitudes derate by 3 for each 500 m 1 640 4 ft up to a maximum of 2 500 m 8 202 ft 91 derating Vibration Limit 5 9 m s2 19 4 ft...

Page 10: ...FD68CKL 5 5 7 1 2 12 0 10 2 8 4 VFD68CLL 7 5 10 16 0 13 6 11 2 VFD68CMP 11 15 23 0 19 6 16 1 VFD68CNP 15 20 29 5 25 0 20 6 Table 6 Maximum Current Output Derating above 50 C by VFD68Dxx Drive Model VF...

Page 11: ...6 22 142 5 5 61 VFD68BKL 150 5 91 138 5 43 220 8 66 208 8 19 155 6 10 VFD68BLL VFD68BMP 260 10 23 244 9 61 220 8 66 195 7 68 190 7 48 VFD68BNP Table 8 Three Phase 460 VAC Models mm in VFD Model H H1 W...

Page 12: ...ives Table 9 Dimensions for VFD68Dxx Drives mm in VFD Model H H1 W W1 D VFD68DFM 150 5 15 16 138 5 7 16 140 5 1 2 128 5 1 16 136 5 3 8 VFD68DGM VFD68DHM VFD68DJN 228 8 11 16 208 8 3 16 148 5 13 16 VFD...

Page 13: ...Figure 5 2 Remove the high voltage wiring cover at the bottom of the VFD68 drive Figure 6 Figure 5 Loosen the Cover Screws and Remove the Front Cover Cover Screws Cover Screw 1 1 2 2 Cover Latch FIG c...

Page 14: ...10 Required Clearance Dimension 3 7 kW 5 HP or Less 5 5 7 5 kW 7 1 2 10 HP A 100 mm 4 in or more 100 mm 4 in or more B 10 mm 7 16 in or more 50 mm 2 in or more C Figure 7 Mount the VFD68 Drive 2 to 10...

Page 15: ...Remove the high voltage wiring cover at the bottom of the VFD68 drive by pulling in the direction of Arrow A Figure 10 Mount the VFD vertically in an acceptable NEMA rated enclosure on a non flammable...

Page 16: ...isque d entra ner une d charge lectrique et de provoquer des blessures graves voire mortelles WARNING Risk of Electric Shock Do not touch any exposed metal parts with anything other than properly insu...

Page 17: ...ment l quipement CAUTION Risk of Property Damage Do not run low voltage cable in the same conduit or wiring troughs with high voltage wires Running low and high voltage wires in the same conduit or wi...

Page 18: ...ore you operate the VFD repeated short circuits may damage the VFD These short circuits may be caused by peripheral circuit inadequacy an earth ground fault due to wiring inadequacy or reduced motor i...

Page 19: ...is a different size Tightening Torque N m lb in 0 1 0 75 1 8 1 M3 5 1 2 10 6 1 5 3 7 2 5 M4 1 5 13 3 5 5 11 7 5 15 M5 2 5 22 2 15 20 M6 M5 4 4 39 Table 13 Torque Specifications for VFD68Cxx Drives Rat...

Page 20: ...40 70 80 90 Molded case circuit breaker MCCB Maximum allowable rating A 1 15 15 15 15 20 30 40 50 70 1 Maximum allowable rating by US National Electrical Code Exact size must be chosen for each instal...

Page 21: ...2 5 VFD68BDC 0 4 1 2 2 5 14 14 2 5 2 5 2 5 VFD68BFD 0 75 1 4 2 14 14 2 5 2 5 2 5 VFD68BGG 1 5 2 7 0 14 14 2 5 2 5 2 5 VFD68BHG 2 2 3 10 0 14 14 2 5 2 5 2 5 VFD68BJK 3 7 5 16 5 12 12 4 4 4 VFD68BKL 5...

Page 22: ...FD68DLN 7 5 10 12 0 12 14 3 5 2 5 5 1 The recommended cable wire size is that of the cable THHW cable with a continuous maximum permissible temperature of 75 C 167 F Assumes that the surrounding air t...

Page 23: ...ve rated for 1 49 kW 2 HP b The rating information plate Figure 1 on page 6 for that model indicates that the VFD66BGG drive has a voltage rating of 230 VAC and a maximum output rating of 7 amperes c...

Page 24: ...cover to access the low voltage wiring Figure 13 2 Remove the high voltage wiring cover at the bottom of the VFD68 drive Figure 14 Figure 13 Loosen the Cover Screws and Remove the Front Cover Cover S...

Page 25: ...terminals U V and W on the drive Figure 15 5 Connect earth ground wiring to the earth ground terminals on the VFD68 drive and on the motor 6 Replace the high voltage wiring cover Note When replacing...

Page 26: ...tion B and pull it away from the VFD68 drive using the hooks at Position C as supporting points Figure 16 2 Remove the high voltage wiring cover at the bottom of the VFD68 drive by pulling in the dire...

Page 27: ...wiring to high voltage output terminals U V and W on the drive Figure 18 5 Connect earth ground wiring to the earth ground terminals on the VFD68 drive and on the motor 6 Replace the high voltage wiri...

Page 28: ...accepts 0 5 V 0 10 V or 4 20 mA analog input signals AM Analog Output Provides a 0 10 VDC analog output signal corresponding to output frequency RUN Open Collector Transistor Output VFD Running Switch...

Page 29: ...en maximum alarm load 230 VAC 0 3 A or 30 VDC 0 3 A B Relay Output N C During normal operation relay contacts B and C are connected maximum alarm load 230 VAC 0 3 A or 30 VDC 0 3 A C Relay Output C Re...

Page 30: ...Wiring Connections on page 28 and make any necessary parameter adjustments 6 Replace the front cover IMPORTANT Do not pull the wires out of the terminal block without pushing the orange tab all the w...

Page 31: ...and reset the thermal relay and regenerative brake circuits SD Common Common for contact inputs using Sink logic default setting and 24 VDC supply AM Analog Output 0 10 VDC analog output corresponding...

Page 32: ...er to allow VFD to rotate in a forward direction STR Contact Input Reverse rotation not used SD Common Common for contact inputs when using Sink logic default setting 1 Gray cells indicate a terminal...

Page 33: ...ameters on page 52 For high pressure refrigerants other than R410a you must calculate and change the C x parameters For medium and low pressure refrigerants you must determine the proper P499R transdu...

Page 34: ...with two transducers Figure 23 or Figure 24 use the parameter values in Table 28 and see Figure 29 on page 40 VFD68Bxx and VFD68Cxx Drive Basic and Advanced Parameters on page 43 and Adjusting the De...

Page 35: ...ulate and change the C x parameters based on the desired operating pressure range for the condensing fans on your application Table 29 Settings for Single 4 20 mA Transducer Setting Single Transducer...

Page 36: ...erate a condenser fan motor on an R410 condensing unit using a P499RCP 107 or P499RAP 107 ratiometric transducer Figure 26 For high pressure refrigerants other than R410a you must calculate and change...

Page 37: ...ange and motor speed for the condensing fans on your application See VFD68Dxx Drives Operation Panel on page 41 and VFD68Dxx Drive Parameters on page 46 for more information Table 31 Settings for Sing...

Page 38: ...following digital characters displayed on the operation panel IMPORTANT If the LED display shows an error code press and see Troubleshooting on page 58 for a list of fault or alarm indications probab...

Page 39: ...setup values can be edited The PU EXT mode is typically used to set up your drive for initial operation or to adjust setup parameters on an operating application NET Mode In Network NET mode the drive...

Page 40: ...de and PU mode MODE SET button Used in PRM mode to select a parameter and save a new parameter value Parameter setting mode indication PRM lit to indicate parameter setting mode Monitor indication MON...

Page 41: ...VACR motor application PU EXT Mode In PU EXT mode the drive responds to the connected external signal devices and the drive setup values can be edited The PU EXT mode is typically used to set up your...

Page 42: ...n command Used to stop operation Used to reset the VFD68 Drive when the output stops due to activation of the protection function Table 33 Unit Indications and Operating Status Indications Indication...

Page 43: ...400 Hz 20 Hz P 6 Low Speed The speed or frequency that the VFD68 output drives the attached motor when terminal RL is connected to terminal SD common 0 400 Hz 10 Hz P 7 Acceleration Time Defines the...

Page 44: ...most conditions causing a trip but not after thermal overload while the VFD operates runs 4 4 P 67 Number of Retries at Fault Occurrence The number of consecutive retries that will occur after a fault...

Page 45: ...ected to terminal 4 Select 0 for 4 20 mA and position AI2 mode switch to I or select 1 for 0 5 V or 2 for 0 10 V and position AI2 mode switch to V 0 1 2 1 P 295 Magnitude of Frequency Change 0 1 Frequ...

Page 46: ...mum Frequency Defines the maximum speed of the motor in your application See Figure 31 0 120 Hz 60 Hz P 2 Minimum Frequency Defines the minimum speed of the motor in your application 1 See Figure 31 0...

Page 47: ...ry Wait Time Defines the time delay in seconds before the drive attempts to restart the motor after a fault shutdown 0 1 600 seconds 10 seconds P 72 PWM Frequency Selection Allows you to reduce audibl...

Page 48: ...peed defined as frequency 1 400 Hz 60 Hz P 905 screen b Analog Input 2 of input current for setpoint where motor reaches maximum frequency or speed 1 100 54 8 11 mA 1 If P 32 9999 then the speed of th...

Page 49: ...es 49 Parameter Setting Calculations for Motor Speed vs Pressure Calculating C x Parameters for VFD68Bxx and VFD68Cxx Models Figure 32 Frequency and Motor Speed 50 Hz Figure 33 Applications Using 0 5...

Page 50: ...VFD68 Variable Frequency Drives 50 Figure 34 Applications Using 0 10 V Transducers Figure 35 Applications Using 4 20 mA Transducers...

Page 51: ...VFD68 Variable Frequency Drives 51 Calculating Parameters 902 to 905 for VFD68Dxx Models Figure 36 Applications Using 0 5 4 5 V Ratiometric Transducers Figure 37 Applications Using 0 10 V Transducers...

Page 52: ...radiation use the smallest number possible for P 72 Adjusting the Default Parameters VFD68Bxx and VFD68Cxx Drives Enter the Parameter Adjustment Mode 1 Remove the jumper that connects terminal SD to...

Page 53: ...Select and Change Most Parameters 5 Turn to select a parameter number on the display Example P 32 6 Press to show the parameter value The default value for P 32 is 12 5 7 Turn to change the parameter...

Page 54: ...g the analog input VFD68Dxx Drives Enter the Parameter Adjustment Mode 1 Remove the jumper that connects terminal SD to terminal STF 2 Turn the power on The monitor display appears 3 Open the operatio...

Page 55: ...ce to display P 902 17 Press to show P 90xa The default value of P 902a is 12 5 Hz Press or to change the value 18 Press and hold for two seconds to set the P 90xa value and show the actual input for...

Page 56: ...Turn to change motor speeds Run the motor at high speed maximum frequency 4 Verify that the motor FLA is correct using one of the following methods Use a clamp on amp meter Press repeatedly until MON...

Page 57: ...t the VFD68 is in PU mode with no jumper between SD and STF Figure 39 on page 56 1 Verify that the jumper above terminal SC Figure 39 is set to SINK 2 Verify that the AI2 mode switch to the left of te...

Page 58: ...eset the VFD and resume operation See Resetting the VFD68 Drive on page 69 Failure to take corrective action and reset the VFD may lead to a repeat of the fault condition and damage the VFD For furthe...

Page 59: ...peration panel lock Er1 to 4 Parameter write error LOCD Password locked Err VFD reset Warning OL Stall protection overcurrent oL Stall protection overvoltage RB Regenerative brake pre alarm not used T...

Page 60: ...al O L relay function E FIN Heatsink overheat E ILF Input phase loss not used E OLT Stall prevention stop E BE Brake transistor alarm detection E GF Output side earth ground fault overcurrent at start...

Page 61: ...eter setting when P 77 has been set to disable parameter write Frequency jump setting range overlapped The PU and VFD cannot make normal communication Check point Check the setting of P 77 Check the s...

Page 62: ...l prevention operation level this function increases the frequency again During constant speed operation When the output current of the VFD exceeds the stall prevention operation level P 22 this funct...

Page 63: ...Operation Panel Indication TH Description Appears if the cumulative value of the P 9 reaches or exceeds 85 of the preset level If it reaches 100 of the P 9 setting a motor overload trip E THM occurs C...

Page 64: ...800 275 5676 Table 51 Fan Alarm Operation Panel Indication FN Description For the VFD that contains a cooling fan appears on the operation panel when the cooling fan stops due to an alarm Check Point...

Page 65: ...on of the motor s mechanical brake Check if the stall prevention operation level is set too high Corrective Action Increase the deceleration time Check the wiring to make sure that output short circui...

Page 66: ...at torque boost setting is not too large small Check the motor for use under overload Check for too high surrounding air temperature Corrective Action Increase acceleration deceleration time Adjust th...

Page 67: ...LT may not occur if stall prevention OL is activated during output phase loss Check Point Check the motor for use under overload Corrective Action Reduce the load weight Check the P 22 setting Table 6...

Page 68: ...ent Limit Circuit Fault Operation Panel Indication E IOH Description This function is activated when the resistor of the inrush current limit circuit overheats Check Point Check that frequent power ON...

Page 69: ...onitor displays PS PU Stop Warning and then performs a controlled shutdown of the motor WARNING Risk of Personal Injury Before you reset the VFD68 drive verify that all persons are clear of the contro...

Page 70: ...ed stop disconnect the supply power from the drive for at least 30 seconds and then reconnect the supply power to the drive If it is not easy to disconnect the supply power from the drive follow these...

Page 71: ...c Noise Table 72 on page 73 Motor Generates Heat Abnormally Table 73 on page 73 Motor Rotates in the Opposite Direction Table 74 on page 73 Speed Greatly Differs from the Setting Table 75 on page 74 A...

Page 72: ...flickering Check the frequency command source and enter a frequency command SINK SOURCE jumper is set incorrectly RUN LED on the operation panel is flickering Check that the control logic switchover j...

Page 73: ...rer Table 72 VFD Generates Abnormal Acoustic Noise Check Points Possible Cause Action Fan The fan cover was not correctly installed when a cooling fan was replaced Install the fan cover correctly Tabl...

Page 74: ...heck Points Possible Cause Action Param Setting Acceleration deceleration time is too short or too long Change P 7 and P 8 values Table 77 Speed Varies During Operation Check points Possible Cause Act...

Page 75: ...bination of motors connected in parallel does not exceed the VFD68 drive s output current rating Table 81 Unable to Write Parameter Setting Check Points Possible Cause Action Input Signal P 77 should...

Page 76: ...UL 508C CSA C22 2 No 14 File E244421 Industry Canada IC Compliant to Canadian ICES 003 Class B limits Europe CE Mark Johnson Controls Inc declares that this product is in compliance with the essential...

Page 77: ...titude 1 000 m 3 300 ft Maximum without derating Enclosures UL Type 1 NEMA Fan Cooled Maximum High Voltage Wire Length Up to 100 m 328 ft between the VFD68 drive and the motor using the appropriate wi...

Page 78: ...DE button twice to enter Fault History mode E 3 Rotate the setting dial slightly If an Indicator Fault Error or Warning has occurred the display blinks while showing an indicator message If no Fault E...

Page 79: ...VFD68 Variable Frequency Drives 79 Figure 40 Check Fault History...

Page 80: ...itional VFD68 Drive Application Examples VFD68Bxx and VFD68Cxx Drives PL 262 PSI PH 420 PSI C 3 C 4 C 6 and C 7 use default settings Figure 41 Connecting Two Ratiometric Transducers Figure 42 Motor Sp...

Page 81: ...VFD68 Variable Frequency Drives 81 Figure 43 Motor Speed versus Pressure Ramp for 0 50 PSI Transducer Used in a Reverse Acting Mode RA Mode...

Page 82: ...alculate new values for C 3 and C 4 When connecting a second P499V transducer then also change Parameter C 6 to 3 4V and change C 7 to 5 2V Figure 44 Connecting Two 0 10V Output Transducers Figure 45...

Page 83: ...able Frequency Drives 83 PL 135 PSI PH 219 PSI Calculate new values for C 6 and C 7 Figure 46 Connecting One 4 20 mA Output Transducer Figure 47 Motor Speed versus Pressure Ramp for 0 500 PSI 4 20 mA...

Page 84: ...Drives 84 The C450CQN can use temperature pressure or humidity to control the VFD68 output to a motor Set the AI2 mode switch to V Figure 48 Connecting a C450CQN Control with a 0 10 V Output to a VFD...

Page 85: ...8 Variable Frequency Drives 85 VFD68Dxx Drives Figure 49 Wiring 0 5 4 5 VDC Ratiometric Input Signal Transducers Figure 50 Motor Speed vs Pressure Ramp for Two 0 5 4 5 VDC 750 PSI Ratiometric Transduc...

Page 86: ...VFD68 Variable Frequency Drives 86 Figure 51 Wiring 0 10 V Input Signal Transducer Figure 52 Motor Speed vs Pressure Ramp for 0 10 VDC 500 PSI Transducer...

Page 87: ...VFD68 Variable Frequency Drives 87 Figure 53 Wiring 4 20 mA Input Signal Transducer Figure 54 Motor Speed vs Pressure Ramp for 4 20 mA 500 PSI Transducer...

Page 88: ...when P 296 1 to 6 0 to 5 Displays password unlock error count reading only Valid when P 296 101 to 106 9999 No password lock reading only Table 83 Parameter Reading and Writing Restriction P 296 P 296...

Page 89: ...password when P 296 1 to 6 creates a password unlock error but does not lock the VFD If the correct password is eventually entered the VFD68 will unlock when P 296 101 to 106 creates a password unlock...

Page 90: ...pin 8 of the RJ45 receptacle are connected to a power supply in the VFD68 drive Connecting one or both of these pins to a communication cable may damage the VFD68 drive Table 85 VFD68Bxx and VFD68Cxx...

Page 91: ...communication speed 96 48 96 192 384 Communication speed The setting value x 100 equals the communication speed For example if the communication setting is 96 the communication speed is 9600 bps P 12...

Page 92: ...his product supports only the RTU mode in which 1 byte 8 bit data is transmitted as it is Only the communication protocol is defined by the Modbus protocol the physical layer is not stipulated Table 8...

Page 93: ...ng address 0 the master can send a message to all slaves All slaves that received the message from the master execute the requested function In this communication the slaves do not return a response t...

Page 94: ...ve recognizes it as one message Protocol Details Table 89 Summary of Message Fields Start 1 2 3 4 End Address Function Data CRC Check T1 8 bit 8 bit n x 8 bit L 8 bit H 8 bit T1 Table 90 Description o...

Page 95: ...ted in this sub table the slave returns an error response When the slave returns a normal response it returns the function code set by the master When the slave returns an error response it returns H8...

Page 96: ...ve Address Address to which the message is sent Broadcast communication cannot be made 0 is invalid Function Set H03 Starting Address Set the address at which holding register data read is started Sta...

Page 97: ...decimal must be added to this Register Starting Address to achieve the Register number of 41004 decimal for Parameter 4 see Table 120 Read value Register 41004 P 004 H1770 60 00 Hz Register 41005 P 0...

Page 98: ...olding register to which data will be written Register address holding register address decimal 40001 For example setting the register address 0001 reads the data of the holding register 40002 Preset...

Page 99: ...ion Date CRC Check 8 bit H08 8 bit H00 8 bit H00 8 bit H 8 bit L 8 bit L 8 bit H 8 bit Table 105 Query Message Setting Message Setting Description Slave Address Address to which the message is sent Br...

Page 100: ...on Function Set H10 Starting Address Address where holding register data write is started Starting address starting register address decimal 40001 For example setting the starting address 0001 reads t...

Page 101: ...g Address Number of Points CRC Check 8 bit H46 8 bit H 8 bit L 8 bit H 8 bit L 8 bit L 8 bit H 8 bit Table 114 Query Message Setting Message Setting Description Slave Address Address to which the mess...

Page 102: ...e H03 Read holding register data when the number of points is 1 or more and there is one or more holding registers from which the data may be read b Function code H10 write multiple holding register d...

Page 103: ...Write See below 3 40014 Running Frequency RAM Value Read Write According to the P 37 settings the frequency and selectable speed are in 1 rotation minute increments 40015 Running Frequency EEPROM Val...

Page 104: ...ual Operation Time 1 h 40224 Motor Load Factor 0 1 40225 Cumulative Power 1 kWh 40252 PID Setpoint 0 1 40253 PID Measured Value 0 1 40254 PID Deviation 0 1 40261 Motor Thermal Load Factor 0 1 40262 VF...

Page 105: ...41905 Terminal 4 Frequency Setting Gain Frequency Read Write C 7 P 905 42905 Terminal 4 Frequency Setting Gain Analog Value Read Write The analog value set to C 7 P 905 is read 43905 Terminal 4 Frequ...

Page 106: ...192 or P 197 Changing the terminal assignment may affect the other functions Make the setting after confirming the function of each terminal H22 E OV3 H90 E OHT HC9 E SAF H30 E THT H91 E PTC HF5 E 5...

Page 107: ...x 8 11 16 x 7 1 2 VFD68BNP 2C FE72015 15 20 75 0 58 0 260 x 220 x 190 10 1 4 x 8 11 16 x 7 1 2 Table 131 VFD68Cxx Models 380 480 V VFD68 Model Rasmi EMC Filter Number kW H P Typical Full Load Input C...

Page 108: ...e registered trademarks of Johnson Controls Inc in the United States of America and or other countries All other trademarks used herein are the property of their respective owners Copyright 2017 by Jo...

Reviews: