background image

420705-UIM-C-0310

10

Johnson Controls Unitary Products

SECTION IV: GAS PIPING

GAS SAFETY

GAS PIPING INSTALLATION

Properly sized wrought iron, approved flexible or steel pipe must be
used when making gas connections to the unit. If local codes allow the
use of a flexible gas appliance connection, always use a new listed con-
nector. Do not use a connector that has previously serviced another gas
appliance.

Some utility companies or local codes require pipe sizes larger than the
minimum sizes listed in these instructions and in the codes. The furnace
rating plate and the instructions in this section specify the type of gas
approved for this furnace - only use those approved gases. The instal-
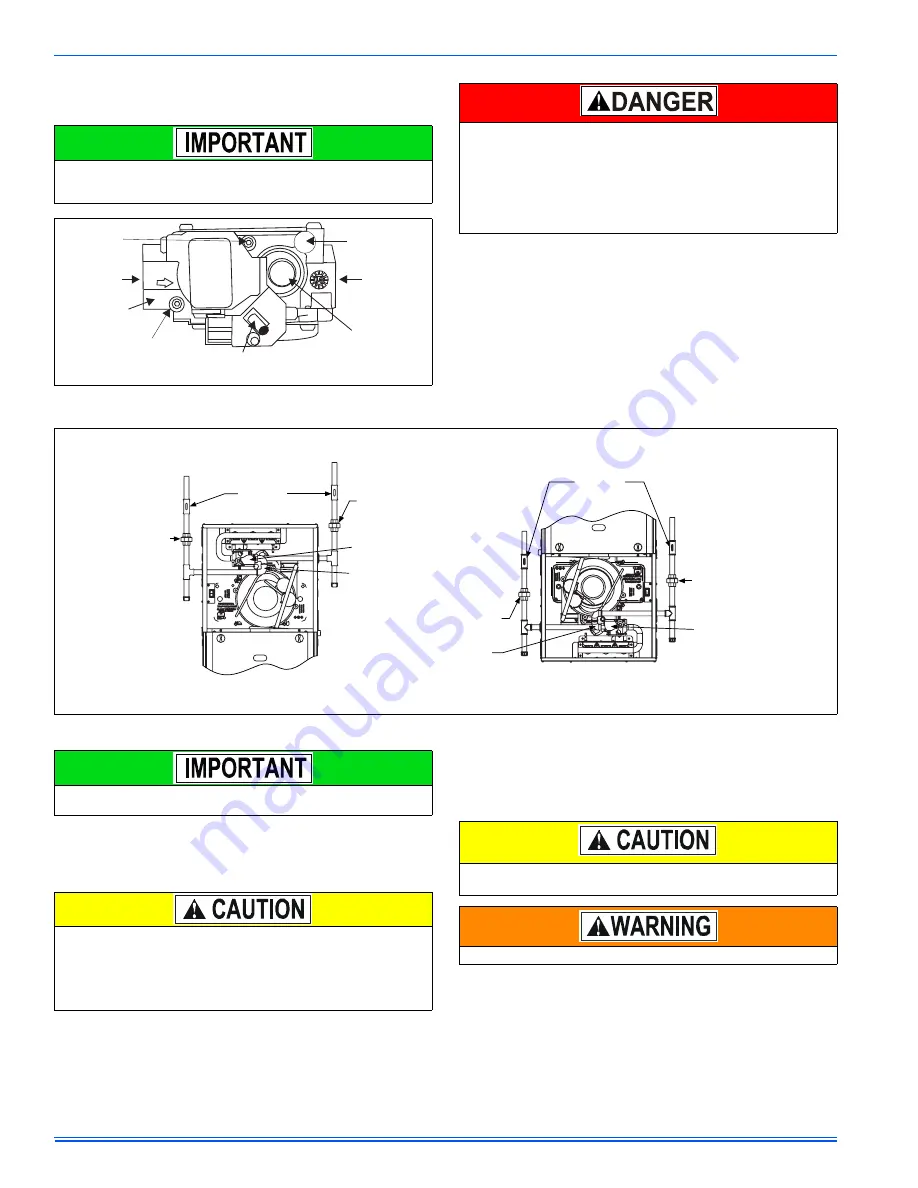
lation of a drip leg and ground union is required. Refer to Figure 15.

The furnace must be isolated from the gas supply piping system by
closing its individual external manual shutoff valve during any pressure
testing of the gas supply piping system at pressures equal to or less
than 1/2 psig (3.5 kPa).

Gas piping may be connected from either side of the furnace using any
of the gas pipe entry knockouts on both sides of the furnace. Refer to
Figure 12.

GAS ORIFICE CONVERSION FOR PROPANE (LP)

This furnace is constructed at the factory for natural gas-fired operation,
but may be converted to operate on propane (LP) gas by using a fac-
tory-supplied LP conversion kit.

1.

Shut off gas supply at valve upstream from furnace or at meter as
required.

2.

Disconnect gas supply piping from gas valve on furnace.

3.

Disconnect electrical wires from gas valve, noting which wires are
connected to which terminals

4.

Remove the screws that attach the gas manifold to the burner sup-
port box.

5.

Remove and discard natural gas orifices.

Plan your gas supply before determining the correct gas pipe entry.
Use 90-degree service elbow(s), or short nipples and conventional
90-degree elbow(s) to enter through the cabinet access holes.

 FIGURE 14:  

Gas Valve

INLET

WRENCH
BOSS

INLET
PRESSURE
PORT

ON

OFF

ON/OFF SWITCH
(Shown in ON position)

MAIN REGULATOR
ADJUSTMENT

OUTLET

OUTLET
PRESSURE
PORT

VENT PORT

An overpressure protection device, such as a pressure regulator,
must be installed in the gas piping system upstream of the furnace
and must act to limit the downstream pressure to the gas valve so it
does not exceed 0.5 PSI (14" w.c. (3.48 kPa). Pressures exceeding
0.5 PSI (14” w.c. (3.48 kPa) at the gas valve will cause damage to
the gas valve, resulting in a fire or explosion or cause damage to
the furnace or some of its components that will result in property
damage and loss of life.

 FIGURE 15:  

Upflow/Downflow Gas Piping

Upflow

Configuration

Downflow

Configuration

External
Manual
Shut-off
Valve

External
Manual
Shut-off
Valve

To Gas
Supply

To Gas
Supply

To Gas
Supply

To Gas
Supply

Drip
Leg

Drip
Leg

Drip
Leg

Drip
Leg

Gas
Pipe

Gas
Valve

Gas
Pipe

Gas
Valve

Ground
Union

Ground
Union

Ground
Union

Ground
Union

NOTE: Ground Union maybe installed inside or outside unit.

An accessible manual shutoff valve must be installed upstream of
the furnace gas controls and within 6 feet (1.8 m) of the furnace.

The gas valve body is a very thin casting that cannot take any
external pressure. Never apply a pipe wrench to the body of the gas
valve when installing piping. A wrench must be placed on the octa-
gon hub located on the gas inlet side of the valve. Placing a wrench
to the body of the gas valve will damage the valve causing improper
operation and/or the valve to leak.

The gas supply must be shut off prior to disconnecting the elec-
trical power, before proceeding with the conversion.

SHOCK HAZARD - Turn off electrical supply to furnace.

Summary of Contents for MG9S*MP

Page 1: ...and Vent Termination 20 Double Vertical Combustion Air Intake and Vent Termination 20 Direct Vent Air Intake Connection and Vent Connection 21 Outside and Ambient Combustion Air 22 Attic and Crawl Space Combustion Air Termination 23 Gas Valve 26 Reading Gas Pressure 26 Furnace Control Board 27 Furnace Control Event Schedule 31 Wiring Diagram 32 LIST OF TABLES Unit Clearances to Combustibles 4 Coil...

Page 2: ...ving or handling this furnace prior to installation always leave the doors on the furnace to provide support and to prevent damage or warping of the cabinet When lifting the furnace by the cabinet support the ends of the furnace rather than lifting by the cabinet flanges at the return air openings bottom or sides or sup ply air opening 13 When lifting the furnace it is acceptable to use the primar...

Page 3: ...TANDARDS Follow all national local codes and standards in addition to this installa tion manual The installation must comply with regulations of the serv ing gas supplier local building heating plumbing and other codes In absence of local codes the installation must comply with the national codes listed below and all authorities having jurisdiction In the United States and Canada follow all codes ...

Page 4: ...r alcove installation FOR FURNACES INSTALLED IN THE COMMON WEALTH OF MASSACHUSETTS ONLY For all side wall horizontally vented gas fueled equipment installed in every dwelling building or structure used in whole or in part for resi dential purposes including those owned or operated by the Com monwealth and where the side wall exhaust vent termination is less than seven 7 feet above finished grade i...

Page 5: ...tor A coil drain pans are to be installed in the upflow horizontal configura tion then extra 2 minimum spacing may be needed to ensure against drain pan distortion On all installations without a coil a removable access panel is recom mended in the outlet duct such that smoke or reflected light would be observable inside the casing to indicate the presence of leaks in the heat exchanger This access...

Page 6: ...ovided the combustion air and vent system have been installed and maintained as a Two Pipe Sealed Combustion Air System and provided a return air duct and plenum are not required by state local or regional codes If a return air duct system and return plenum are required by state local or regional codes then the return plenum may be con nected to the furnace inlet and must terminate outside the spa...

Page 7: ...no conversion Position the coil casing over or under the furnace opening as shown in Figure 7 after configuring coil flanges as required see Coil Flange sec tion below COIL FLANGE INSTALLATION The coils include removable flanges to allow proper fit up with furnaces having various inlet and outlet flange configurations The two flanges are attached to the top of the coil in the factory during produc...

Page 8: ...oor and sealed Refer to the instructions supplied with the duct con nector for proper installation Refer to the separate accessory parts list at the end of these instructions for the approved accessory duct con nectors DOWNFLOW APPLICATION Furnace is shipped in downflow configuration It may be necessary to rotate the vent blower 180 left so that the vent pipe passes through the side of the furnace...

Page 9: ...bustion Air Inlet Gas Pipe Entry Electrical Entry Condensate Drain Optional Return Air Cutout Either side 29 5 For Cladded door add appoximately an additional 75 C SUPPLY END 56 56 20 B 3 23 8 56 Combustion Air Inlet Vent Outlet RETURN END B 24 25 Table 3 Cabinet and Duct Dimensions BTUH kW Input Nominal CFM m3 min Cabinet Size Cabinet Dimensions Inches Approximate Operating Weights A A cm B B cm ...

Page 10: ...s orifices Plan your gas supply before determining the correct gas pipe entry Use 90 degree service elbow s or short nipples and conventional 90 degree elbow s to enter through the cabinet access holes FIGURE 14 Gas Valve INLET WRENCH BOSS INLET PRESSURE PORT O N O FF ON OFF SWITCH Shown in ON position MAIN REGULATOR ADJUSTMENT OUTLET OUTLET PRESSURE PORT VENT PORT An overpressure protection devic...

Page 11: ...or specific furnace electrical data Never use an open flame to check for leaks Fire or explosion could occur Since some leak solutions including soap and water may cause corrosion or stress cracking the piping must be rinsed with water after testing unless it has been determined that the leak test solution is non corrosive Table 5 Nominal Manifold Pressure High Fire Manifold Pressures in wc Manifo...

Page 12: ...ections on the thermostat to the terminal board on the ignition module as shown in Figure 18 Electronic thermo stats may require the common wire to be connected Apply strain relief to thermostat wires passing through cabinet If air conditioning equip ment is installed use thermostat wiring to connect the Y and C termi nals on the furnace control board to the proper wires on the condensing unit uni...

Page 13: ...n better if an open stand pipe is installed in the drain line See Figure 20 If evaporator coil or humidifier drains are combined with the furnace drain then the open stand pipe could be raised higher above the 5 minimum FIGURE 19 Accessory Connections The Figures 22 23 show the condensate drain arrangement for the various possible furnace and vent blower positions The furnace condensate pan is sel...

Page 14: ... furnace FIGURE 21 Typical Combustion Pipe Drain Tee Connect to Drain Trap Combustion Air Pipe Tee with Drain Trap Exhaust Pipe DO NOT terminate the condensate drain in a chimney or where the drain line may freeze If the drain line will be exposed to tempera tures below freezing adequate measures must be taken to prevent the drain line from freezing Failure to provide proper protection from freezi...

Page 15: ...off so that no sagging loops will collect and hold condensate which will cause the furnace to not operate Shorten pressure switch hose Re route and shorten pressure switch hose Shorten rain gutter hose Move rain gutter hose to this position For 100 120 input furnaces the condensate drain is plumbed toward the left casing outlet from the factory For 060 080K input furnaces the condensate drain is p...

Page 16: ...itch hose to this position NOTE May require the longer hose that is provided with wider cabinets Move condensate drain hose to this position May exit either side of the cabinet Move rain gutter hose to this position When drain hose routing changes are required be sure to cap all un used openings If rerouting hoses excess length should be cut off so that no sagging loops will collect and hold conde...

Page 17: ...ment that is approved for use with BOTH materials Metallic materials must not be used for venting or air intake 5 If a flexible connector is used in the vent system it must be made of a material that is resistant to acidic exposure and to at least 225 F temperature Flexible connectors are also allowed in the combustion air pipe 6 All models are supplied with 2 vent connections When the pipe must b...

Page 18: ...event sagging 9 Seal around the openings where the combustion air and or vent piping pass through the roof or sidewalls COMBUSTION AIR VENTING TABLE 9 Equivalent Length of Fittings Fitting Equivalent Length 2 90º sweep elbow 5 feet of 2 pipe 2 45º sweep elbow 2 1 2 feet of 2 pipe 2 90º standard elbow 7 feet of 2 pipe 2 45º standard elbow 3 1 2 feet of 2 pipe 3 90º sweep elbow 5 feet of 3 pipe 3 45...

Page 19: ...equirements of the gas supplier 12 30 5 cm or in accordance with local installation codes and the requirements of the gas supplier F Clearance to outside corner 12 30 5 cm or in accordance with local installation codes and the requirements of the gas supplier 12 30 5 cm or in accordance with local installation codes and the requirements of the gas supplier G Clearance to inside corner 3 feet 91 4 ...

Page 20: ...r combustion air or venti lated combustion air and the instructions for installing the vent system with the vent terminating as shown in Figures 28 or 29 The two pipe system must have a separate combustion air pipe and a separate vent pipe for each furnace Under NO circumstances can the two combus tion air or vent pipes be tied together The combustion air and vent pipes must terminate in the same ...

Page 21: ...ally adjustable louvers are not permitted for use 4 A automatically operated damper or automatically adjustable lou vers shall be interlocked so that the main burner cannot operate unless either the damper or the louver is in the fully open position An optional plastic birdscreen is shipped in the loose parts bag with every furnace This may be installed in the intake collar to prevent any small ob...

Page 22: ...l input rating of all equipment located in the enclosure b Not less than the sum of all vent connectors in the confined space 3 The duct shall be least the same cross sectional area as the free area of the air supply inlet opening to which it connects 4 The blocking effects of louvers grilles and screens must be given consideration in calculating free area If the free area of a specific louver or ...

Page 23: ...e and horizontal pitch Determine that there is no blockage restriction leakage corrosion or other deficiencies which could cause an unsafe condition 2 Close all building doors and windows and all doors 3 Turn on clothes dryers and TURN ON any exhaust fans such as range hoods and bathroom exhausts so they shall operate at maximum speed Open the fireplace dampers Do not operate a summer exhaust fan ...

Page 24: ...tion to adjust the manifold pressure Repeat steps 2 5 until correct input is achieved HOT SURFACE IGNITION SYSTEM Do not attempt to light this furnace by hand with a match or any other means There may be a potential shock hazard from the components of the hot surface ignition system The fur nace can only be lit automatically by its hot surface ignition system DO NOT set manifold pressure less than...

Page 25: ...0 300 750 78 46 92 231 25 144 288 720 80 45 90 225 26 138 277 692 82 44 88 220 27 133 267 667 84 43 86 214 28 129 257 643 86 42 84 209 29 124 248 621 88 41 82 205 30 120 240 600 90 40 80 200 31 116 232 581 92 39 78 196 32 113 225 563 94 38 76 192 33 109 218 545 96 38 75 188 34 106 212 529 98 37 74 184 35 103 206 514 100 36 72 180 36 100 200 500 102 35 71 178 37 97 195 486 104 35 69 173 38 95 189 4...

Page 26: ...ressure by adjusting gas valve regulator screw for the appropriate gas per the following 4 After the manifold pressure has been adjusted re calculate the furnace input to make sure you have not exceeded the specified input on the rating plate Refer to CALCULATING THE FURNACE INPUT NATURAL GAS 5 Once the correct BTU kW input has been established turn the gas valve to OFF and turn the electrical sup...

Page 27: ...ings 60 90 120 and 180 seconds The fan off delay is factory set to 120 sec onds The fan off setting must be long enough to adequately cool the furnace but not so long that cold air is blown into the heated space The fan off timing may be adjusted by positioning the jumper on two of the four pins as shown in Figure 35 The temperature rise or temperature difference between the return air and the sup...

Page 28: ...gh 2341 2245 2153 2072 1977 1876 1769 1642 1506 1306 Medium High 2002 1952 1878 1823 1739 1657 1563 1458 1322 1185 Medium Low 1615 1579 1533 1473 1430 1368 1282 1186 1091 953 Low 1352 1295 1259 1245 1190 1141 1076 998 938 820 Left Side Airflow Data SCFM Models Input Airflow Cabinet Speed Ext Static Pressure in H2O 0 1 0 2 0 3 0 4 0 5 0 6 0 7 0 8 0 9 1 0 60 1200 B High 1470 1406 1361 1309 1241 1155...

Page 29: ...he pressure switch will close the ignition control pro vides a 17 second ignitor warm up period the gas valve then opens the gas starts to flow ignition occurs and the flame sensor begins its sensing function The blower motor will energize 30 seconds after the gas valve opens if a flame is detected Normal furnace operation will continue until the thermostat circuit between R and W is opened which ...

Page 30: ...rnace will lock out for one hour and then restart 8 RED FLASHES This fault is indicated if the flame is lost 5 times 4 recycles during the heating cycle This could be caused by low gas pressure dirty or faulty flame sensor or faulty gas valve The furnace will lock out for one hour and then restart 9 RED FLASHES Indicates reversed line voltage polarity or grounding problem Both heating and cooling ...

Page 31: ...Req d BRACKET BLOWER TRACK 2 Req d HEAT EXCHANGER ASS Y FABRICATED PARTS Continued MANIFOLD GAS PAN BOTTOM PANEL TOP PANEL DOOR 2 Req d PANEL BLOCKOFF MISCELLANEOUS ORIFICE BURNER Natural 45 SIGHT GLASS OVAL 2 Req d GASKET FOAM Door 1 5 ft req d PAN CONDENSATE BRACKET DOOR HARNESS WIRING FERRULE 3 Req d GROMMET 3 Req d MOTOR MOUNT TUBING SILICON HOSE RAIN GUTTER HOSE CONDENSATE PLUG SEAL 7 8 PLUG ...

Page 32: ...hed in U S A 420705 UIM C 0310 Copyright 2010 by Johnson Controls Inc All rights reserved Supersedes 420705 UIM A 1209 Johnson Controls Unitary Products P O Box 19014 Wichita KS 67204 9014 SECTION XII WIRING DIAGRAM FIGURE 37 Wiring Diagram ...

Reviews: