

Security
Using the tilt mount to attach the camera to a wall surface
(continued)
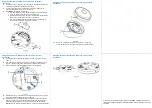
12. Hold the rear cap (1) (Figure 6) up to the camera and align the three holes
on the rear cap with the three holes on the camera.
13. Insert the three screws into the three holes and use a screwdriver to
securely attach the rear cap cover to the camera.
14.
OPTIONAL:
Inserting a micro-SD card.
a. Use the screwdriver to remove the two screws on the SD card slot
cover (2) (Figure 6) and then insert a micro-SD card.
b. Hold the SD card slot cover back up to the camera and align the two
holes on the cover with the two holes on the camera.
c. Insert the two screws into the two holes and use a screwdriver to
securely attach the SD card cover to the camera.
Figure 6
Using the tilt mount to attach the camera to a wall surface
(continued)
15. Use a screwdriver to remove the safety wire screw (3) (Figure 7) on the
camera.
16. Insert the
safety wire screw into the ‘loop’ at the end of the safety wire (2)
(Figure 7) and then insert the screw back into the hole on the camera.
17. Use a screwdriver to securely attach the screw into the camera.
Figure 7
18. Hold the camera up to the tilt mount and align the security screw (1) (Figure
8) with the tilt mount alignment mark (2) (Figure 8).
19. Hold the camera up to the flat bracket and insert the three screws on the
camera (1) (Figure 7) up into the three holes in the flat bracket and then
rotate the camera clockwise until it clicks into place on the flat bracket.
Note:
Rotate the camera counterclockwise to remove it from the flat bracket.
Using the tilt mount to attach the camera to a wall surface
(continued)
Figure 8
20. Use the torx wrench to rotate the security screw (1) (Figure 9)
counterclockwise to securely attach the camera to the flat bracket.
Using the tilt mount to attach the camera to a wall surface
(continued)
Figure 9
© 2022 Johnson Controls. All rights reserved. JOHNSON CONTROLS, TYCO and
ILLUSTRA are trademarks and/or registered trademarks. Unauthorized use is strictly
prohibited.