background image

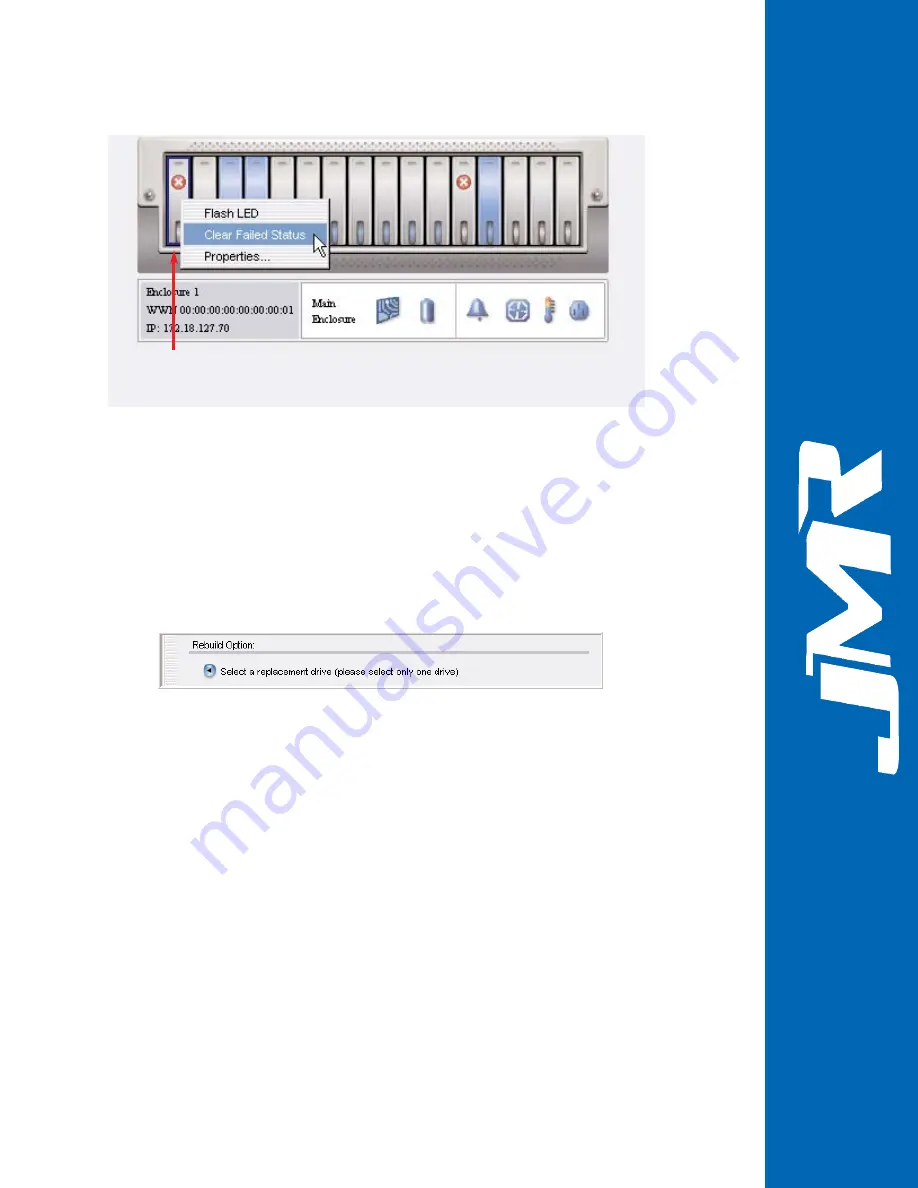
Figure 71.  Clear Drive of Failed Status

• Drive fails due to a system fault.

Select a replacement drive:  If a drive fails during system operation, it
will be marked as a failed drive. This drive is most likely damaged
and not a good choice for a rebuild. It should physically be replaced
or the rebuild option should be directed to a different drive already
installed. In order to start a manual rebuild, click on the Select a
replacement drive 
button on the Rebuild window, (see 

Figure 72

and

Figure 75

).

Figure 72.  Select the Replacement Drive Button 

Manual Rebuild Process

This section assumes three conditions: 1- that a hard disk drive is already
installed and available in your enclosure, 2- that there are no global or dedicated
spares assigned, 3- that auto rebuild in not enabled. The following instructions
will walk you through a manual rebuild process of an array.

Once a member drive has failed, it will be marked with a circled  X and displayed
in the Physical Elements Panel, but is no longer part of any array (see 

Figure 73

,

(it is not included in the highlighted blue drives (ComArray1)). This will cause
the associated array to be marked as degraded with a yellow tag (see

Figure 73

). 

If the auto rebuild does not start immediately (no global or dedicated spare
available)
, you will need to manually direct the system to rebuild an array set. 

MARLIN

TM

4-39

M

MA

AR

RLLIIN

N

T

TM

M

16-Bay 4G FC-SATA300/SAS RAID Array Management Users Guide Rev B

Click the following:
1) failed drive
2) Clear Failed Status


Summary of Contents for MARLIN FC-SATA300/SAS

Page 1: ...4Gb FC SATA300 SAS 16 bay Rackmount Enclosure RAID Array Management Users Guide May 19 2006 Revision B Patent Pending MARLIN TM ...

Page 2: ...on and performance of equipment with this manual Disclaimer The original product packaging has been tested and is safe under normal shipping circumstances Reshipping the product without using the original product packaging will void the warranty Do not ship the unit with canisters or power supplies installed as this will void the warranty and could cause damage to the unit and drives The canisters...

Page 3: ...n Application and Global View Window 2 3 Overview Menu Bar and Toolbar 2 4 Menu Bar 2 4 Menu Bar Organization 2 4 Toolbar 2 5 Toolbar Organization 2 5 Overview Main Application Window Three Panel Divisions 2 6 3 Tutorial Creating an Array 3 1 STEP 1 3 1 STEP 2 3 3 STEP 3 3 3 STEP 4 3 4 Creating a Logical Volume 3 6 STEP 1 3 7 STEP 2 3 8 LUN Mapping Masking to a Host 3 10 LUN Mapping Masking 3 10 S...

Page 4: ... Failed Drive Status 4 16 Array Options 4 17 Creating An Array 4 17 1 of 3 Create Array Window 4 20 2 of 3 Create Array Window 4 22 3 of 3 Create Array Window 4 23 Deleting an Array 4 25 Assigning a Dedicated Hot Spare 4 26 Assigning a Dedicated Hot Spare while Creating an Array 4 27 Assigning a Dedicated Hot Spare after Creating an Array 4 29 Expanding the Capacity of an Array 4 32 Additional not...

Page 5: ...4 System Policies for Array and Cache Settings 4 66 System Array Policy Settings 4 66 System Cache Policy Settings 4 68 User Manager for the Administrator 4 69 User Manager Add User for the Administrator 4 70 User Manager Remove User for the Administrator 4 72 User Manager Change Password for the Administrator 4 73 User Manager Change Password for the non Admin User 4 75 Configure Controller Setti...

Page 6: ...napshot is Completed 6 5 LUN Mapping Masking to a Host for Snapshot 6 6 7 Product Support US Corporate Headquarters 7 1 Manual Changes 7 1 Appendix A Drive and Controller Manufacturers Drive Manufacturers A 1 RAID Controller Manufacturers A 1 Host Bus Adapter Manufacturers A 2 MARLINTM vi M MA AR RL LI IN NT TM M 16 Bay 4G FC SATA300 SAS RAID Array Management Users Guide Rev B ...

Page 7: ...lers with optional Snapshot functionality For example you can use JMR Storage Manager to create an array configuration using RAID Levels 0 1 or 5 etc The basic functions include the following create delete arrays expand capacity of the arrays assign global or dedicated hot spares create delete logical volumes increase the size of logical volumes map volumes to specific servers and assign a LUN Log...

Page 8: ...rformance good write performance and single spindle fault tolerance for video applications RAID 5 Provides single drive failure protection with excellent read performance by striping data and parity across multiple spindles suitable for varied applications requiring fault tolerance RAID 6 Provides double drive failure protection with excellent read performance by striping data and dual parity acro...

Page 9: ...D 6 read and write performance by striping multiple RAID 6 sets and can selectively tolerate over two spindle failures MARLINTM 1 3 M MA AR RL LI IN NT TM M 16 Bay 4G FC SATA300 SAS RAID Array Management Users Guide Rev B ...

Page 10: ...visions of the Main Application Window The topics covered in this section are Overview Launching the JMR Storage Manager Overview JMR Storage Manager with Global View Window Overview Main Application and Global View Window Overview Menu Bar and Toolbar Overview Main Application Window Three Panel Divisions NOTE Before you start using the JMR Storage Manager and building RAID configurations please ...

Page 11: ...ew System Figure 3 JMR Storage Manager Global View Window These steps will show you how to select and login to a storage system STEP 1 MARLINTM 2 2 M MA AR RL LI IN NT TM M 16 Bay 4G FC SATA300 SAS RAID Array Management Users Guide Rev B Select the storage system by clicking one of the available system icons in the Global View panel see Figure 3 Alternatively if you use the menu bar click on Appli...

Page 12: ...cal Elements Panel and the Logical Configuration Panel the Global View Panel and the Task bar see Figure 5 The details of the Physical Elements Panel and the Logical Configuration panel are outlined later in this section see Overview Main Application Window Three Panel Divisions MARLINTM 2 3 M MA AR RL LI IN NT TM M 16 Bay 4G FC SATA300 SAS RAID Array Management Users Guide Rev B Type in the usern...

Page 13: ...in the Reference section Chapter 4 for a description of each item Figure 6 Menubar Menu Bar Organization Application About Connect to New System Refresh Exit Array Create Array Delete Array Expand Capacity Dedicated Hot Spare Config Initialize Array Verify Integrity Rebuild Array Flash LEDs Properties MARLINTM 2 4 M MA AR RL LI IN NT TM M 16 Bay 4G FC SATA300 SAS RAID Array Management Users Guide ...

Page 14: ... Toolbar Organization Create Array Expand Capacity Create Volume Create Snapshot Increase Volume Jobs Event Log System Configuration icon globe Controller Configuration icon rectangle Refresh icon circular arrows There is not a drop menu list for the toolbar buttons because these are action buttons which provide the capability to directly access the function you choose Detailed information about t...

Page 15: ...r that provides a number of operational options that may be performed on the selected item The Physical Elements Panel displays the representation of the enclosure s the drives that are contained in them and other enclosure elements such as controllers batteries alarms fans temperature sensors and power supplies When there are multiple enclosures shelves the main enclosure is always shown as the t...

Page 16: ...tion icon Then click on the Network tab and Configure Ethernet Settings button to reach the Properties window Click on the Modify Properties box and enter a unique host name Click on Apply to save and affect the changes For complete details please see Network under Configure Controller Settings in the Reference section Chapter 4 The tutorials covered in this section are Creating an Array Creating ...

Page 17: ...che Settings under Array Options in the Reference section Chapter 4 NOTE Enable checkmark the box the Disable on Partner Controller Fault only when a dual controller is installed in your system MARLINTM 3 2 M MA AR RL LI IN NT TM M 16 Bay 4G FC SATA300 SAS RAID Array Management Users Guide Rev B First click on the RAID level you want in this example RAID 6 was chosen There are several default valu...

Page 18: ...re 11 Next to the column for the member drives there is a column for spares which is how you assign one or more dedicated spares while you are creating the array Choose the member drives for the array In the Member column you will find that the wizard has auto selected a minimal set of drives that will be used in the new array However you may select additional or different drive members by clickin...

Page 19: ...entire sections Assigning a Dedicated Hot Spare and Manually Rebuilding an Array in the Reference section Chapter 4 STEP 4 This summary allows you to review the details of the array and the selected member drives If you want to modify any of the options you may click Previous to go back to a previous configuration page When you are satisfied with the array configuration click Finish to commit the ...

Page 20: ...hin the Logical Configuration panel The following illustration is an expanded view of how the new array is aligned below the system icon or below an existing logical array configuration within the tree structure see Figure 14 MARLINTM 3 5 M MA AR RL LI IN NT TM M 16 Bay 4G FC SATA300 SAS RAID Array Management Users Guide Rev B ...

Page 21: ...w Array Displayed in Logical Configuration Panel Creating a Logical Volume Logical volumes can be thought of as a partition of an array set They are the logical units that will ultimately be mapped and seen by host systems servers For detailed instructions on two other methods to create logical volume using the menu bar or the logical volume icon and other logical volume activity please see Logica...

Page 22: ...RAID Array Management Users Guide Rev B Select the desired array by clicking on the array icon or one of the other icons in the Configuration Panel circled below and then click the Create Volume button in the toolbar see Figure 15 to bring up the next window to create a logical volume see Figure 17 If you get a drop menu you can click on Create Logical Volume Right click on any icon to access a dr...

Page 23: ...space on the selected array ComArray1 The number is automatically entered in the Desired capacity box When you reach the Create Logical Volume screen all the arrays will be listed Click on the box next to the name of the array you want to use for a Logical Volume If you want to create more than one Logical Volume for the selected array you need to make smaller Logical Volumes by entering a smaller...

Page 24: ...on you will see the new Logical Volume icon appear under the respective array icon see Figure 20 The Logical Volume has immediate availability Figure 20 Logical Volume with its Corresponding Array MARLINTM 3 9 M MA AR RL LI IN NT TM M 16 Bay 4G FC SATA300 SAS RAID Array Management Users Guide Rev B ...

Page 25: ... you need to access the LUN Mapping Masking drop menu illustrated on the next page see Figure 21 which takes you to the LUN Mapping Window see Figure 22 It is possible to have several logical volumes directed to the same host The connection from the host to the logical volume is achieved when the JMR Storage Manager automatically assigns the LUN number which gives direction to the routing of data ...

Page 26: ...apping Masking Drop Menu menu bar MARLINTM 3 11 M MA AR RL LI IN NT TM M 16 Bay 4G FC SATA300 SAS RAID Array Management Users Guide Rev B Select the Logical Volume to be mapped by clicking on the respective logical volume icon marked with a rectangle box Then click on the LogicalVolume tab and LUN Mapping Masking in the drop menu see Figure 21 or right click on the icon to access the drop menu The...

Page 27: ...l Hot Spare is in the enclosure or a Dedicated Hot Spare is assigned to an array the auto rebuild operation is enabled Please note initialization must not be running in the background otherwise rebuild will not run until initialization is completed To assign a drive as a global hot spare follow the steps below This is the only process to create a Global Hot Spare it is not available while creating...

Page 28: ...city expansion operation however do not exceed a total of 16 drives per array The OCE process integrates the new member drives into the array configuration by restriping existing data across them The resulting array is larger than the original array Expanding the capacity of an array is a lengthy operation that can take several hours however data is fully available during the process Capacity expa...

Page 29: ...l volumes WARNING You may consider backing up your data before using the OCE process If you accidentally or choose to delete the array that is being expanded stopping the OCE there will be permanent data loss of that array STEP 1 Figure 26 Select the Array for Expansion You have now reached the Expand Capacity Window This is the screen used to select the number of drives and their location for the...

Page 30: ...Expand Capacity Window STEP 2 MARLINTM 3 15 M MA AR RL LI IN NT TM M 16 Bay 4G FC SATA300 SAS RAID Array Management Users Guide Rev B Select the additional member drives to add to the array by clicking the blue checkbox of one or more of the available drives in the list You will note that as you select additional members the new Capacity After Expansion value reflects that individual change The to...

Page 31: ...o the volume will also be able to realize the increase in size STEP 1 Figure 29 Increase Logical Volume Size from Tool Bar MARLINTM 3 16 M MA AR RL LI IN NT TM M 16 Bay 4G FC SATA300 SAS RAID Array Management Users Guide Rev B Select the desired logical volume by left clicking on its icon and then click the Increase Volume button in the toolbar see Figure 29 This will launch the next window to inc...

Page 32: ...ew size to be realized by mapped hosts The slight difference of the size allows for overhead working space Figure 31 New Size of Logical Volume MARLINTM 3 17 M MA AR RL LI IN NT TM M 16 Bay 4G FC SATA300 SAS RAID Array Management Users Guide Rev B The software automatically determines the maximum value of expansion capability for the selected logical volume see Figure 29 Click OK to commit the new...

Page 33: ... View window see Figure 33 will appear where you can click on a system icon to access the system to be managed Once you choose a server the login screen will appear There are two methods to reach a login screen For security purposes you are required to enter a username and password in the login window for the storage system see Figure 34 The JMR Storage System uses a Service Location Protocol SLP ...

Page 34: ...o New System Select this menu item if you need to connect to a system not visible in the global view presentation The IP address needs to be manually entered in the System field followed by entering the Username and Password Click on OK see 34B in Figure 34 MARLINTM 4 2 M MA AR RL LI IN NT TM M 16 Bay 4G FC SATA300 SAS RAID Array Management Users Guide Rev B Drop Menu Connect to New System Click o...

Page 35: ...gin window The fields are explained below System When you choose from the Available Systems box the selection s IP address will appear here You may also manually type in an IP address or choose from a list of previous selections Username The Username of the selected storage system the default is admin Password The password of the selected storage system the default is storage Main Application Wind...

Page 36: ...nts Panel Shows the available physical elements in the system If you have sub enclosures attached to the main enclosure they will appear in this panel with the main enclosure at the top of the stack In addition to the drive elements the panel also shows the status of controllers batteries alarms fans temperature sensors and power supplies that are contained in their respective enclosures Logical C...

Page 37: ...n logical configuration and status information Exit Exits JMR Storage Manager Array Create Array Launches the array creation wizard and allows you to create a new array configuration Delete Array Deletes the selected array from the system Expand Capacity Expands the capacity of the selected array by adding drive members to it Dedicated Hot Spare Config Assigns a selected member drive in an array s...

Page 38: ...to clicking this option Delete Logical Volume Deletes the selected logical volume from the associated array configuration Increase Size Increases the size of the selected logical volume LUN Mapping Masking Manages LUN Mapping Masking of host visibility for the selected logical volume Properties View and modify the properties of the selected logical volume View Event Log Displays the controller bas...

Page 39: ...epending on the size of the Physical Elements Panel is either below the enclosure or on the right side of it This box is subdivided into three regions Enclosure Information Controller Information and Element Status Information see Figure 36 For more information please refer to Figure 8 Application Window in Chapter 2 MARLINTM 4 7 M MA AR RL LI IN NT TM M 16 Bay 4G FC SATA300 SAS RAID Array Managem...

Page 40: ...formation see Figure 33 For more information please refer to Figure 7 Application Window Left and Right Panels in Chapter 2 Each of the Physical Elements has properties that can be viewed There are two methods to access the properties 1 double click on the element to have the properties screen appear or 2 right click on the element and then click on the word Properties in the drop menu For a full ...

Page 41: ...s drive Invalid Drive Drive is Invalid but marked with the same symbol as failed Do not use this drive MARLINTM 4 9 M MA AR RL LI IN NT TM M 16 Bay 4G FC SATA300 SAS RAID Array Management Users Guide Rev B Element Name Description Enclosure Information This section provides the enclosure number the WWN and the IP address of the enclosure The IP address will only appear for the main enclosure Contr...

Page 42: ... a sub enclosure will appear as the second or third shelf see Figure 37 Multiple Enclosure Table 5 Controller Information Review MARLINTM 4 10 M MA AR RL LI IN NT TM M 16 Bay 4G FC SATA300 SAS RAID Array Management Users Guide Rev B Element Name Description Single controller Designates this array is using a single controller critical Dual controller Designates this array is using a dual controller...

Page 43: ...eview MARLINTM 4 11 M MA AR RL LI IN NT TM M 16 Bay 4G FC SATA300 SAS RAID Array Management Users Guide Rev B Main controller as top self Sub enclosur es as 2nd self Element Name Description Alarm Rings when needed critical Fan normal Flashes with yellow caution tag when it needs attention critical Temperature normal Flashes with yellow caution tag when it needs attention critical Power Supply nor...

Page 44: ...lable to the host but something in the system has failed or is in a degraded state that affects the overall health of the system Failed None of the logical volumes in the system are available to the host due to various failures in the system RAID Sets The icon for Array Sets in the Logical Configuration panel The single array icon shown below is a sub set of this icon in the tree structure Array T...

Page 45: ... Figure 38 Figure 38 Flash LED for the Drive Assigning a Global Hot Spare In order to assign a Global Hot Spare right click on an available drive to access the drop menu Check in the blue box next to Global Hot Spare see Figure 39 Figure 39 Assign a Global Hot Spare MARLINTM 4 13 M MA AR RL LI IN NT TM M 16 Bay 4G FC SATA300 SAS RAID Array Management Users Guide Rev B Name Description Server Examp...

Page 46: ... normal drive again Figure 41 Unassign a Global Hot Spare When the mouse is released a pop up box appears asking if you are sure you want to unassign this global hot spare Click Yes see Figure 42 Figure 42 Confirm to Unassign a Global Hot Spare Viewing Drive Properties If you want to see the properties of a certain drive right click on the drive and then click on Properties on the drop menu see Fi...

Page 47: ...view all drives If you want see all the drives in the enclosure with flashing LEDs then right click on the Enclosure box and click on Flash LED to activate blinking lights for all the drives in the system enclosure The results will be visible only on the enclosure see Figure 45 MARLINTM 4 15 M MA AR RL LI IN NT TM M 16 Bay 4G FC SATA300 SAS RAID Array Management Users Guide Rev B ...

Page 48: ... a failed drive For example if the failed drive is actually damaged and the failed status is cleared when you try to use that drive in a new configuration it may cause problems Figure 46 Unconfigured Failed Drive If needed you can clear a failed status by following these directions Right click on the marked failed drive in the Physical Elements Panel to see the drop menu and click on Clear Failed ...

Page 49: ...to start building an array You can use the Array tab in the menu bar see Figure 48 right click on the system icon see Figure 49 or the RAID Sets icon see Figure 50 which will present the drop menu Click on Create Array as shown in the drop down menu in both examples You will now have access to the Create Array Window so that you can build your array configuration see Figure 53 At this point you wi...

Page 50: ... use Tree structure RAID Sets click on Create Array in the drop menu see Figure 50 Figure 49 Create Array with the System Icon and the Drop Menu Figure 50 Create Array with the RAID Sets Icon and the Drop Menu MARLINTM 4 18 M MA AR RL LI IN NT TM M 16 Bay 4G FC SATA300 SAS RAID Array Management Users Guide Rev B Click on the following 1 Array Tab 2 Create Array ...

Page 51: ...c in the drop menu Then use the Create Array Window to select a RAID level see Figure 53 choose drives set a dedicated hot spare see Figure 54 and review the Array Summary Window see Figure 55 For step by step instructions to create an array please refer to Creating an Array in the Tutorial section Chapter 3 If you need information to create a dedicated hot spare after the array has been configure...

Page 52: ...n see Figure 50 The details of this window are explained below Figure 53 Create Array Window Array Name Enter a name when the array is being configured If the array is not named a default name will be provided Choose RAID Level Presents a list of RAID levels to choose from Information box Gives a brief description of the selected RAID level MARLINTM 4 20 M MA AR RL LI IN NT TM M 16 Bay 4G FC SATA3...

Page 53: ...k to media after write completion is reported to the application without danger of data loss when a backup battery is installed aka non volatile write behind cache RAIDbook Sixth Ed RAID Advisory Board 1997 p 187 Disable on Partner Controller Fault Turn off write back cache if there is only a single controller therefore there is no partner controller Disable on Battery Fault Turn off write back ca...

Page 54: ...bar or the Create Array button in the toolbar See the detailed explanation in the section titled Assigning a Dedicated Hot Spare after Creating an Array A Global Hot Spare is not created at this site see Assigning a Global Hot Spare in Chapter 3 Figure 54 Custom Select Drives and or Dedicated Hot Spare for an Array Set Information Box Gives a brief statement to choose member drives for the array a...

Page 55: ...at appears in this field indicates how many dedicated hot spares have been assigned during the creation of the current Array Set 1 in this example Global Hot Spare The Yes No in this field is an indicator referring to the current array set When there is an available drive in the enclosure you can designate a global hot spare at any time For instructions please refer to Assigning a Global Hot Spare...

Page 56: ...ted array 4 drives in this example Dedicated Hot Spare This number designates how many dedicated hot spares are assigned to the current Array Set Global Hot Spare The Yes No in this field is an indicator referring to the current array When there is an available drive in the enclosure you can designate or assign a global hot spare at any time For instructions please refer to Assigning a Global Hot ...

Page 57: ...nfiguration Be sure that you are using selected and configured drives that are associated with the array icon that you selected in the Logical Configuration Panel In order to delete an array right click on the array icon to be deleted and you will get the drop menu You may also click on the word Array from the Menu bar to access the drop menu Click on Delete Array You will get the following alert ...

Page 58: ...is a good safety practice to build a dedicated hot spare option into your configuration Two methods are available to create a dedicated hot spare 1 Assigning a Dedicated Hot Spare while Creating an Array or 2 Assigning a Dedicated Hot Spare after Creating an Array When you click on the array icon the disk drives associated with the icon will be lit up with the blue light ON in the Physical Element...

Page 59: ...sociated only with the array being created Click the blue box with an available drive in the Spare column see Figure 59 Watch the information at the bottom of the window The Dedicated and Global Hot Spare will toggle back and forth Yes No as you select or deselect the dedicated hot spare drive When you are satisfied with your selection click Next to review the summary of your current settings see ...

Page 60: ...rmation at the bottom of Figure 59 and the top of Figure 60 have almost the same information This is to help verify that the dedicated hot spare has been assigned to the correct newly created array MARLINTM 4 28 M MA AR RL LI IN NT TM M 16 Bay 4G FC SATA300 SAS RAID Array Management Users Guide Rev B ...

Page 61: ...than one drive can be selected The numbers in the Encl and Slot columns tell the location of the drive you are planning to use see Figure 61 Right click on the array icon and click on Dedicated Hot Spare Config in the drop menu which will display the Dedicated Hot Spare Configuration Window see Figure 62 Option You may also click on the Array tab from the menu bar to access the drop down menu or t...

Page 62: ...creen see Figure 109 and now you select a dedicated hot spare the No will change to Yes and the Auto Rebuild policy will be enabled Please refer to System Array Policy Settings for more information This is the Dedicated Hot Spare Configuration Window that allows you to assign a dedicated hot spare after an array has been created Click on one or more of the available drives blue box in the spare co...

Page 63: ... the array was created RAID Level The RAID level chosen when the array was created RAID 5 is shown in this example Current Size The size of the selected array configuration that will have a dedicated hot spare assigned to it Please Select Dedicated Hot Spares List of available disk drives that can be used as a dedicated hot spare with identifying information Spare Use this column to check which dr...

Page 64: ...p this operation Expanding the Capacity of an Array To expand capacity to an array means to add a physical drive of the same size as the existing drives This is NOT the same as Increase Size of a logical volume adding virtual space For example if you have an array of 40 GB two drives of 20 GB each you can add another 20 GB drive You have now expanded the array s capacity to a total of 60 GB The fi...

Page 65: ...y about adding capacity Device Information Displays a summary of the selected array for expansion showing the array s name size and RAID level Select Additional Drives Gives a choice of available drives that can be selected to add to the array Drive Information Displays the new calculated expansion size 68 31 GB is shown in this example OK button Click here to activate the Expand Capacity function...

Page 66: ...ty Expansion Message WARNING Expand Capacity Operation cannot be aborted However if you need to stop the expansion you need to delete the complete array that is in process of being expanded which will cause permanent data loss Initializing an Array Initializing an array is a background process that writes a known pattern to the drives in the array The best time to do this is when the array and RAI...

Page 67: ...ill be lost see Figure 67 Figure 67 Warning Message when Disabling the Initialize Process When you are ready to manually initialize the array there are two methods to access the initialize feature Either select the Array tab from the menu bar see Figure 68 or select the array icon in the Logical Configuration Panel see Figure 69 and use the guidelines below MARLINTM 4 35 M MA AR RL LI IN NT TM M 1...

Page 68: ...t is recommended that you make backup copies of your data before you start an initialize process Figure 68 Initialize an Array with Drop Down Menu from the Menu Bar Tab Figure 69 Initialize an Array with Drop Down Menu from the Array Icon The Initialize Array Window screen provides general information about the array which is explained below MARLINTM 4 36 M MA AR RL LI IN NT TM M 16 Bay 4G FC SATA...

Page 69: ...k Cancel to stop this operation Manually Rebuilding an Array A manual rebuild or an auto rebuild is a background process that is effective for all RAID levels except RAID 0 The rebuild activity will reconstruct data and parity on a replacement member drive when one of the member drives of a redundant array set fails System performance will be impacted during rebuilds A manual rebuild is required i...

Page 70: ... to fail Here is a brief summary using a manual rebuild in both cases A member drive of an array is mistakenly removed from the drive slot If you inadvertently pulled the wrong drive from the drive slot and the array is active it will be displayed in the enclosure as a gray drive slot as a missing drive If you quickly reinsert the same drive in the same slot it will be marked as a failed drive not...

Page 71: ...lled and available in your enclosure 2 that there are no global or dedicated spares assigned 3 that auto rebuild in not enabled The following instructions will walk you through a manual rebuild process of an array Once a member drive has failed it will be marked with a circled X and displayed in the Physical Elements Panel but is no longer part of any array see Figure 73 it is not included in the ...

Page 72: ...er a manual rebuild process Click on the blue box next to the drive you want to use for the rebuild and write down the slot number of the rebuilt drive in case you need this for future reference Follow this process if you are selecting an available drive in the enclosure or after you have inserted a new drive Now click OK at the bottom of the screen to commit the rebuild process see Figure 75 MARL...

Page 73: ...Summary of the array that needs to be rebuilt Name ComArray1 the name given when the array was created RAID Level RAID 5 Current Size 68 31 GB the size of the array used in this example Rebuild Option Summary of the drive selection for Rebuild Option MARLINTM 4 41 M MA AR RL LI IN NT TM M 16 Bay 4G FC SATA300 SAS RAID Array Management Users Guide Rev B ...

Page 74: ...k drive OK button Click here to begin the manual rebuild process Cancel button Click here to stop this operation Verifying the Integrity of an Array Verifying the integrity of an array means that the JMR Storage Manager software will check and validate the parity of the drives in the array This is a long background operation however you can continue with other system processes The following guidel...

Page 75: ... it is not checked it means that only a Parity Check will be processed OK Click here to begin the verify operation Cancel Click here to stop this operation Flashing the LEDs of an Array Flash the LEDs of an array by selecting and right clicking on the array icon in the configuration panel to access the drop down menu see Figure 78 Click on Flash LED and check your enclosure to verify that the ligh...

Page 76: ...Use the drop menu as illustrated in Figure 80 to access the Properties Editor Window which allows you to make corrections of the properties or values of an array Figure 79 Array Tooltip Properties Click on Properties in the drop menu see Figure 80 to display the information in the Array Properties Editor Box see Figure 81 When you are finished click OK MARLINTM 4 44 M MA AR RL LI IN NT TM M 16 Bay...

Page 77: ...Array Properties Editor Box The Array Properties Window for an array gives you information about the selected array The details are listed below MARLINTM 4 45 M MA AR RL LI IN NT TM M 16 Bay 4G FC SATA300 SAS RAID Array Management Users Guide Rev B ...

Page 78: ...the Online Capacity Expansion process Remaining Size Shows the available space for the selected array 0 MB in this example The remaining size will change according to the size of logical volumes created When the full amount of space has been utilized by the logical volumes the remaining size will show as 0 MB Cache Settings This area gives details about the Cache Setting options which the user can...

Page 79: ...r to create a Logical Volume click on either the Logical Volume tab in the menu bar or the Create Volume button in the toolbar Using the array icon in the Logical Configuration Panel is another way to build a logical volume You can use the Logical Volume tab in the menu bar see Figure 82 or the array icon see Figure 83 which will present the drop menu Click on Create Logical Volume as shown in the...

Page 80: ... the logical volume has been created you can use the logical volume and its drop menu for several logical volume functions The menu presents the following options Delete Logical Volume Increase Logical Volume Size LUN Mapping Masking and Properties These options will be detailed later MARLINTM 4 48 M MA AR RL LI IN NT TM M 16 Bay 4G FC SATA300 SAS RAID Array Management Users Guide Rev B ...

Page 81: ... menu see Figure 82 and Figure 83 and accept the default size or enter the size of the logical volume see Figure 85 For step by step instructions to create logical volume please refer to Creating a Logical Volume in the Tutorial Chapter 3 The Create Logical Volume window presents all the fields you need to design your array with one or more logical volumes You can choose the desired array for any ...

Page 82: ...sired Capacity This box displays the size of the logical volume either the default size or a new value that you can enter OK The OK button is available when you are finished with this window Cancel The Cancel button is available if you need stop to this function Viewing Logical Volume Properties There are three ways to view the Logical Volume Properties Roll the mouse over the logical volume icon ...

Page 83: ...operties or values of a logical volume Figure 86 Logical Volume Tooltip Properties Click on Properties in the drop menu see Figure 87 to display the information on the Logical Volume Properties Editor Box see Figure 88 When you are finished click OK Figure 87 Logical Volume Properties Drop Menu MARLINTM 4 51 M MA AR RL LI IN NT TM M 16 Bay 4G FC SATA300 SAS RAID Array Management Users Guide Rev B ...

Page 84: ...he logical volume properties Name Provides the name of the selected logical volume Device ID Provides the identification number given to the device associated with the selected logical volume Array ID Provides the identification number given to the device associated with the selected array that is connected to its logical volume Status Provides the state of the selected logical volume Job Status P...

Page 85: ...oversized to the point that you loose a lot of space For example if the smallest drive is 20GB and your largest drive is 60GB you still only get the advantage of 20GB Deleting a Logical Volume You may need to delete or remove a logical volume if you need to make a new configuration or you simply want to start over from the first configuration design Be sure that you have made a backup of anything ...

Page 86: ...e Logical Volume Warning Message When you click Yes watch the logical configuration to verify that the selected logical volume icon is removed from the configuration Also notice in the Physical Elements Panel that the drives from the logical volume are no longer selected but they still show that the blue light is ON This means that these drives are still configured to the array and they are availa...

Page 87: ...cal volume s name current size RAID level and the maximum size allowed Increase Logical Volume Size Shows the maximum size allowed and the up down arrows to make the change OK button Click here to commit and increase the size to this logical volume Cancel button Click here to stop this operation Additional Information about Increasing the Size of a Logical Volume When you increase the size of a lo...

Page 88: ...following message that there is not enough space in the Array Set see Figure 94 Figure 94 Not enough space to increase size Creating LUN Mapping Masking LUN Mapping Masking allows the host to see the array set configuration in the enclosure It directs a path of recognition from the host to the designated logical volumes In order to set a LUN Map Mask follow the guidelines below Using the menu bar ...

Page 89: ...e LUN Mapping Window see Figure 97 displays the information box and the device information which includes the Status Vendor Host Node WWN Host Port WWN the LUN and the Permission rights MARLINTM 4 57 M MA AR RL LI IN NT TM M 16 Bay 4G FC SATA300 SAS RAID Array Management Users Guide Rev B ...

Page 90: ...created Name Displays the name assigned to the logical volume when it was created i e LogicalVol 1 in this example RAID Level Displays the RAID level created for this array i e RAID 5 in this example Current Size Displays the size assigned to the logical volume i e 50 31 GB in this example Selection Box Displays five columns of identifying information MARLINTM 4 58 M MA AR RL LI IN NT TM M 16 Bay ...

Page 91: ...tional Toolbar Button Details This part of the Reference section will explain additional buttons on the tool bar that give more information about the activity of your storage system Previously in the Tutorial Chapter 3 the action toolbar buttons were explained to learn how to create or delete arrays logical volumes hot spares etc The remaining toolbar buttons to be explained include Jobs Event Log...

Page 92: ...nline capacity expansion OCE etc Start Time Displays the date and time the job began processing in minutes seconds and hundredths of seconds Description Displays the names of the arrays Progress Displays the percentage of the current activity Job Manager Properties Double click on the job line to bring up the properties for the job running Figure 101 Job Manager Properties Box MARLINTM 4 60 M MA A...

Page 93: ...pTime Displays date mm dd yy and time hh mm sec that the job stopped running TargetAuid Displays the numerical ID value of the target The Event Log The Event Log provides a quick glance of the current background events that are being processed in real time For example you can easily check on any device to see if the condition is informational warning or an error Access the Event Log to evaluate ba...

Page 94: ...es or Password Click on the desired tab see Figure 104 Notification Includes a configuration choice for Email Recipients or SMTP Server Policies Includes a configuration choice for Array Settings or Cache Settings User Manager Includes fields to add or remove user accounts and change the password Notification The notification feature will send emails to a list of people when events are generated i...

Page 95: ...they are generated Up to 10 recipients can be defined In order to make changes within this Email property box click on Modify Properties to enable modifications Click and edit the fields to be changed Click on Apply to save and affect the changes Click on Close to exit the window MARLINTM 4 63 M MA AR RL LI IN NT TM M 16 Bay 4G FC SATA300 SAS RAID Array Management Users Guide Rev B ...

Page 96: ... all events including warnings and errors If set to Warning the user will receive only warnings and errors If set to Error only errors will be received SMTP Server Settings The SMTP Server Configuration window see Figure 106 allows for defining the access parameters to the SMTP server that will receive the email notifications Enter the Access Account and Password information to access the desired ...

Page 97: ...l address e g test jmr com Access Password The account password of the associated account username on the SMTP server that will be used to send emails e g mypassword Retype Access Password Retype the access password to confirm the first entry After you have completed the SMTP Server Configuration dialog box you will get a popup message to remind you that you may need to set a unique host name to t...

Page 98: ...nfigure button under either the Array Setting or the Cache Setting to access the associated properties Figure 108 Policies Tab System Array Policy Settings The System Array policy settings window see Figure 109 defines how the system responds to the various critical array conditions as well as monitor settings To modify the settings first check the Modify Properties box and then make the necessary...

Page 99: ...omatically rebuilds the data on a replacement drive if the replacement drive is inserted in the same drive slot of the failing member Background Verify When enabled this function will continuously verify all drives in the system The function verifies 2MB of data on each drive every 10 seconds If the drive is a member drive of a fault tolerant array set the data will be reconstructed when a media e...

Page 100: ...y the settings first check the Modify Properties box and then make the necessary changes Click on Apply to save and affect the changes Click on Close to exit the window Figure 110 System Cache Policy Settings The information below describes each cache policy setting Read Ahead Cache Defines the default setting for the read ahead cache size When Automatic is selected the system will choose an appro...

Page 101: ...r Manager for the Administrator The User Manager allows you to add or remove user accounts and change existing user account passwords which are used to access the JMR System Manager software Please refer to the main window in Chapter 2 Getting Started with the JMR Storage Manager and see Figure 3 Select Storage System Window Click on the User Manager tab and wait for the Please wait message to dis...

Page 102: ...own with the Add User option selected see Figure 113 Click on Add User to access the work window see Figure 114 to add a new user account You can add more than one user name by repeating the process for each new user account MARLINTM 4 70 M MA AR RL LI IN NT TM M 16 Bay 4G FC SATA300 SAS RAID Array Management Users Guide Rev B ...

Page 103: ...Enter the password in the Password field and the password by typing it again in the Retype Password field Figure 114 Add New User Account Click OK to submit this activity The new user name will appear in the User Account List see Figure 115 MARLINTM 4 71 M MA AR RL LI IN NT TM M 16 Bay 4G FC SATA300 SAS RAID Array Management Users Guide Rev B ...

Page 104: ...th the Remove User option selected see Figure 116 Click on the name of the account you want to remove Then click on Remove User You will get the warning message see Figure 117 that this account will be permanently removed Figure 116 Click on the Remove User Button MARLINTM 4 72 M MA AR RL LI IN NT TM M 16 Bay 4G FC SATA300 SAS RAID Array Management Users Guide Rev B ...

Page 105: ...ame Removed from User Account List User Manager Change Password for the Administrator This is the User Manager window Admin level only shown with the Change Password option selected see Figure 119 Click on Change Password to access the work window see Figure 120 to change the password MARLINTM 4 73 M MA AR RL LI IN NT TM M 16 Bay 4G FC SATA300 SAS RAID Array Management Users Guide Rev B ...

Page 106: ...sword you will get the Please wait message When it disappears the password has successfully been changed and you are returned to the user account window with the username still highlighted see Figure 121 MARLINTM 4 74 M MA AR RL LI IN NT TM M 16 Bay 4G FC SATA300 SAS RAID Array Management Users Guide Rev B ...

Page 107: ... When you have changed your password use it to access the JMR System Manager software as indicated in the System Selection Window see Figure 3 in Chapter 2 Getting Started with the JMR Storage Manager Click on the User Manager tab to access the window shown below see Figure 122 Changing the password to an existing user account gives protection from unauthorized users to access your system configur...

Page 108: ...ystem Figure 124 Change Password Confirmation Configure Controller Settings In order to make unique settings to your controller you will need to access the Controller Configuration view screens Click on the Controller Configuration icon which will take you a view screen with a choice of four tabs Firmware Download Clock Network or Reset Click on the desired tab for access to that area FW Download ...

Page 109: ...window Select Firmware to download Displays the File Name field box Browse button and the Download button File Name Select the name of the file to be downloaded Click on the Browse button to search for the correct file to download Click on the Download button to update your configuration and then click on the Close button to exit the window see Figure 126 NOTE Allow some time for the download proc...

Page 110: ...he Browse button brought you to the following screen to open the desired file see Figure 127 Figure 127 Firmware Download Open File MARLINTM 4 78 M MA AR RL LI IN NT TM M 16 Bay 4G FC SATA300 SAS RAID Array Management Users Guide Rev B JMR_SM_1_21 JMR_SM_1_2 ...

Page 111: ... Figure 128 When the file has finished downloading click on Close to exit this window Please see the note below to coordinate your GUI and new firmware Clock Clock will allow you to change the date and time that has previously been set on the controller Click on the Clock tab and then the Change Controller Time button see Figure 129 to access the editor window see Figure 130 MARLINTM 4 79 M MA AR ...

Page 112: ...ime Displays the time received by the controller This is the editing window used to change the date and time for the controller Notice the month and year fields are directly above the calendar The time is in the right column Figure 130 Calendar and Clock Editor Window MARLINTM 4 80 M MA AR RL LI IN NT TM M 16 Bay 4G FC SATA300 SAS RAID Array Management Users Guide Rev B ...

Page 113: ...fy your Ethernet settings see Figure 131 Figure 131 Network Tab and Configure Ethernet Settings Controller Ethernet Configuration Displays the Configure Ethernet Settings button Click on the Network Tab and the Configure Ethernet Settings to access the next screen see Figure 132 This is the properties window where you can make changes to your Ethernet Configuration MARLINTM 4 81 M MA AR RL LI IN N...

Page 114: ... later time When you are finished click Apply to save and affect the changes When you return to the main Controller Configuration screen click on Close You can continue by selecting a different tab or click Close at the bottom and return to the Main View of JMR Storage Manager The following fields are explained for the Ethernet Configuration Window Status Displays the state of the Ethernet connect...

Page 115: ...cording to your choices Reset the Controller Displays the option to reset Controllers If only one controller is being used this screen will be shown with one controller If you need to restart a controller board click on the Reset tab and the selected controller board Controller 1 or Controller 2 You will get a message that this action will terminate the connection see Figure 134 If your intention ...

Page 116: ...Tab Controller Port Displays the Configure button to access the properties editor window for the controller s Now that you have reached the Ports screen you can access the properties editor box for the Controller Port by clicking on its Configure button see Figure 136 NOTE Changes are allowed on the Controller Port however the Drive Port is READ ONLY to view the status of the drive ports MARLINTM ...

Page 117: ...t NOTE If you are working with a dual controller your setting selections will be the same on both controllers Figure 137 Controller Configuration Port Editor Window MARLINTM 4 85 M MA AR RL LI IN NT TM M 16 Bay 4G FC SATA300 SAS RAID Array Management Users Guide Rev B ...

Page 118: ...the interface link type Link Speed 1Gb 2Gb 4Gb unknown actual or system negotiated Loop ID Same as Link ID Values 0 0x7E Valid or Link Loop is up 0xFF Invalid or Link Loop is down Port Mode Automatic Point to Point or Arbitrated Loop commonly called Loop Table 10 Controller Port Property Definitions MARLINTM 4 86 M MA AR RL LI IN NT TM M 16 Bay 4G FC SATA300 SAS RAID Array Management Users Guide R...

Page 119: ...blems that need attention by system administrator personnel The following SES element property windows are displayed with full descriptions The topics covered in this section are Controller Sub enclosure Battery Alarm Fan Temperature Power Supply Controller Figure 138 Controller Property Window 5 1 M MA AR RL LI IN NT TM M 16 Bay 4G FC SATA300 SAS RAID Array Management Users Guide Rev B 5 Enclosur...

Page 120: ...the WWN number assigned to this configuration Config Timestamp Displays the current time the user is viewing the status Power On Count Displays the number of times power was turned on possibly because of testing power will be off and on Power On Time Displays the time the system was powered on Total Power On Time Displays the total continuous time the system is on Firmware Code Version Displays th...

Page 121: ...y when the battery is fully charged at 100 1GB 18 chip DRAM Hold up time typically is 36 hours only when the battery is fully charged at 100 0 zero will be displayed if battery is not installed Sub enclosure Access the status and properties information about the sub enclosure from the tooltip of the Enclosure Box see Figure 139 In order to see this tooltip place the cursor mouse rollover on the En...

Page 122: ... sub enclosure is down it will not be visible on the Main Application Window Battery Figure 140 Battery Properties Window MARLINTM 5 4 M MA AR RL LI IN NT TM M 16 Bay 4G FC SATA300 SAS RAID Array Management Users Guide Rev B Main controller as top self Sub enclosur es as 2nd self ...

Page 123: ...ip DRAM Hold up time is typically 72 hours only when the battery is fully charged at 100 1GB 18 chip DRAM Hold up time is typically 36 hours only when the battery is fully charged at 100 0 zero will be displayed if battery is not installed Battery Charge Displays the charge capacity of the battery When the battery is fully charged it will show as 100 and will be displayed as Normal Alarm Figure 14...

Page 124: ...and the muted state is Yes Alarm Visible Displays if the alarm is visible on the GUI Yes if it is On and Ringing It will show No if it is OFF and not ringing Fan Figure 142 Fan Properties Window The following fields are described for the Fan properties Status Displays the fan function status as normal or critical Enclosure ID Displays the shelf position of the enclosure as 1 2 3 etc Variable Speed...

Page 125: ...s normal or critical Enclosure ID Displays the shelf position of the enclosure as 1 2 3 etc Sensor Type This is a sensor installed on the controller to measure the controller s temperature Current Temperature C Displays the current temperature of the controller 45C in this example MARLINTM 5 7 M MA AR RL LI IN NT TM M 16 Bay 4G FC SATA300 SAS RAID Array Management Users Guide Rev B ...

Page 126: ...isplays the power supply function status as normal or critical Enclosure ID Displays the shelf position of the enclosure as 1 2 3 etc DC Status Displays the electrical current direct current function status as normal or critical MARLINTM 5 8 M MA AR RL LI IN NT TM M 16 Bay 4G FC SATA300 SAS RAID Array Management Users Guide Rev B ...

Page 127: ... option will not be visible in the GUI Creating a Snapshot STEP 1 Figure 145 Create Snapshot using the Tool Bar Button Figure 146 Create Snapshot using the Drop Menu If you try to create a Snapshot volume without first selecting a logical volume you will get the following message see Figure 147 6 1 M MA AR RL LI IN NT TM M 16 Bay 4G FC SATA300 SAS RAID Array Management Users Guide Rev B 6 Using Sn...

Page 128: ...pshot you will get the following message see Figure 148 Figure 148 Not Enough Space to create a Snapshot STEP 2 MARLINTM 6 2 M MA AR RL LI IN NT TM M 16 Bay 4G FC SATA300 SAS RAID Array Management Users Guide Rev B When planning your snapshot ensure that there is the same amount of space as the selected logical volume in the array that will hold that snapshot When a Snapshot is created a list of t...

Page 129: ...ate Snapshot Window workpage Preview Space not available in the same array for snapshot You can easily preview the total space of the array by clicking on the array that you want to use for the Snapshot When you click on the array all of the logical volumes associated with that array will be marked with a blue arrow see Figure 150 You can quickly add up the amount of space already used and compare...

Page 130: ...isted with enough space see Figure 151 You may also want to refer back to Table 11 about calculating the space requirements to create a snapshot volume MARLINTM 6 4 M MA AR RL LI IN NT TM M 16 Bay 4G FC SATA300 SAS RAID Array Management Users Guide Rev B Array Name Logical Volume Name Available Space Used Space Remaining Space ComArray1 465 72 LogicalVol1 2 5 and 6 397 82 67 90 Snapshot of 98 75 o...

Page 131: ...shot Volume you will see the new Snapshot Volume icon camera appear directly under the respective logical volume see Figure 152 The Snapshot process is completed Figure 152 Snapshot with its Corresponding Logical Volume MARLINTM 6 5 M MA AR RL LI IN NT TM M 16 Bay 4G FC SATA300 SAS RAID Array Management Users Guide Rev B ...

Page 132: ...king limits the logical volume s access to a single host or a subset of hosts LUN Mapping controls how a specific host will address the logical volume For detailed instructions on how to use LUN Mapping Masking please refer to LUN Mapping Masking to a Host in the Tutorial section in Chapter 3 MARLINTM 6 6 M MA AR RL LI IN NT TM M 16 Bay 4G FC SATA300 SAS RAID Array Management Users Guide Rev B ...

Page 133: ...you can contact our Technical Support division directly at the address below US Corporate Headquarters JMR Electronics Inc ATTN Technical Support Division 20400 Plummer St Chatsworth CA 91311 Customer Support 818 739 1140 E mail techsupport jmr com Office Hours Monday Friday 8 00 A M to 5 00 P M Pacific Standard Time Internet http www jmr com Manual Changes Revision A Initial Release Revision B Ad...

Page 134: ... maxtor com Seagate Technology Internet Address www seagate com RAID Controller Manufacturers Adaptec Inc Internet Address www adaptec com Chaparral Network Storage Internet Address www chaparralnet com Digi Data Corporation Internet Address www digidata com Infortrend Corporation Internet Address www infortrend com Intel ICP VORTEX Intelligent Computer Peripherals Internet Address www icp vortex ...

Page 135: ...icrosystems Internet Address www antares com Emulex Corporation Internet Address www emulex com JNI Corporation Internet Address www jni com QLogic Corp Internet Address www qlogic com MARLINTM A 2 M MA AR RL LI IN NT TM M 16 Bay 4G FC SATA300 SAS RAID Array Management Users Guide Rev B ...

Reviews: