background image


30 

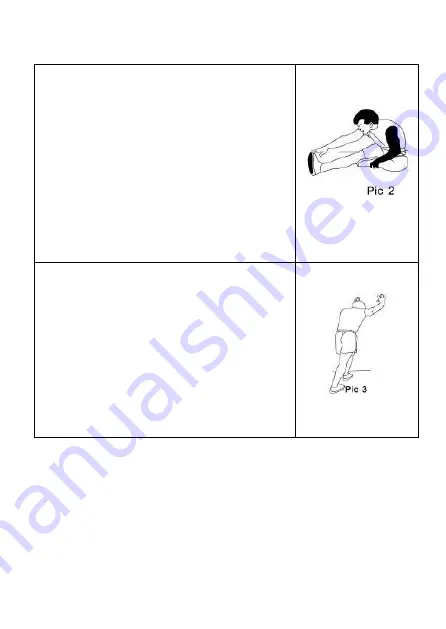
2. Tendon stretch: 

  Sit  on  a  clean  cushion,  straighten  one  leg, 

and then put the other leg inward so that it fits 

snugly  against  the  inside  of  the  straight  leg 

and try to touch the toe with your hand.    Hold 

for 10-15 seconds and then relax.    Repeat 3 

times for each leg 


3.Calf and heel stretch: 

  Hold  the  wall  with  both  hands  or  stand  with 

one  foot  behind,  keep  the  hind  legs  upright, 

and the heels touch the ground and tilt toward 

the  wall.    Hold  for  10-15  seconds  and  then 

relax.    Repeat 3 times for each leg 


Summary of Contents for A7

Page 1: ...A7 PLUS Treadmill Instruction Manual Please read this manual carefully before using the product and keep it ...

Page 2: ...lly before use new machine To guarantee the maximum quality of products all parts of this treadmill use high quality material and passed strict inspection and Number Content 1 Catalog 2 Safety instructions 3 Package specifications 4 Assembly specifications 5 Electric control instructions 6 Maintenance instructions 7 Failures and trouble shooting 8 Warranty terms 9 Exercise guidelines 10 Warm exerc...

Page 3: ...safety please read all contents of this manual carefully before use We do not bear the consequences of any abnormal operation RISK Do not use the heart rate device together with other wireless heart rate devices or it can cause electrical interference WARNING Please follow the instructions below to avoid any hurt to you or others 1 To avoid any accidents or danger please make sure this treadmill i...

Page 4: ...erating malfunction c Keep the room clean and tidy avoid dirts being absorbed into the treadmill which will cause operating malfunction d User weight should not exceed 100kg 4 This product is for one person use only when it is running To avoid any accidents please do not let children or pets play around to avoid accidents 5 Minimum spacing requirements for placing the treadmill in the home no less...

Page 5: ... 11 Please use the handrail when getting on or getting off from the machine Do not get off from the treadmill when the walking machine is not stopped completely If need an emergency jump you must pull off the safety lock then the treadmill will stop immediately 12 Do not use this machine when you are using oxygen equipment or or using spray near it 13 To make sure the treadmill running properly pl...

Page 6: ...5 Nu mbe r Spare parts Single function Multifun ction 1 Frame 2 Manual 3 Side Cover 4 Screws Pack Sixth page 5 Message Hang 6 Message Bracket 7 Message Helnet 说明书 ...

Page 7: ...6 3 Packing Specifications Screw pack 4 Assembly Instructions Step 1 Pull up the upright in the direction of the arrow as shown below and secure it with M8 45 screws and M8 bushings 8 Feet Tube Foam ...

Page 8: ... direction indicated by the arrow and fix it with the M10 knob Step 3 Rotate the meter in the direction of the arrow until you feel the best angle Finally use the knob on the back to secure it and put a safety lock to use your treadmill ...

Page 9: ...pad M8 and then fixed with D massage stand with G screw M8 45 I flat pad M8 and H anti loose nut M8 On the 6 massage stand 2 Respectively put the 8 sponge jacket on the round tube of the 6 massage stand 3 Fix the 7 massage head on the flat plate at the upper end of the 6 massage stand with its own screws flat pad and elastic pad ...

Page 10: ...he number of programs is P1 P12 automatic programs Safety lock function Unplugging the safety lock immediately shows that the SAFE treadmill is quickly stopped When the safety lock is placed the electronic watch is fully displayed for 2 seconds and the data is all F G F G 5 6 D G H 7 8 ...

Page 11: ... this button to cycle through the manual mode to the automatic program P1 P12 the manual mode is the system default operation mode the default speed of the manual mode is 1 0km h and the maximum running speed is 12 8km h Mode key MODE is the mode button In the standby mode press this button to cycle through three different countdown modes of operation from time distance and calories when selecting...

Page 12: ...n Speed display Displays the speed value of the current run Time display Shows the running time in manual mode or the running time countdown in mode and program Distance display Displays the distance total in manual and program mode or the inverse of the mode running distance Calorie display Shows the calorie accumulation during exercise in manual and program mode or the calorie count in mode run ...

Page 13: ...into 10 segments and the running time of each program block is evenly distributed The motor stops the meter clear after the running time is completed The following is a motion chart of 12 programs Time slot Program Set time 10 run time of each time slot 1 2 3 4 5 6 7 8 9 10 P1 SPEED 2 3 1 4 3 2 1 3 3 1 P2 SPEED 3 4 5 6 5 4 3 4 4 2 P3 SPEED 2 3 4 5 4 3 4 3 4 2 P4 SPEED 3 4 5 6 5 7 5 4 3 3 P5 SPEED ...

Page 14: ... initial distance of the countdown distance is 5 0 km the setting range is 0 5 99 0 km and the step is 0 1 The cycle switching sequence is manual time distance calories other When a countdown parameter is run the display shows END and a P6 SPEED 4 6 8 10 12 8 9 6 4 2 P7 SPEED 5 6 7 5 6 8 6 5 4 2 P8 SPEED 5 6 5 4 3 2 3 5 4 2 P9 SPEED 5 6 5 4 2 2 3 5 4 2 P10 SPEED 2 5 7 5 8 6 5 2 4 3 P11 SPEED 2 5 6...

Page 15: ... Bluetooth device to click and connect After the connection is successful the music on the mobile phone can be transmitted to the power amplifier device on the treadmill through Bluetooth Control the prev next volume and other control sounds on the phone 6 Maintenance Instructions Proper maintenance keeps your treadmill in top condition incorrect maintenance can hurt or shorten the life of your tr...

Page 16: ...placed immediately 6 In order to better maintain and extend the life of the treadmill it is recommended that you rest the treadmill for 10 minutes after 30 minutes of continuous use 7 The running belt has been adjusted at the factory but after use the running belt will be stretched will deviate from the center position and cause the running belt friction strip and the rear cover to be damaged It i...

Page 17: ...ynchronization will be adjusted counterclockwise Note The running belt cannot be adjusted too tightly This will break the running belt increase the pressure of the front rear drum cause damage to the roller bearing etc abnormal noise or other problems and only need to adjust to the running belt without slipping B Running belt alignment adjustment When you use the treadmill the pressure on the two ...

Page 18: ...n the middle repeat the above action until it is adjusted to the middle After adjusting the running belt to the middle adjust the speed to the sixth gear and observe the deviation of the running belt and the smooth running condition If there is any deviation repeat the adjustment step Caveat Do not overtighten the rollers This will result in permanent damage to the bearing 8 lubricating oil The tr...

Page 19: ...ow to refuel Please use non oil based lubricants How to add lubricant please operate as shown below open the sidebar left For the fueling decorative cover on the front side use a pair of scissors or a utility knife to cut the oil bottle according to the size of the figure and then add the oil according to the bottom icon When filling please pay attention to insert the thin rod at the front end of ...

Page 20: ...19 excludes Fault code Fault description Troubleshooting Fault process ...

Page 21: ...lectronic watch displays the fault code and the buzzer sounds 3 times Possible reason The communication between the electronic control and the electronic watch is blocked Check each connection of the electronic watch to the lower control communication line to ensure that each core is fully inserted Check if the cable between the electronic watch and the controller is damaged and replace the cable ...

Page 22: ...icates that the controller does not detect the voltage on the motor Possible reason Check if the motor cable is connected and reconnect the motor cable Check the motor cable for damage odor and replace the motor ...

Page 23: ... area does not display the content After the fault condition is maintained for about 10 seconds it enters the standby state and can be restarted Possible reason The speed sensor signal is not detected for 3 seconds check if the sensor plug is plugged in or damaged plug it in or replace the sensor 3 When the machine enters the fault state the electronic watch buzzer sounds 9 times and the fault cod...

Page 24: ...state and can be restarted Possible reason Exceeding the rated load the current is too large the system is self protected or a part of the treadmill is stuck resulting in the motor not turning the load is too heavy the current is too large the system is self protected adjust the treadmill again Start up and run There is also checking whether the motor is running excessively or has a burnt smell re...

Page 25: ... than 50 of the normal voltage Please retest with the correct voltage specification check the controller for odor replace the controller check if the motor cable is connected and reconnect the motor cable E7 Indicates that the electronic watch does not detect the safety lock signal The magnetron is damaged the magnetron is installed in the correct position and the magnet is placed ...

Page 26: ... after the power is turned back on 2 The electronic watch has no display Troubleshooting methods 2 1Check if the input voltage is within the allowable range AC 200 240V 2 2 Check if the switch on the electric running machine is turned on 2 3 Check if the fuse inside the power outlet is blown If it is blown replace it with a spare fuse 2 4Check the controller if LED is lit 2 5Check each cable 2 6Ch...

Page 27: ...the running belt to center d Running abnormal sound Check if the machine screws are loose and the running belt needs to be lubricated 8 Warranty Terms Warranty coverage In the case of proper use and maintenance the non human damage caused by normal use the warranty card is limited to the original purchaser and may not be transferred 2 Free warranty period Free one year warranty from the date of pu...

Page 28: ...he resulting damage 4 Spare parts and services Please contact the dealer or us Our company is not responsible for the extended services arranged by the merchants themselves 5 The warranty commitment is only valid for private use of the family not for professional training in the gym If you need to purchase non warranty accessories please contact customer service Please provide the following inform...

Page 29: ...itor ask your doctor how to measure the pulse by hand or neck In addition you must set the target heart rate based on age and physical well being Drink plenty of water during exercise You must replenish moisture lost from excessive exercise to prevent dehydration Avoid drinking plenty of ice water or beverages drinking water or beverages at room temperature 10 Warm Exercise Warm up and soothe exer...

Page 30: ...ation increases pulse and delivers more oxygen into the muscles After the aerobic exercise repeated warm up exercises can also reduce muscle soreness We recommend the following warm up and soothing exercises 1 Stretch down The knees are slightly curved the body slowly bends forward let the back and shoulders relax and the hands touch the toes as much as possible Hold for 10 15 seconds and then rel...

Page 31: ...raight leg and try to touch the toe with your hand Hold for 10 15 seconds and then relax Repeat 3 times for each leg 3 Calf and heel stretch Hold the wall with both hands or stand with one foot behind keep the hind legs upright and the heels touch the ground and tilt toward the wall Hold for 10 15 seconds and then relax Repeat 3 times for each leg ...

Page 32: ...ward your hips until you feel the muscles in front of your thighs Hold for 10 15 seconds and then relax Repeat 3 times for each leg 5 The sartorius muscle muscle inside the thigh stretches The soles of the feet are opposite the knees are seated outwards and both hands grasp the feet and pull toward the groin Hold for 10 15 seconds and then relax Repeat 3 times ...

Reviews: