background image

18

In case any issues arise, please do not hesitate to contact our Customer Service team on 
+44 (0)800 6123 988 or email us at 

INFO

@

JLLFITNESS.CO.UK

You can also visit our support centre at 

SUPPORT.JLLFITNESS.CO.UK

 for maintenance and 

assembly articles & videos.

Additional Information

5

CONTACT INFORMATION

•  You should consult your physician, doctor or other health care professional before 

starting or taking part in any of our workout guides. It is your responsibility to 
evaluate your own health before taking part or performing any physical activity you 
may see associated with JLL Fitness Ltd. 

•  Always seek professional advice before changing your diet or starting any exercise 

program. 

•  JLL Fitness Ltd is not liable for any injuries or damages that may occur when 

assembling or using this exercise bike.

•  By reading this you assume full responsibility for any injuries or changes to your 

physical well-being. You waive all rights and release JLL Fitness Ltd of blame from 
any injuries or damages to property that may occur whilst following our advice. 

• This manual offers specific instructions on how to assemble and maintain your 

exercise bike. Failure to follow these directions may result in your warranty being 
void.

DISCLAIMER

Summary of Contents for RE100

Page 1: ...INSTRUCTION MANUAL Please read this book thoroughly before operating the bike ...

Page 2: ...e Diagram Content listing Box contents Tools pack RE100 assembly Adjusting the handlebars Monitor configuration Testing the bike operation Specifications Heart rate sensors Data readouts 3 OPERATION Preventive maintenance activities Bike cleaning Bike balance 4 MAINTENANCE p 6 p 7 p 7 p 7 p 7 p 7 p 8 p 9 p 9 p 10 p 10 p 10 p 11 p 13 p 13 p 14 p 14 p 15 p 15 p 16 p 17 p 17 Exploded diagram Parts li...

Page 3: ...Contact information Disclaimer 5 ADDITIONAL INFORMATION p 18 p 18 ...

Page 4: ...4 1 EXPLODED DIAGRAM ...

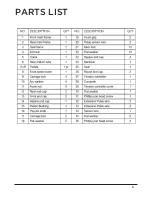
Page 5: ...5 PARTS LIST ...

Page 6: ...of the following symptoms pain tightness in your chest irregular heartbeat lightheadedness dizziness or feelings of nausea If you do experience any of these conditions you should consult a health professional before continuing with your exercise program 3 Keep children and pets away from the equipment The equipment is designed for adult use only 4 Use the equipment on a solid flat level surface wi...

Page 7: ...se sports clothes and gym shoes DO NOT use with bare feet This model has been designed for domestic purposes only FACILITY SAFETY PRECAUTIONS DO NOT operate in damp or wet locations Use caution when getting on or off the bike Check the bike for worn or loose components before each use DO NOT use until worn or damaged parts are replaced Maintain regularly Refer to Preventive Maintenance chapter DO ...

Page 8: ...ify the bike in any way Any modifications will void the warranty All the data displayed by the monitor is for reference purposes only Warning stickers indicate a potentially hazardous situation which if not avoided could result in death or serious injury Carefully read the following caution and warning labels before using the unit WARNING STICKERS It is strictly forbidden to touch any moving parts...

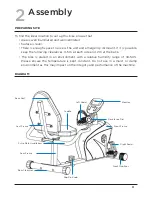
Page 9: ...t each side and 2 m at the back The bike is placed in an environment with a relative humidity range of 30 50 Please ensure the temperature is kept constant Do not use in a moist or damp environment as this may impact on the integrity and performance of the machine PREPARING SITE DIAGRAM Resistance Dial Monitor Rear Frame Front Stabiliser Front Frame Back Rest Rear Stabiliser Pulse Plate Handlebars...

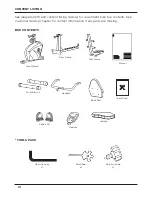
Page 10: ...r recumbent bike box contents See Customer Service chapter for contact information if any parts are missing BOX CONTENTS Seat Frame Saddle Rear Frame Front Frame Tools Pack2 Monitor Stabilisers x2 Manual Hex Allen Key x1 Handles Pedals R L Multi Tool x1 Back Rest Pop Pin Knob x1 ...

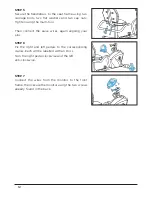
Page 11: ...he front and rear frames using four carriage bolts four arc washers and four cap nuts NOTE The front stabiliser will be the shorter one with the transport wheels STEP 2 Connect the sensor wires from each frame making sure your pins are aligned and you hear a click Then slide the rear frame into the front frame and lock in place with an pop pin knob Be careful not to trap your wires STEP 3 Attach t...

Page 12: ...n connect the pulse wires again aligning your pins STEP 6 Fix the right and left pedals to the corresponding cranks Each will be labelled with an R or L Turn the right pedal clockwise and the left anti clockwise STEP 7 Connect the wires from the monitor to the front frame then secure the monitor using the two screws already found in the back ...

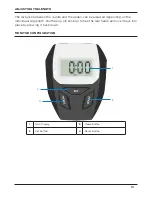
Page 13: ...and the pedals can be adjusted depending on the individuals leg length Pull the pop pin knob up to free the rear frame and lock it back into place by pressing it back down MONITOR CONFIGURATION 1 Main Display 3 Mode Button 2 Set Button 4 Reset Button 4 2 1 3 ...

Page 14: ...make sure the digits are changing on each setting to record your workout correctly TESTING THE BIKE OPERATION SPECIFICATIONS Display Displays Time speed distance heart rate calories and odometer Flywheel 5KG Flywheel Pedals Adjustable toe straps Resistance 8 Levels of magnetic resistance Seat Adjustable seat with forwards and back movement Handlebars Pulse plates built into the handlebars Storage ...

Page 15: ...e the bike keeps track of the following data Time The total time you have been working out or time remaining Display time as hours minutes Speed Your current speed displayed in kilometres per hour km h Distance The total accumulated distance in kilometres during your workout Calories The total accumulated calories burned during your workout Heart rate Your current heart rate Heart rate will appear...

Page 16: ...re normal operation of the unit Keep a log of all maintenance actions to assist in staying current with all preventive maintenance activities JLL is not responsible for performing regular inspection or maintenance Read all instructions and warnings listed both in this chapter and in the Safety chapter During maintenance disconnect the power cable Contact JLL Customer Service on 44 0 800 6123 988 f...

Page 17: ...to prevent the machine of corrosion Wipe away any sweat that may have dripped onto the monitor or handlebars Avoid scratching the display by using a soft cloth Contaminants such as hand lotions oils or body powder may come off on the sensor plates These can reduce sensitivity and interfere with the pulse signal It is recommended that the user has clean hands when making contact with the sensor pla...

Page 18: ... or performing any physical activity you may see associated with JLL Fitness Ltd Always seek professional advice before changing your diet or starting any exercise program JLL Fitness Ltd is not liable for any injuries or damages that may occur when assembling or using this exercise bike By reading this you assume full responsibility for any injuries or changes to your physical well being You waiv...

Page 19: ...19 ...

Page 20: ...20 WWW JLLFITNESS COM Follow us on Facebook and Twitter JLLFitness JLL Fitness Ltd All Rights Reserved ...

Reviews: