background image

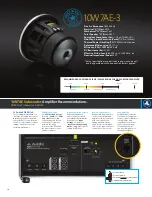
Input Sensitivity “Gain” Setting Guide  

for JL Audio Subwoofer Amplifiers

Following the directions below will allow you to easily adjust the input sensitivity of the amplifier(s), using commonly 

available equipment. Properly setting levels according to this procedure will result in optimum amplifier performance 

and improved system reliability.

Step 1:   

Disconnect the speaker(s) from the amplifier.

Step 2:

 Turn “Off” all processing on the source unit and 

the amplifier (bass/treble, loudness, EQ, etc.).

Step 3:   

Turn the input sensitivity control on the amplifier 

all the way down.  If there is a sensitivity range 

switch, set it to the “low” position.

Step 4:   

Set source unit volume to 3/4 of full volume. 

This will allow for reasonable gain overlap 

with moderate clipping at full volume.

Step 5:   

Cross-reference the amplifier model used and 

impedance load per channel on the chart below 

to determine the target output voltage.

Step 6:   

Verify that you disconnected the speakers before 

proceeding. Play a track with an appropriate sine wave 

(within the frequency range to be amplified) at 3/4 

source unit volume. Selecting the source unit’s “Repeat 

Track” feature (if applicable) will be helpful in this step.

Step 7:   

Connect the AC voltmeter to the speaker output  

of the amplifier.

Step 8: 

 Increase the input sensitivity control until the desired 

voltage (determined in Step 5) is delivered. If multiple 

subwoofer amps are being used, set each one to the same 

exact voltage and you have also level matched them. On an 

amplifier with a sensitivity range switch, if excessive voltage 

is read with the control at minimum (full counterclockwise), 

switch the “Input Voltage” to “High” and re-adjust.

Step 9:   

Once you have adjusted each amp to its maximum 

unclipped output level, turn down the volume of the 

source unit and turn it off. Reconnect all the speakers, 

turn the source unit on and proceed to adjust the 

level balance between the subwoofer and satellite 

amplifiers. This is accomplished by listening to the 

system at a moderate level and  turning DOWN the 

input sensitivity controls of amplifiers that are playing 

too loudly. Do NOT increase the input sensitivity of 

any amplifier as this will defeat the purpose of this 

procedure by permitting excessive clipping (distortion).

Necessary Equipment

• AC Voltmeter (Digital display recommended)
•  A low-frequency (40 or 50 Hz) sine-wave test tone recorded at 0dB reference level. 

Do not use attenuated test tones (-10dB, -20dB, etc.).

The Nine-Step Procedure:

Amplifier Voltage Chart

Impedance

HD750/1

HD1200/1

Slash 600/1v3

Slash 1200/1v3

XD600/1v2

JX500/1D

JX1000/1D

47.4V 

(750W)

60.0V

(1200W)

42.4V  

(600W)

60.0V  

(1200W)

38.7V  

(500W)

34.6V 

(400W)

47.4V 

(750W)

1.5Ω

33.5V 

(750W)

42.4V 

(1200W)

30.0V  

(600W)

42.4V  

(1200W)

not  

recommended

not  

recommended

not  

recommended

14    

Summary of Contents for W7AE

Page 1: ...W7AE Owner s Manual ...

Page 2: ...0 0 W 1 2 5 W 13W7AE 12W7AE 10W7AE 8W7AE Thank you for purchasing a JL Audio W7AE subwoofer driver The W7AE embodies JL Audio s commitment to pushing the envelope of speaker technology with eight patented technologies a design patent and a completely unique set of component parts Each W7AE model has been meticulously engineered to reproduce sub bass with extreme fidelity at any volume level provid...

Page 3: ...ool air through slots directly above the top plate to the voice coil of the speaker This not only enhances power handling but also sound quality by minimizing dynamic parameter shifts and power compression In addition to the patented technologies listed above multiple U S and International patents are currently pending WARNING Prolonged exposure to high sound pressure levels can lead to permanent ...

Page 4: ...th your fingertips and set it aside Step 4 Remove Screws Once the O Ring is out of the way the surround is completely free of the speaker frame no glue is used to secure it Lift the surround up and fold it back inside the speaker frame picture 4a This exposes the mounting screws picture 4b The surround should be folded back and in towards the center of the speaker picture 4c Do not pull it up pict...

Page 5: ... to disastrous consequences so don t do it While holding the surround back with two fingers picture 7a screw the speaker into the enclosure picture 7b Once all twelve screws are in place you did use all twelve right place the surround back over the outside of the speaker frame picture 7c Step 8 Attach O Ring Next take the steel O Ring that you removed in step 3 and place it over the outside of the...

Page 6: ...h one controller by adding standard phone cable splitter not included This is a true subwoofer level control not a bass boost Output Polarity Carefully listen to the sub bass to mid bass transition with music that has strong mid bass content Select the switch position which gives the smoothest most natural mid bass response If using multiple HD1200 1 s on multiple subwoofers make sure this switch ...

Page 7: ... with the displacement of any braces and or ports if applicable to arrive at a gross internal volume Air inside a port is not part of the effective net volume Calculate ports as solid not hollow objects The dimensions given for the enclosure examples below take all applicable displacements into consideration SEALED ENCLOSURE Recommended Net Volume 1 875 cu ft 53 1 ltrs Fc 40 5 Hz F3 37 4 Hz Qtc 0 ...

Page 8: ...listen to the sub bass to mid bass transition with music that has strong mid bass content Select the switch position which gives the smoothest most natural mid bass response If using multiple HD750 1 s on multiple subwoofers make sure this switch is set to the same position on all amplifiers Infrasonic Filter Turn Off for Sealed Enclosure Select 30Hz for Ported Enclosure Input Sensitivity Controls ...

Page 9: ...on pages 4 5 for detailed step by step instructions PORTED ENCLOSURE Recommended Net Volume 1 75 cu ft 51 54 ltrs Recommended Port Tuning 36 7 Hz Port Type Slot ports are recommended See information above The port recommendations listed above are derived through actual tests and measurements not computer simulations Front Baffle Thickness 1 in 25 mm Wall Thickness 0 75 in 19 mm Net volumes given b...

Page 10: ...ed This is a true subwoofer level control not a bass boost Input Sensitivity Controls Proper adjustment of these controls is critical For virtually all aftermarket head units set Input Voltage to Low See Input Sensitivity Setting Guide on pg 14 for precise setting instructions JL Audio XD600 1v2 These settings are intended as a baseline for tuning your system Depending on your vehicle and your pre...

Page 11: ... with the displacement of any braces and or ports if applicable to arrive at a gross internal volume Air inside a port is not part of the effective net volume Calculate ports as solid not hollow objects The dimensions given for the enclosure examples below take all applicable displacements into consideration SEALED ENCLOSURE Recommended Net Volume 1 25 cu ft 35 4 ltrs Fc 43 5 Hz F3 40 5 Hz Qtc 0 7...

Page 12: ...d This is a true subwoofer level control not a bass boost Input Sensitivity Controls Proper adjustment of these controls is critical For virtually all aftermarket head units set Input Voltage to Low See Input Sensitivity Setting Guide on pg 14 for precise setting instructions JL Audio XD600 1v2 These settings are intended as a baseline for tuning your system Depending on your vehicle and your pref...

Page 13: ...splacement of any braces and or ports if applicable to arrive at a gross internal volume Air inside a port is not part of the effective net volume Calculate ports as solid not hollow objects The dimensions given for the enclosure examples below take all applicable displacements into consideration SEALED ENCLOSURE Recommended Net Volume 0 875 cu ft 24 8 ltrs Fc 45 9 Hz F3 41 3 Hz Qtc 0 798 Front Ba...

Page 14: ... input sensitivity control until the desired voltage determined in Step 5 is delivered If multiple subwoofer amps are being used set each one to the same exact voltage and you have also level matched them On an amplifier with a sensitivity range switch if excessive voltage is read with the control at minimum full counterclockwise switch the Input Voltage to High and re adjust Step 9 Once you have ...

Page 15: ...imitations on implied warranties therefore these exclusions may not apply to you This warranty gives you specific legal rights and you may also have other rights which vary from state to state If you need service on your JL AUDIO product All warranty returns should be sent to JL AUDIO freight prepaid through an authorized JL AUDIO dealer and must be accompanied by proof of purchase a copy of the o...

Page 16: ...logo are registered trademarks of JL Audio Inc W7AE VRC OverRoll W Cone and their respective logos are trademarks of JL Audio Inc U S PATENTS 5 734 734 5 949 898 6 118 884 6 229 902 6 243 479 6 294 959 6 501 844 6 496 590 6 441 685 5 687 247 6 219 431 6 625 292 D472 891 8 605 936 D480 709 Other U S Foreign patents pending For more detailed information please visit us online at www jlaudio com Due ...

Reviews: