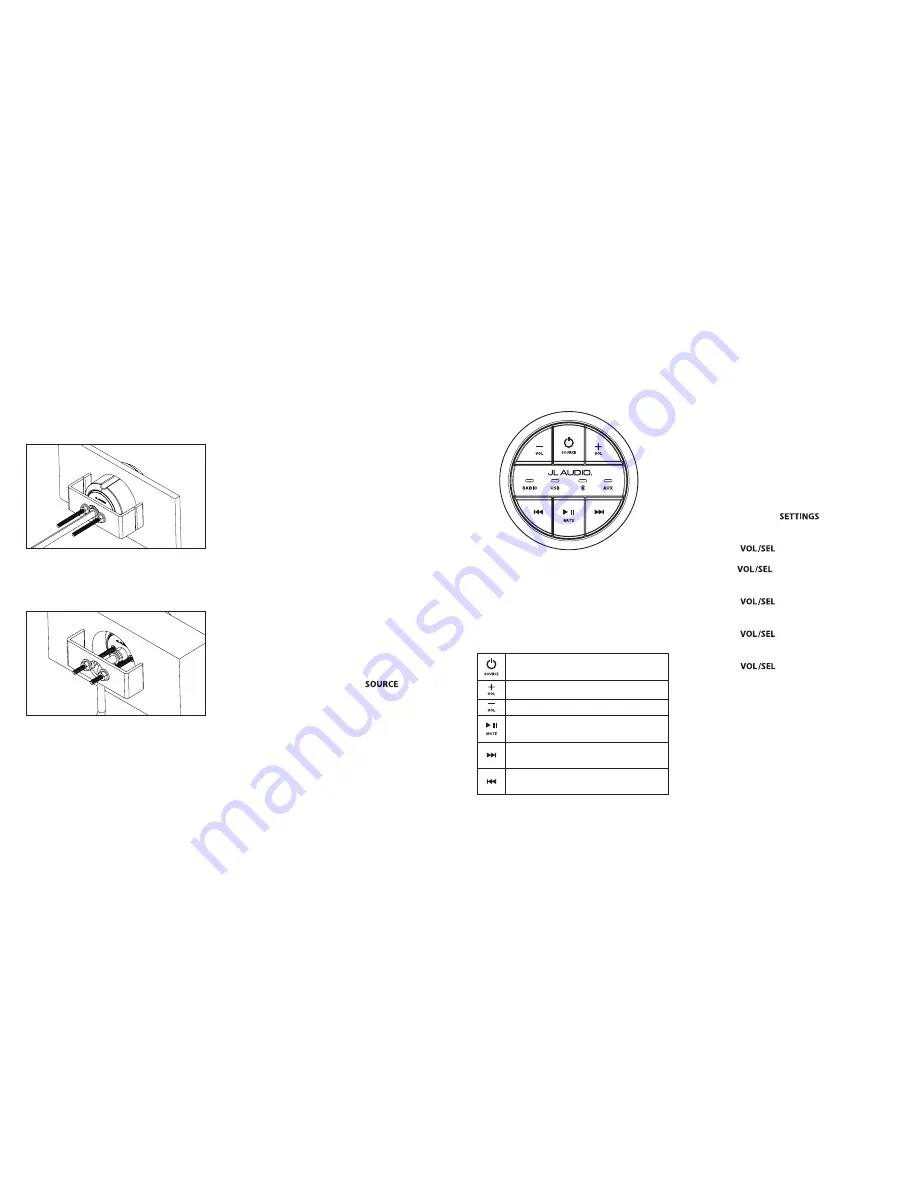
Thin Panel Installation Example
Route the cable through the C-bracket as shown to
avoid chafing/damage (with the strain relief extended
past the center hole).
Thick Panel Installation Example
Route the cable as shown to avoid chafing/damage
(not through the center hole in the C-bracket).
Connection Cables
Connection cables (sold separately) are
available in 6 ft. (MMC-6) and 25 ft. (MMC-25)
lengths to suit different mounting locations.
A Y-splitter (MMC-2Y) (sold separately) may be
used to connect an additional remote to a
single source unit.
Each remote controller may be connected
a maximum 75 ft. (22.8 m) of cable length
away from its source unit. Remote controllers
and cables utilize a 5-pin connector with a
watertight threaded collar to securely mate
their ends together. Connectors are keyed
and must be aligned to fit properly. Once
connected, make sure that cables are securely
routed using cable ties or wire clamps, keeping
connections away from areas where they could
be submerged in water.
LED Source Indicators
Blue LED indicators on the front of the remote
controller are used to report the currently
selected source. Pressing the
button
will cycle through each source option (RADIO/
USB/Bluetooth®/AUX).
Since the MMR-20 does not incorporate a
display screen, all available tuner options (AM/
FM/WB SiriusXM®) are combined as “RADIO”.
When RADIO is chosen, the last tuner used
will be selected. To change tuners, use the
MediaMaster® source unit.
MMR-20 Backlight Settings
Brightness settings for the MMR-20’s LEDs and
buttons can be accessed in the MediaMaster®
source unit’s System Settings menu.
Adjustments can be set independently for Day
and Night lighting modes.
To access the remote controller backlight
settings on the MediaMaster® source unit:
1. Press and hold
to access the
System Settings: Main Menu
.
2. Turn
to
Display
and press to enter.
3. Use
to select
Day Mode
or
Night
Mode
and press to enter.
4. Turn
to
Brightness
and press
to enter.
5. Turn
to
Remote Backlight
and
press to enter.
6. Turn
to adjust the remote’s
brightness and press to set.
05-06-2016 • Printed in China
2-Year Limited Warranty (U.S.A.)
Visit www.jlaudio.com for warranty details.
For Service Information in the U.S.A. please call JL Audio
customer service:
(954) 443-1100 during normal business hours
(Eastern Time) • JL Audio, Inc • 10369 N Commerce Parkway,
Miramar, FL 33025
International Warranties:
Products purchased outside the United States of America are
covered only by that country’s distributor and not by JL Audio, Inc.
• Press to turn the source unit ON
• Press to cycle through sources (RADIO/USB/Bluetooth®/AUX)
• Press and hold to turn the source unit OFF
• Press to increase volume
• Press to decrease volume
• Press to mute audio (AM/FM/WB SiriusXM®/AUX)
• Press to pause or resume the current selection
(USB/Bluetooth®)
• Press to select the next Favorite (AM/FM/WB SiriusXM®)
• Press to select the next track (USB/Bluetooth®)
• Press and hold to fast-forward (USB)
• Press to select the previous Favorite (AM/FM/WB SiriusXM®)
• Press to select the previous track (USB/Bluetooth®)
• Press and hold to fast-rewind (USB)
Control Functions
Below is a list of MMR-20 command functions.
The functionality of some controls will vary
depending on the current source and/or last
tuner selected. Note: The MediaMaster® source
unit only accepts commands from the MMR-20
when its display is on a
Now Playing
Screen or
in the
SOURCE: Select
menu screen.


