background image


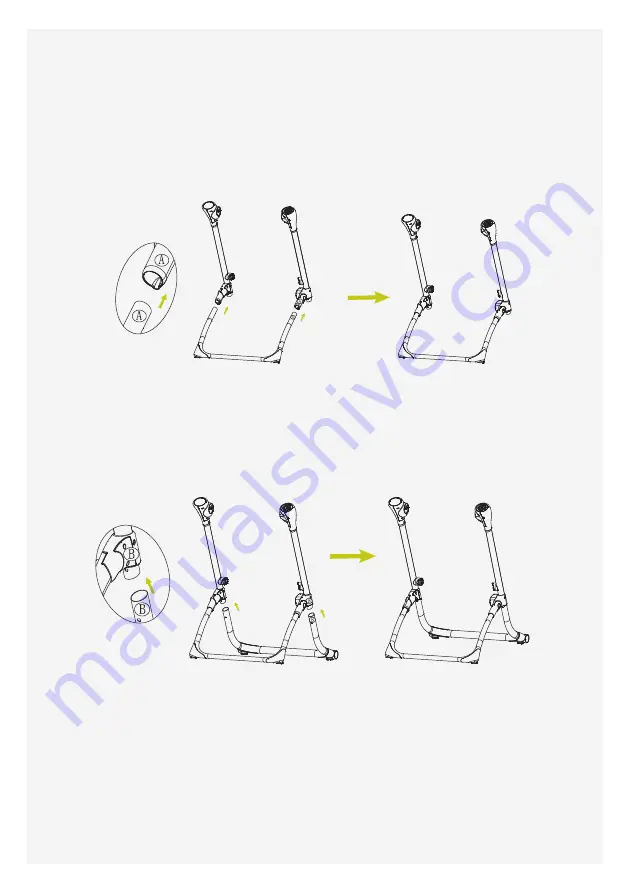
II Instructions for assembling the parts


WARNING


It should be installed by adult.


1. Insert the front foot tube into the corresponding hole in the lower joint, A to A, until you hear 
the "click" sound. As below picture.


“Click”


2. Insert the rear foot tube into the corresponding hole in the lower joint, B to B, until you hear 

the "click" sound. As below picture.


¡°Click¡±


3. Insert the left and right arms into the seat group on both sides, C to C, As below picture

3

Summary of Contents for Multifunctional Comfort 3

Page 1: ...RUCTION IMPORTANT KEEP FOR FUTURE REFERENCE Please read the instruction of high chair carefully before using and keep it for future reference It may cause injury to the infant if operation of chair do...

Page 2: ...g and Maintenance 14 1 Product List Photo Name Quantity Photo Name Quantity Main model 1 1 1 1 1 1 1 Fixed sets of l 1 1 1 1 1 1 Assist model Dinner Plate Front Foot Tube Toy Bar Hind feet tube Footre...

Page 3: ...esponding hole in the lower joint A to A until you hear the click sound As below picture Click 2 Insert the rear foot tube into the corresponding hole in the lower joint B to B until you hear the clic...

Page 4: ...4 Make the arm align to the fixed hole D to D fixed in the designated position As below picture 5 Assemble the left and right arms as below picture D D 4...

Page 5: ...rd thing of diameter about 4mm push the quick detachable button to disassemble 7 Install the dinner plate on the seat group in the direction of the arrow As shown below Notice Use the high chair with...

Page 6: ...2 Timer Indicator Light 2 Timer Button 1 Speed Up 6 signal Remote control 3 USB Connector 9 Put small pedal on the pedal port and then press down installed in place as the picture shows III Function...

Page 7: ...Use the same way to adjust volume under U disk and APP mode 6 Remote control instructions 2 Adapter if this accessory is available please operate it as following ways 1 As below picture shows insert D...

Page 8: ...battery cover and then remove the battery cover put the battery in the battery slot with correct polarity and then cover the battery cover and fixed Remove the battery according to above steps 1 AC p...

Page 9: ...hildren Adapter used with the infant swing are to be regularly examined for damage to the cord plug enclosure and other parts and in the event of such damages it shall not be used Please unplug the po...

Page 10: ...re press the adjustment button on both sides there are 6 different height for adjust when you want to adjust the height Your hands lift the seat in balance keep both sides of the seat at the same heig...

Page 11: ...n as shown below 8 Clean the tray as shown below 1 2 9 As shown keep your hands on both sides of the footrest button at the same time and press down to adjust up and down 4 sections 6 position to adju...

Page 12: ...hown below In swing status the seat height can t be adjusted WARNING The swing rocking function must be closed when swing convert into high chair or it will affect the lifespan of motor The seat heigh...

Page 13: ...5 point safety harness will protect your baby secure and comfortable 1 Slide 2 Press 1 Slide 2 Press Slide 13 When the footrest is in flat position remove the elastic band fixed on the footrest and th...

Page 14: ...d on the pedal pin As shown below 15 Fold the chair press the left and right side s button and tread on the back foot tube then fold the front tube inward As the picture shows 16 Unfold the chair pres...

Page 15: ...of suffocation Please do not use product above soft objects to prevent chipping caused by suffocation such as bed sofa etc 14 Please do not let the children stand in the multifunctional dining chair I...

Page 16: ...make the elastic cord fixed on the foot pedal 2 Basic maintenance lock in place No Problems that may occur Solution 1 2 3 4 5 Suddenly stop when swinging and playing music Batteries are not be assembl...

Reviews: