background image

Microscopy 

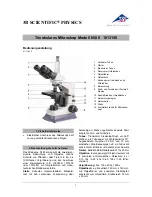
40*400 LED monocular microscope 

Ref : 
571 218 


ENGLISH

 6 

1  Technical specifications  


Head


Monocular, tilted at 45°, 


pivoting at 360°, non detachable


Eyepiece


x10 set wide field


Achromatic objectives


Inverted 4 position turret 
x4 N.A. 0.1 ; x10 N.A. 0.25 ; x40 N.A. 0.65 ; 

Magnification


x40 to x400


Stage


125x125mm with overstage


Focusing


Rack and pinion adjustment with separate micrometric 


and macrometric commands


Rack stop


Yes


Diaphragm


Iris with filter with filter holder


Blue filter


Yes


Cover


Provided


Condenser


Lens 1.25


Lighting


LED lighting, wheel adjustment 
separate from switch


Power


Rechargeable batteries 
and separate 5.5V-300mA transformer


Weight 


5 kg


2 Assembly 

- Remove the microscope from its box and packaging, carefully place it on a 
stable work bench. 
- Remove the plastic bags and the dust covers from the adaptors. 
- Place the monocular head in the tube adaptor; tighten the knurled screw with 
fingers. 
- Familiarise yourself with the mechanics of your microscope. Gently handle 
each element to see how it behaves and what effect it has. Connect the power 
cord correctly using the power supply provided with the microscope. 
 
Note : 

1)  The microscope must have an earth connection. 
2)  Make sure that the supply voltage is adequate for the nominal voltage 

of the microscope. 

 
The batteries have an initial charge time of 5 to 6 hours. The standard charge 
time is of 4 hours for an autonomy of 4 hours.


3  Use and adjustment 

To move the microscope, hold it by the inclined portion of the stand only, 
placing the other hand underneath.  

 
-  Turn on using the switch at the back of the base, turn the light dimmer 

switch on the right of the base to obtain the desired illumination. 


Summary of Contents for 571 218

Page 1: ...Microscopie Microscopy Ref 571 218 Français p 1 English p 5 Version 9009 Microscope monoculaire à LED 40x400 Monocular LED microscope 40X400 ...

Page 2: ...de A Oculaire grand champ avec index B Objectifs C Platine carrée avec surplatine D Lentille Condensatrice O N 0 65 E Collecteur d éclairage F Tête monoculaire G Tourelle 4 places H Mise au point rapide I Mise au point fine J Réglage de l intensité lumineuse E D C B A F H I J G ...

Page 3: ...formateur séparé 5 5V 300mA Poids 5 kgs 2 Mise en service Retirer le microscope de sa boîte et de l emballage et le poser soigneusement sur une table de travail stable Enlever les sacs en plastique et les couvercles anti poussières de chaque adaptateur Mettre en place la tête monoculaire dans l adaptateur de la potence serrer avec les doigts la vis moletée Familiarisez vous avec la mécanique de vo...

Page 4: ...longée Sous la platine se trouve un condenseur de lumière L intensité du faisceau de lumière incident peut se trouver modifié quand on règle l ouverture du diaphragme Note L ouverture du diaphragme n est pas destinée à régler la luminosité la luminosité se règle à l aide du bouton de réglage de la luminosité Tourner le porte objectifs pour changer l objectif 4 ou 10 et s assurer en entendant un cl...

Page 5: ...ec et en climat particulièrement exposé dans leurs coffrets polystyrène avec un sachet dessiccateur Démontage un microscope est un appareil de précision d usinage délicat Si le démontage s avère nécessaire maintenance il faut retourner l instrument à la société JEULIN La plaque inférieure qui le ferme ne doit être ouverte que par un électricien car le boîtier doit rester protégé au niveau de la sé...

Page 6: ... Ref 571 218 ENGLISH 5 A Wide field eyepiece B Objectives C Square stage with overstage D Lens condenser E Illuminator F Monocular head G 4 positions objective turret H Coarse focus I Fine focus J Light intensity adjustment E D C B A F G H J I ...

Page 7: ...y place it on a stable work bench Remove the plastic bags and the dust covers from the adaptors Place the monocular head in the tube adaptor tighten the knurled screw with fingers Familiarise yourself with the mechanics of your microscope Gently handle each element to see how it behaves and what effect it has Connect the power cord correctly using the power supply provided with the microscope Note...

Page 8: ... focus knob to make the sample image as clear as possible 4 Maintenance Dust protection cover the apparatus with its cover after use If dust deposits itself on the lenses blow using a syringe or a dust remover Ref 574 198 or use a sable hair brush the lenses are fragile and may be scratched by dust Fingerprints do not touch the lenses However if they have fingerprints remove them with a soft cloth...

Page 9: ...Sales Service This material is under a two year warranty and should be returned to our stores in the event of any defects For any repairs adjustments or spare parts please contact JEULIN TECHNICAL SUPPORT Rue Jacques Monod BP 1900 27 019 EVREUX CEDEX FRANCE 33 0 825 563 563 ...

Page 10: ......

Reviews: