background image

© 2018 Jetta Corporation. All rights reserved. REV 03/2018


WWW.JETTACORP.COM


1(800) 288-7771


INSTALLATION INSTRUCTIONS | JETTA CORPORATION 

PAGE | 5 

OPTIONAL SKIRT INSTALLATION INSTRUCTIONS 

OPTIONAL SKIRT: 

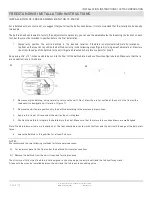
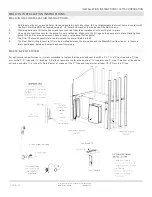
1. The skirt may need to be trimmed to size. Take the measurements of the skirt opening and compare those of the skirt itself to

determine if the skirt must be trimmed to fit. If so, mark the dimensions on the skirt and trim the skirt on the bottom and sides (do
not trim the top of the skirt) and cut to within 1/8” of the required dimensions using a circular saw with sharp tooth blade. Using a
belt sander is recommended to finish trimming the sides and bottom of the skirt to the exact size of the  opening.

2. To create a positive stop for the skirt, nail, glue or screw 2x2” or 2x4” wood blocks on both side walls and along the full length of

the front floor section (parallel to tub lip). The wood blocks must be mounted securely against a wall or stud wall framing and the
floor.

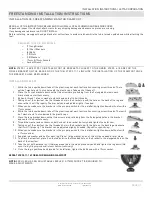
3. The top of the skirt is notched. Foam blocks are glued to the top backside of the skirt (section that is notched) and will compress to

hold the skirt against the bathing well of the tub. Check the underside of the tub lip for smoothness. There may be fiberglass chop
that requires sanding, so the skirt will fit snugly in place. Slide the notched top edge of the skirt under the lip of the tub. Move the
bottom section of the skirt in place until it is resting against the wood blocks. Verify the vertical edge of the skirt is perpendicular to
the f l o o r .

4. Included with the skirt are two screws and decorative caps that cover/conceal the screw head and are color matched to the acrylic.

Drill two (2) screw holes in the bottom of the skirt to protect the acrylic from cracking, position to align with wood block. Screw
both lower ends of the skirt through the decorative caps, through the acrylic and into the wood blocks to hold the skirt securely in
place.

Note: 

the skirt is not marked where the screws should be positioned as application will dictate position. 

Installer may then seal the sides and floor with caulk or silicone if so desired. 

Parts included for optional skirt  installation: 

o


(1) skirt

o


(2) screws

o


(2) decorative caps

o


(1) instruction sheet

Parts / tools needed for optional skirt installation that are NOT included: 

o


circular saw with sharp tooth blade and a belt sander

o


drill

o


2x2” or 2x4” wood  blocks

o


caulk or silicone

o


screw driver

o


tape measure

o


square / level

IMPORTANT: MANUFACTURER WILL NOT BE LIABLE FOR THE REMOVAL OR RE- INSTALLATION OF THE BATHTUB IF 
THERE IS A FAILURE TO FOLLOW THE MANUFACTURERS RECOMMENDED PRE-INSTALLATION AND INSTALLATION 
PROCEDURES, FAILURE TO FOLLOW THE MANUFACTURER’S RECOMMENDATIONS COULD RESULT IN THE 
WARRANTY BEING VOIDED. 

Summary of Contents for RAIN SHOWER BASES

Page 1: ...FOR ALL LINES AND MODELS ADVANTAGE RAIN SHOWER BASES CLASSIC DESIGNER ELITE AFFINITY COSMO WALK IN 800 288 7771 WWW JETTACORP COM Installation Instructions...

Page 2: ......

Page 3: ...PREPARATIONS 6 ROUGH IN 6 INSTALLATION STEPS 6 FREESTANDING INSTALLATION INSTRUCTIONS 8 ROUGH IN 8 PREPARATIONS 8 INSTALLATION OF FREESTANDING BATHTUBS 1 PIECE AND DRAIN 9 INSTALLATION OF FREESTANDING...

Page 4: ...duseasdescribedinthe Owner sManual Onlyuseattachmentsrecommendedbythemanufacturer 3 Do not insert any object into any opening Do not operate electrical appliances while in or within 5 feet of the bath...

Page 5: ...manufacturers facility and is factory tested and should not be removed or altered under any circumstances Removal or alteration of this pigtail will void the warranty The green lead of the pigtail is...

Page 6: ...uring that uniform support is given to all areas of the base and that no portion of the lip is bearing weight DO NOT SUPPORT THE WEIGHT OF THE BATH BY THE RIM Your Jetta bath has a pre leveled lip tha...

Page 7: ...will fit snugly in place Slide the notched top edge of the skirt under the lip of the tub Move the bottom section of the skirt in place until it is resting against the wood blocks Verify the vertical...

Page 8: ...r Jetta bath should be installed in a bedding compound of mortar mix or thin set which should be distributed under the base to provide maximum support and even weight distribution Do not use foam sand...

Page 9: ...pended by its lip 9 Connect the bath drain to the drain pipe Position a protective liner in the bath basin 10 Drill small holes through the flange at the studs If there are gaps fill them with a shim...

Page 10: ...leted by a licensed plumber before the bathtub is moved into its final position PROTECTIVE FOAM PACKAGING The adjustable feet are protected with foam packaging around each foot to ensure the quality o...

Page 11: ...t staples to avoid damaging the surface of the bathtub 5 Temporarily install the drain assembly of the bathtub 6 Place the bathtub back into position on the previously traced outline while ensuring th...

Page 12: ...the bathtub drain and overflow see figure below Make sure that there are no obstructions in this space A 2 Remove only the bathtub being careful to not move the skirt Next draw the interior outline of...

Page 13: ...up with the hole on the back of the leg and ensure that it will fit properly The bracket can be adjusted slightly if needed 5 When you ve made sure the bracket is in the proper position for the instal...

Page 14: ...refer to the installation guide provided with the door All plumbing rough in for both the drain and the supply should be completed before installing the shower base INSTALLATION STEPS Ensure walls and...

Page 15: ...1 Feet are extended for shipping purposes to provide clearance and protection of the front skirt The tub must be reset to proper installation height by installer 2 Raise the two center feet so that t...

Page 16: ...not overtighten Make sure the O rings on the pump are in place Hand tighten pump fittings Do not use a wrench channel locks or pipe dope Teflon paste 4 The Filler Extension panel s are used to extend...

Page 17: ...for cleaning To remove the jets turn the outer ring counter clockwise past the point of resistance until you hear a click Pull the jet straight out to remove To reinstall the jet insert the jet body...

Page 18: ...sure that the lines stay clean and dry What should I do if the light in my air tub will not turn on The light on air or combo tubs is operated by the keypad Check to ensure that the gray cable coming...

Page 19: ...PAGE 15 2018 Jetta Corporation All rights reserved REV 03 2018 WWW JETTACORP COM 1 800 288 7771 INSTALLATION INSTRUCTIONS JETTA CORPORATION...

Page 20: ...WWW JETTACORP COM 425 Centennial Blvd Edmond OK 73013 LOCAL 405 340 6661 TOLL FREE 405 340 6661 SALES JETTACORP COM...

Reviews: