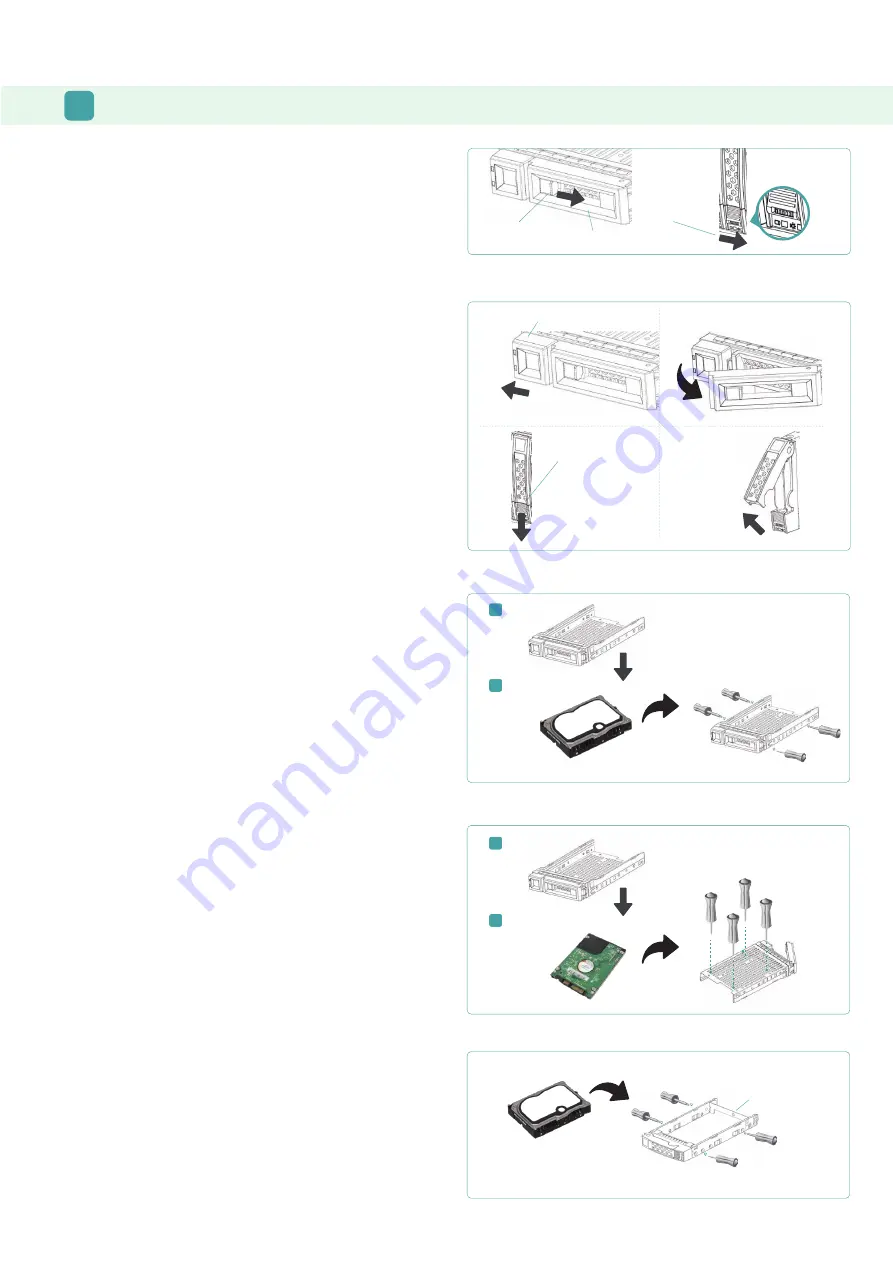
Open the Carrier Handle of a Disk Drive Tray
- The procedure of opening an LFF disk drive tray carrier handle: shift
the carrier handle release button from right to left; then carrier
handle will automatically pop out.
- Open an SFF disk drive tray carrier handle: shift the carrier handle
release button from up to down; then carrier handle will automatically
pop out.
Install an SFF Disk Drive into an LFF Tray
1. Place a disk drive tray onto a stable surface.
2. Align the disk drive to the tray with the connector facing away
from the carrier handle.
3. Align the four disk drive tray screw holes (front row at the bottom
side of the tray for SAS interface disk drive; a rear row for SATA
interface SSD) to the disk drive.
4. Install and tighten all four screws to secure disk drive.
Install an SFF Disk Drive into an SFF Tray
1. Place a disk drive tray onto a stable surface.
2. Remove the supporting bracket. Then align the disk drive with the
connector facing away from the carrier handle.
3. Align the four disk drive tray screw holes on both sides of the disk
tray.
4. Install and tighten all four screws to secure disk drive within the
tray.
Install an LFF Disk Drive into an LFF Tray
1. Place a disk drive tray onto a stable surface.
2. Align the disk drive to the tray (with disk connector facing away
from carrier handle) and align the four disk drive tray screw holes
located on both sides of the hard drive.
3. Install and tighten all four screws to secure the disk drive within
the tray.
2
INSTALL THE DISK DRIVES
Unlock the Disk Drive Tray
- The standard position of the disk drive tray is locked to prevent
damage during transport.
- To unlock LFF or SFF disk drive tray: shift the release button lock
from left to right.
Release Direction
Release Direction
Carrier Handle Release Button
Carrier Handle Release Button
Unlock Direction
Supporting Bracket
Release Button Lock
Unlock Direction
Unlock Direction
Re
l
e
ase
B
u
t
t
on
Lo
c
k
3.5” HDD
1
2
2.5” HDD
LFF Tray
LFF Tray
1
SFF Tray
2


