background image

14

1.2 

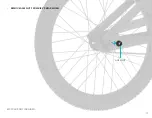
Attach the Wheel Bracket to the Bike


·

ON THE WHEEL BRACKET FIND THE HOLE THAT CORRESPONDS TO YOUR BIKE’S WHEEL SIZE.

WHEEL BRACKET

20˝

18˝

16˝

14˝

12˝

Summary of Contents for Spark Light-Up Training Wheels

Page 1: ...Spark Light Up Training Wheels A guide for your ride IMPORTANT READ CAREFULLY AND RETAIN FOR FUTURE REFERENCE MODELS JSPARK BLK...

Page 2: ......

Page 3: ...Jetson stoptworidingrules Be safe Have fun...

Page 4: ......

Page 5: ...fety Warnings Warranty Coverage What s in the Box Specs Features Online Resources 1 Getting Started Attach the Wheel to the Wheel Bracket Attach the Wheel Bracket to the Bike 2 Making Moves Getting Go...

Page 6: ...eels or drive train while the motor is running This product should not be used by children or persons with reduced physical sensory or mental capabilities or lack of experience and knowledge unless th...

Page 7: ...r a demonstration that such operators can understand and operate all components of the unit before use Do not ride without proper training Do not ride at high speeds on uneven terrain or on slopes Do...

Page 8: ...8...

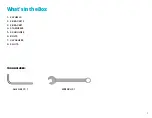
Page 9: ...9 What s in the Box 1 2 WHEELS 2 2 BRACKETS 3 2 BRACKET 4 STABILIZERS 5 2 SHOULDER 6 BOLTS 7 4 WASHERS 8 2 NUTS TOOL INCLUDED ALLEN KEY X 1 WRENCH X 1...

Page 10: ...RECOMMENDED AGE 3 COMPATIBILITY INTENDED USE INTENDED FOR USE WITH MOST BIKES WITH 12 14 16 18 AND 20 WHEELED BICYCLES THAT USE A SOLID AXLE WITH NUTS THAT ATTACH TO THE REAR WHEEL IN THE FRAME NOTE A...

Page 11: ...ILURE TO COMPLY WITH THE FOLLOWING INSTRUCTIONS MAY RESULT IN INJURY TO THE CHILD OR OTHERS KEEP SMALL PARTS AWAY FROM CHILDREN DURING ASSEMBLY ACCESSORY MUST BE ASSEMBLED AND REMOVED BY AN ADULT FREQ...

Page 12: ...12 ATTACH THE WHEEL TO THE WHEEL BRACKET USING SHOULDER BOLT 2 WASHERS AND NUT 1 1 Attach the Wheel to the Wheel Bracket 1 Getting Started SHOULDER BOLT WASHER WASHER NUT...

Page 13: ...13 TIGHTEN BOLT NUT MAKING SURE THE WHEEL ROTATES SMOOTHLY...

Page 14: ...14 1 2 Attach the Wheel Bracket to the Bike ON THE WHEEL BRACKET FIND THE HOLE THAT CORRESPONDS TO YOUR BIKE S WHEEL SIZE WHEEL BRACKET 20 18 16 14 12...

Page 15: ...15 REMOVE AXLE NUT FROM BIKE S REAR WHEEL BICYCLE IS NOT INCLUDED AXEL NUT...

Page 16: ...16 INSERT STABILIZER BRACKET BEHIND SELECTED WHEEL BRACKET HOLE STABILIZER BRACKET...

Page 17: ...KET ONTO THE AXLE TIGHTEN AXLE NUT USING A WRENCH REPEAT PROCESS ON OTHER SIDE OF THE BIKE ONCE BOTH BRACKETS ARE CONNECTED MAKE SURE THEY ARE TIGHTLY SECURED FOR INSTALLATION ON SOME 20 BIKES YOU MAY...

Page 18: ...18 THE TRAINING WHEELS SHOULD EXTEND A MINIMUM OF 175MM FROM THE CENTER OF THE BICYCLE S REAR WHEEL MAKE SURE THERE IS NO MORE THAN 25MM OF CLEARANCE BETWEEN EACH WHEEL AND THE GROUND 25MM 175MM...

Page 19: ...19 NOW YOU HAVE YOUR TRAINING WHEELS ATTACHED IT S TIME TO GO OUT AND SHOW OFF YOUR RIDE YOUR LIGHTS WILL TURN ON ONCE YOU START RIDING 2 1 Getting Going Keeping Momentum 2 Making Moves...

Page 20: ...DED FOR AGES 3 YEARS AND UP MAXIMUM RIDER WEIGHT IS 198 LB WARNING EXCEEDING RIDER WEIGHT MAY CAUSE THE PRODUCT TO BEND OR BREAK RESULTING IN A FALL THIS PRODUCT IS NOT INTENDED FOR USE BY ADULTS OR R...

Page 21: ...sure to leave a review at ridejetson com reviews We can t wait to hear from you Stay connected Be sure to follow ridejetson on social media to learn about fantastic offers giveaways and all the lates...

Page 22: ...Hebei China Imported by Jetson Electric Bikes LLC P O Box 320149 775 4th Ave 2 Brooklyn NY 11232 www ridejetson com Questions Let us help Made in China Date Code 10 2023 Document Edition v1 1 2023 JET...

Reviews: