background image

 13 

TIP:

  On  rough  lumber,  you  may  need  to  rip  one 

edge  on  a  table  saw  or  band  saw  to  more  easily 
observe a board’s grain direction. Also, the grain on 
some  wood  species  may  change  direction  in  the 
middle of the board – if possible, cut the board in the 
middle  so  the  grain  direction  will  be  consistent  on 
both pieces. Otherwise, use personal judgment as 
to which direction is more favorable, and safer, for 
feeding.  

Edge  grain  (see  Figure  9-2)  may  be  planed  if  the 
stock is wide enough to rest firmly upon the table.  

Do not attempt to plane end-grain 

(see Figure 9-

2) as this can result in splintering of the stock and 
potential kickback.  


Figure 9-3 


Figure 9-4 

9.8

  Knots and trouble spots 

Wood with knots, “wild” grain, or extensive figuring 
is always difficult to surface and requires extra care. 
Check that any knots are solid. Do not plane stock 
with  loose  knots.  Take  light  cuts.  Be  especially 
cautious of kickbacks and stop cutting immediately 
if the board will not feed smoothly. 

9.9

  Snipe 

Snipe  refers  to  a  depression  at  either  end  of  the 
board caused by an uneven force on the cutterhead 
when  the  work  is  entering  or  leaving  the  planer. 
Snipe may occur when the board is not supported 
properly or when only one feed roller is in contact 
with the board at the beginning or end of the cut. 

If the snipe is deep, be more careful how the board 
is supported. Keep it parallel to and flat on the table 
at all times. Use an extra support, such as a roller 

stand,  at  both  the  infeed  and  outfeed  ends  of  the 
planer. 

Other  methods  to  prevent  snipe  are  reducing  the 
depth  of  cut, and  feeding  additional  boards  butted 
closely to leading and trailing ends of the workpiece. 

If snipe cannot be avoided, cut the material longer 
than needed and trim the ends after planing. 

9.10

  Ridges 

Damaged or nicked knives can leave ridges along 
the length of a board.   

Always  inspect  each  board  carefully  before 
attempting  to  plane  it.  Do  not  attempt  to  plane 
second-hand  lumber  with  nails  below  the  surface, 
painted  wood,  plywood,  hardboard,  wood  with  a 
glue bead, or any material other than solid wood.   

  Do  not  attempt  to  plane 

second-hand  lumber,  painted  or  varnished 
wood,  plywood  or  particle  board.  These 
materials can damage planer knives. Failure to 
comply may cause serious injury. 

9.11

  Planing rough lumber 

  Make  sure  wood  is  properly 

dried before planing. Wet or “green” lumber may 
clog the machine and lead to damage.


Air dried wood should stand for at least a year per 
inch  of  thickness  of  the  rough  cut  stock.  The 
moisture content of air dried wood should be about 
12%  to  15%.  Kiln  dried  woods  should  have  a 
moisture content of approximately 10%. Wood to be 
used in fine furniture should have a moisture content 
of 7% to 8%. 

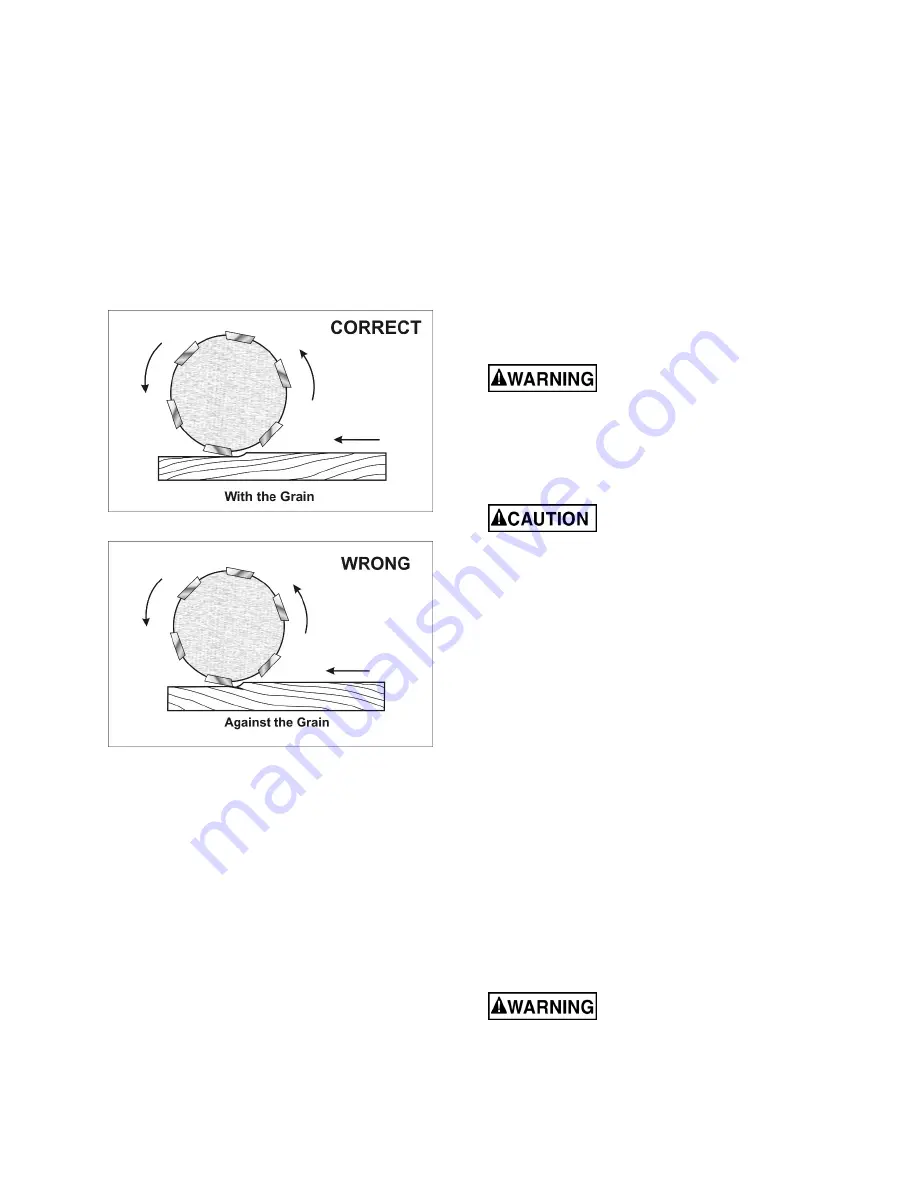
Joint  one  edge  of  the  rough  cut  lumber  before 
planing. This will help you determine the direction of 
grain travel. Feed the board into the planer so the 
knives cut with the grain, see Figure 9-3. 

Measure  the  rough  lumber  at  several  locations  to 
find the thickest part. As wood dries, its dimensions 
vary, including its thickness. Set the planer to take a 
very shallow cut on the highest, thickest part of the 
board. Continue to take very shallow cuts until you 
can  determine  whether  there  are  any  knots  or 
unusual grain patterns. 

After completing one side, inspect the opposite side 
for  irregularities,  then  process  it  using  the  same 
procedure as for the first side. 

9.12

  Planing glued-up boards 

  Glued-up  stock  must  dry  at 

least  24  hours  before  being  planed.  Failure  to 
comply may cause the stock to separate in the 
planer, leading to kickback and serious injury.


Summary of Contents for JWP-13BT

Page 1: ...Parts Manual 13 inch Portable Thickness Planer Model JWP 13BT JET 427 New Sanford Road LaVergne Tennessee 37086 Part No M 722130 Ph 800 274 6848 Edition 1 12 2018 www jettools com Copyright 2018 JET This pdf document is bookmarked ...

Page 2: ...ance purposes use extreme caution and replace the guards immediately after completion of maintenance 14 Check damaged parts Before further use of the machine a guard or other part that is damaged should be carefully checked to determine that it will operate properly and perform its intended function Check for alignment of moving parts binding of moving parts breakage of parts mounting and any othe...

Page 3: ...r pass 42 Keep knives sharp for best results and safer operation Rotate for a fresh edge or replace as needed 43 Plane in the direction of the board s grain Planing against the grain can result in tear out and splintering of the wood and increase risk of kickback Do not plane end grain 44 Check feed rollers before use for chips and sawdust lodged between any of the components If the rollers are no...

Page 4: ... 9 3 Start stop 12 9 4 Circuit breaker reset 12 9 5 Feed rate 12 9 6 Planing warped wood 12 9 7 Grain direction 12 9 8 Knots and trouble spots 13 9 9 Snipe 13 9 10 Ridges 13 9 11 Planing rough lumber 13 9 12 Planing glued up boards 13 10 0 User maintenance 14 10 1 General cleaning 14 10 2 Feed roller inspection 14 10 3 Commutator brush inspection 14 10 4 Lubrication 14 10 5 Thickness scale calibra...

Page 5: ...rdance with the instructions set forth in this document If there are questions or comments please contact your local supplier or JET JET can also be reached at our web site www jettools com Retain this manual for future reference If the machine transfers ownership the manual should accompany it Read and understand the entire contents of this manual before attempting assembly or operation Failure t...

Page 6: ...in 240 mm Head movement per one revolution of handle 1 16 in 1 6 mm Feed rate 18 and 26 FPM Thickness gauge stops 1 8 1 4 3 8 1 2 3 4 1 in Cutterhead and feed rollers Number of cutterhead rows 6 Knife style Two edged HSS inserts Knife inserts number of 26 Knife inserts size LxW 1 3 32 x 19 32 in 28 x 15 mm Cutterhead speed no load 10 000 RPM Cutterhead diameter 2 in 46 mm Dimensions Dust chute dia...

Page 7: ... a better estimation of the hazards and risks involved only L length W width H height FPM feet per minute CFM cubic feet per minute RPM revolutions per minute The specifications in this manual were current at time of publication but because of our policy of continuous improvement JET reserves the right to change specifications at any time and without prior notice without incurring obligations 5 1 ...

Page 8: ...ching the flats on handle base and leadscrew Secure the handle with the provided socket head cap screw using a 4mm hex wrench 6 4 Dust collection It is strongly recommended that a dust collection system be used with this planer with a minimum capacity of 500 CFM Install the dust hood using the four screws already installed at back of machine and the provided T wrench The port should angle upward a...

Page 9: ...Check with a qualified electrician or service personnel if the grounding instructions are not completely understood or if in doubt as to whether the tool is properly grounded Failure to comply may cause serious or fatal injury Use only 3 wire extension cords that have 3 prong grounding plugs and 3 pole receptacles that accept the tool s plug Repair or replace damaged or worn cord immediately 2 Gro...

Page 10: ...e Figure 4 1 allows final thickness of the workpiece to be preset This is particularly useful when multiple boards must be processed to the same final thickness Choose one of 6 stop settings from 1 8 to 1 inch Rotate thickness gauge dial to desired finish depth Lower head for each pass until the stop is contacted then make the final pass Do not force the crank handle farther when thickness gauge s...

Page 11: ...best results use shallow cuts and multiple passes Excessive depth of cut can place additional strain upon the motor 2 Use shallower cuts on wider workpieces 3 A thickness planer works best when the lumber has at least one flat surface Use a jointer to create a flat surface If this is not possible make several passes of the same surface through the planer until it is flat Then flip the material ove...

Page 12: ...o desired rate of 18 or 26 feet per minute while planer is operating Only move feed rate selector while planer is running Moving selector with planer stopped will cause stress to roller gear engagement at start up resulting in possible damage to gear system 9 6 Planing warped wood Do not attempt to plane a board which is warped along its length A warped board can jam itself against the cutterhead ...

Page 13: ...be avoided cut the material longer than needed and trim the ends after planing 9 10 Ridges Damaged or nicked knives can leave ridges along the length of a board Always inspect each board carefully before attempting to plane it Do not attempt to plane second hand lumber with nails below the surface painted wood plywood hardboard wood with a glue bead or any material other than solid wood Do not att...

Page 14: ...fer to Figure 8 4 3 Insert 4mm hex wrench through hole and into recess Use this wrench to rotate cutterhead and rollers during the inspection process 4 Inspect both rollers for sawdust and wood chips To remove sawdust or wood chips first use a soft brush If chips or dust remain use a soft cloth with a mild cleaner Do not touch feed rollers with sharp or abrasive objects or use harsh solvents Keep ...

Page 15: ...ing grease to the chain Turn the crank handle a few times to spread the grease then wipe off any excess Figure 10 3 head elevating chain 10 5 Thickness scale calibration If the thickness scale becomes inaccurate after extended use plane a board and carefully measure its thickness If the scale does not match this measurement loosen the two screws on the cursor see Figure 4 1 and adjust the cursor a...

Page 16: ... a board making several passes top and bottom until the final pass is taken with the head lowered to the thickness gauge stop 4 Carefully measure the board thickness using a calipers If it measures 1 inch the gauge is correct check the accuracy of the cursor and adjust if needed If the board thickness is not 1 inch proceed as follows 5 Remove side panel refer to Figure 10 4 6 Back off the hex nut ...

Page 17: ...too fast or cutting too deeply Select lower feed rate or shallower depth of cut Drive belt is loose stretched Replace belt Motor brush failure Inspect and replace brushes if needed Snipe Dull knife inserts Rotate or replace knife inserts Inadequate support of long boards Use an assistant or roller stand to support long workpieces Lumber is not butted properly Butt each piece of stock end to end as...

Page 18: ...cate posts and lead screws Head cannot be lowered Thickness gauge is preventing further movement Reset thickness gauge dial setting Buildup of debris on leadscrews and or columns Clean affected areas and re grease Board thickness doesn t match thickness scale Thickness scale out of adjustment Recalibrate thickness scale cursor and make test cuts Chain keeps coming off sprocket s Chain or sprocket ...

Page 19: ...through Friday 8 00 a m to 5 00 p m CST Having the Model Number and Serial Number of your machine available when you call will allow us to serve you quickly and accurately Non proprietary parts such as fasteners can be found at local hardware stores or may be ordered from JET Some parts are shown for reference only and may not be available individually ...

Page 20: ...20 12 1 1 Base Assembly Exploded View ...

Page 21: ...de Bar 1 29 2 F009871 Socket Head Button Screw M3x10 4 29 3 JWP13BT 1293 Surface Plate 1 29 4 JWP13BT 1294 Table 1 29 5 JWP13BT 1295 Left Side Bar 1 30 JWP13BT 130 Chain 1 31 TS 1505041 Socket Head Cap Screw M10 1 5x30 4 32 JWP13BT 132 Base Left 1 33 JWP13BT 133 Side Cover Left 1 34 JET 92 JET Logo with 3M Adhesive 92x38mm 1 35 JWP13BT 135 Plate 2 JWP13BT ETA Extension Table Assembly item 27 36 37...

Page 22: ...22 12 2 1 Head Assembly Exploded View ...

Page 23: ...et Head Cap Screw M5 0 8Px35 2 30 TS 1502101 Socket Head Cap Screw M5 0 8Px45 2 31 JWP13BT 231 Cover 1 32 F009923 Socket Head Button Screw M4 0 7Px6 1 33 TS 1522021 Set Screw M5 0 8Px8 4 34 JWP13BT 234 Nut Includes 85 89 2 35 JWP13BT 235 Chip Deflector 1 36 JWP13BT 236 Deflector Cover 1 37 JWP13BT 237 Block 4 38 JWP13BT 238 Spring 4 39 JWP13BT 239 Plate 4 40 JWP13BT 240 Outfeed Roller 1 41 JWP13BT...

Page 24: ...hort 1 75 TS 2245202 Socket Head Button Screw M5 0 8x20 2 76 JWP13BT 276 Belt 140J 6 1 77 JWP13BT 277 Shaft 1 78 TS 2361051 Lock Washer M5 2 79 JWP13BT 279 Bolt Special 45L 2 80 TS 2244102 Socket Head Button Screw M4 0 7Px10 2 81 TS 1550021 Flat Washer M4 2 82 TS 1550021 Flat Washer M4 1 83 F009871 Socket Head Button Screw M3 0 5x10 1 84 TS 2244202 Socket Head Button Screw M4 0 7Px20 2 85 TS 02670...

Page 25: ...itch Plate 1 6 JWP13BT269 06 Machine Screw M5 0 8x12 5 7 JWL1442 118 Switch 1 JWL1442 118 1 Safety Key 1 8 JWP13BT269 08 Motor Pulley 1 9 JWP13BT269 09 Flat Washer M5 2 10 JWP13BT269 10 Lock Washer M5 2 11 TS 2245162 Socket Round Head Screw M5 0 8Px16 1 12 JWP13BT269 12 Machine Screw M5 0 8Px35 1 13 JWP13BT269 13 Power Cable 1 14 JWP13BT269 14 Strain Relief 6P3 4 1 15 JWP13BT269 15 Wire Overload t...

Page 26: ... Gear 12t 1 2 BB 6203ZZ Ball Bearing 6203ZZ 2 3 TS 2245102 Socket Head Button Screw M5 0 8x10 3 4 JWP13BT244 04 Cutterhead 1 5 JWP13BT244 05 Bearing Seat 1 6 JWP13BT244 06 Spindle Pulley 1 7 JWP13BT244 07 Nut LH M16 2 0P 1 8 722131 Knife Insert set of 10 26 total 9 JWP13BT244 09 Knife Insert Screw 52 10 JWP13BT244 10 Allen Wrench T Handle 3mm 1 11 KF2R5512 Flat Key Dbl Rd Hd 5x5x12 mm 1 ...

Page 27: ...27 13 0 Electrical Connections for JWP 13BT White Green Black White Black SWITCH Motor White LINE LOAD Overload Protector Green Black ...

Page 28: ...itional action needed JET has Authorized Service Centers located throughout the United States For the name of an Authorized Service Center in your area call 1 800 274 6846 or use the Service Center Locator on the JET website More Information JET is constantly adding new products For complete up to date product information check with your local distributor or visit the JET website How State Law App...

Reviews: