background image


7

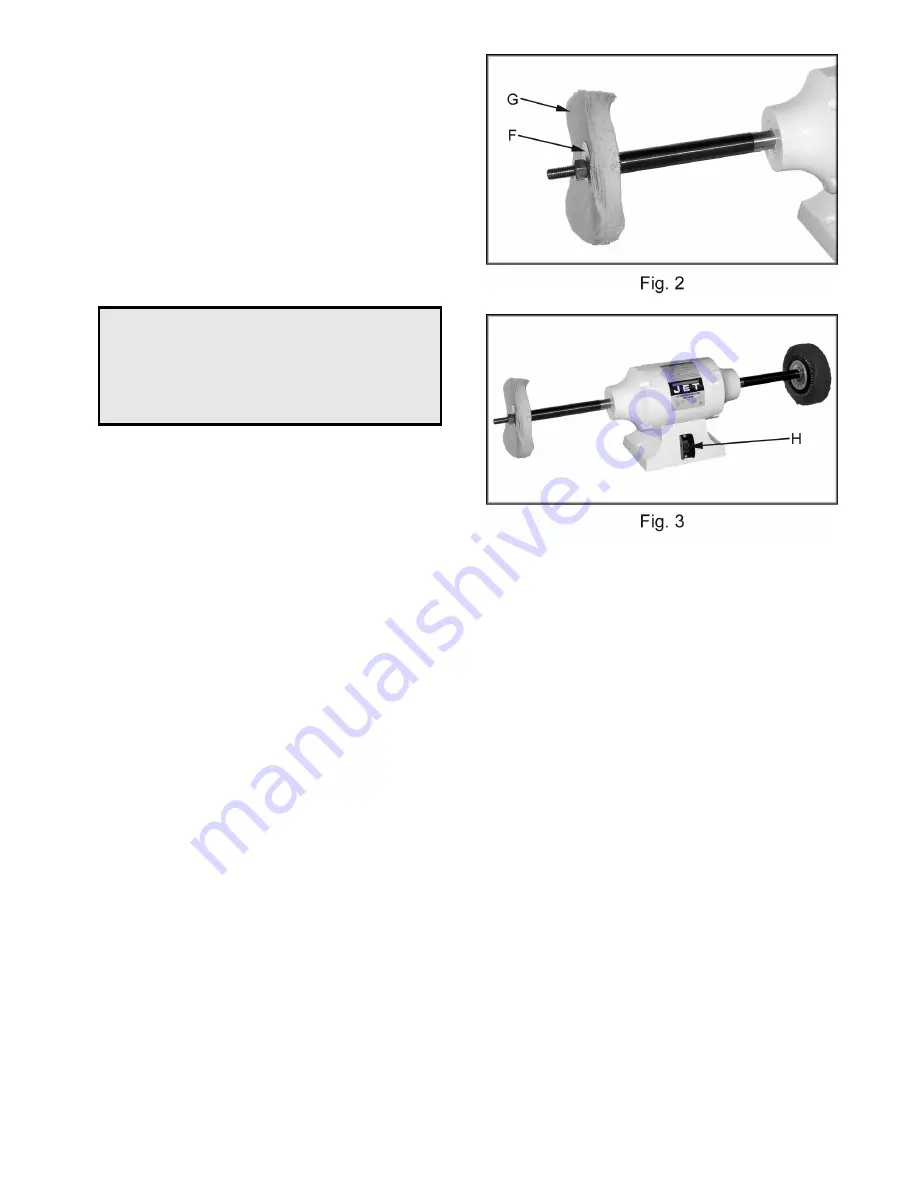
5.  Use the flange washers (F, Fig. 2) on either 

side of soft accessories such as, buffing 
wheels (G, Fig. 2).  Note:  If the accessory 
has a 5/8" ID mount on the threaded section 
of the shaft along with the 5/8” ID flanges.  If 
the accessory has a 1” ID mount on the 
main portion of the shaft using the 1” ID 
flanges. 

 
6.  Turn the buffer / sander on and off by using 

toggle switch (H, Fig. 3).  


Buffing & Polishing 


  WARNING 

Never sand or buff with the workpiece on top 

of the wheel.  The workpiece may be catch 

the wheel and be thrown at the operator.  

Always process the workpiece near the 

bottom of the wheel! 

 
1.  Select the appropriate stick of polishing 

compound for your application and apply to 
the rotating face of the wheel.   

 
2.  Start the buffer and with both hands firmly 

grasp the item to be polished.  Lightly and 
evenly move the workpiece back and forth 
on the buffing wheel.   


Drum Sanding 

 
1.  Slide sanding sleeve onto the drum.  Ensure 

that the arrows on the inside of the sleeve 
point in the direction of the drum rotation.   

 
2.  Inflate the drum using a hand pump.  Some 

sanding applications may require more, or 
less air in the drum.  The maximum air 
pressure is 10 psi.  Do not over inflate!   

 
3.  Flip the switch up to turn the machine on 

and firmly grasp the workpiece to be 
sanded.   

 
4.  With light and even pressure against the 

direction of rotation, move the workpiece 
back and forth on the sanding drum.  Sand 
in the direction of the wood grain.   


Sanding and Buffing Accessories 

 
Jet offers a wide variety of sanding, buffing and 
polishing accessories for use with this machine.  
Visit www.wmhtoolgroup.com and go to JET 
Woodworking Accessories to view the options.  
Then visit your local JET Distributor to make a 
purchase. 


Summary of Contents for JSB-10H

Page 1: ...er Sander WMH TOOL GROUP Consumer Light Industrial Products Division P O BOX 1349 Auburn WA 98071 1349 Ph 1 800 274 6848 Fax 1 800 274 6840 E mail jet wmhtoolgroup com www wmhtoolgroup com M 577110 01...

Page 2: ...e abuse negligence or accidents normal wear and tear repair or alterations outside our facilities or to a lack of maintenance THE WMH TOOL GROUP LIMITS ALL IMPLIED WARRANTIES TO THE PERIOD SPECIFIED A...

Page 3: ...sories improper accessories may be hazardous 16 Read and understand warnings posted on the machine and in this manual 17 Failure to comply with all of these warnings may cause serious injury 18 Some d...

Page 4: ...grounding conductor to a live terminal Check with a qualified electrician or service personnel if the grounding instructions are not completely understood or if in doubt as to whether the tool is pro...

Page 5: ...peration 4 Introduction 5 Table of Contents 5 Specifications 5 Contents of the Shipping Container 6 Unpacking and Cleanup 6 Assembly 6 7 Buffing and Polishing 7 Drum Sanding 7 Sanding and Buffing Acce...

Page 6: ...l until the buffer sander is set up and running properly 2 Clean all rust protected surfaces with a cleaner degreaser Assembly WARNING Always unplug the sander buffer before performing any maintenance...

Page 7: ...firmly grasp the item to be polished Lightly and evenly move the workpiece back and forth on the buffing wheel Drum Sanding 1 Slide sanding sleeve onto the drum Ensure that the arrows on the inside of...

Page 8: ...8 Breakdown for the JSB 10 Sanding Buffing Machine...

Page 9: ...15 JSB10 15 Starting Capacitor 300MFD 125VAC 1 16 JSB10 16 Capacitor Cover 1 17 JSB10 17 Fixture 1 18 JSB10 18 Pan Head Screw 3 16 x 1 4 2 19 JSB10 19 Terminal 1 20 TS 0733041 Tooth Washer 1 4 1 21 JS...

Page 10: ...10 Wiring Diagram for the JSB 10 Sanding Buffing Machine...

Reviews: