background image


29.  Never hand hold the material. Always use the 

vise and clamp it securely. 

30. Be sure that blade is not in contact with 

workpiece when motor is started. Allow motor to 
come up to speed before bringing blade into 
contact with workpiece. 

31.  Avoid contact with coolant, especially guarding 

your eyes. 

32.  Never reach around or over saw blade during 

operation. Keep hands and fingers away from 
blade area. 

33.  Do not remove jammed pieces until blade has 

stopped. 

34.  Don’t use in dangerous environment. Don’t use 

power tools in damp or wet location, or expose 
them to rain. Keep work area well lighted. 

35. Use proper extension cord. Make sure your 

extension cord is in good condition. When using 
an extension cord, be sure to use one heavy 
enough to carry the current your product will 
draw. An undersized cord will cause a drop in 
line voltage resulting in loss of power and 
overheating. Table 2 

(sect. 6.3)

 shows correct 

size to use depending on cord length and 
nameplate ampere rating. If in doubt, use the 
next heavier gage. The smaller the gage 
number, the heavier the cord. 


Familiarize yourself with the following safety notices used in this manual: 

 This means that if precautions are not heeded, it may result in minor injury and/or possible 

machine damage. 

 This means that if precautions are not heeded, it may result in serious, or possibly even fatal, 

injury. 


1.1

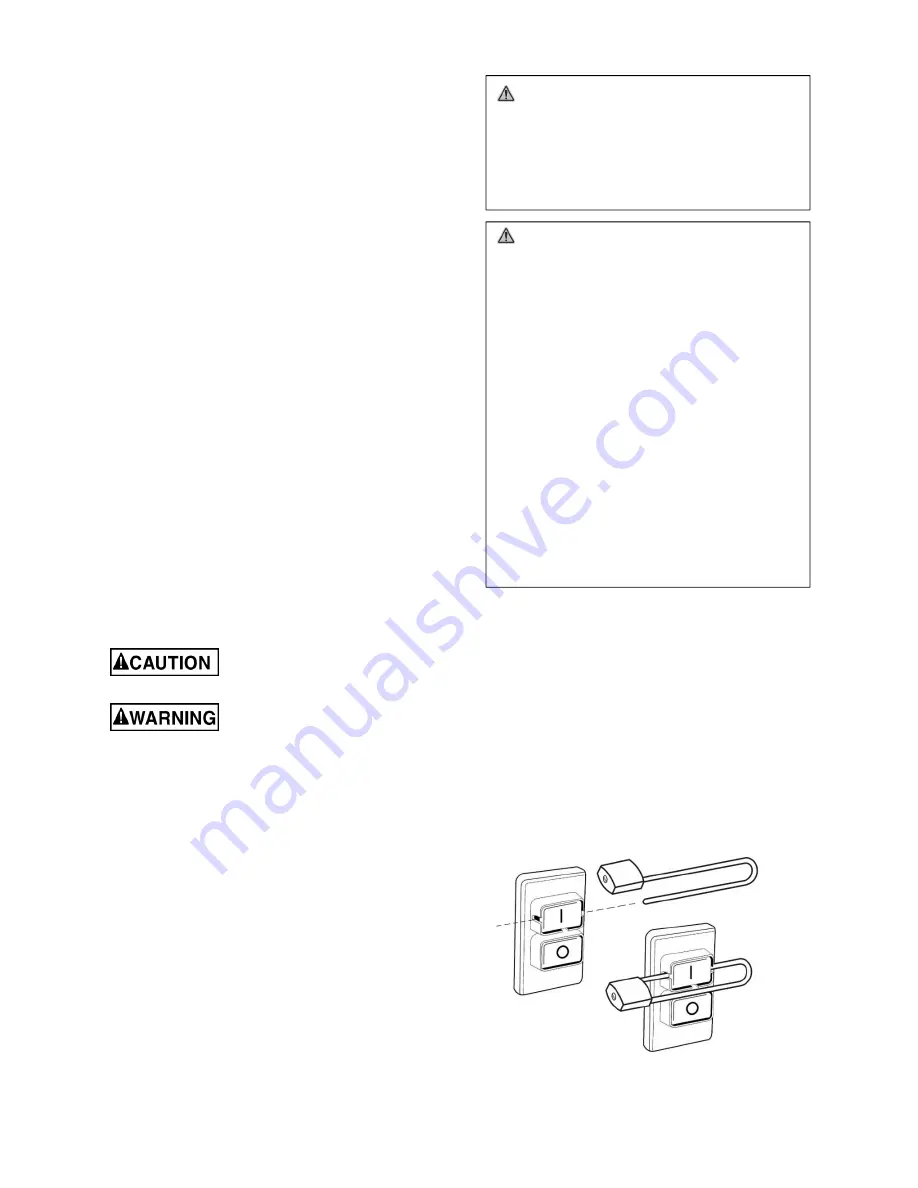
  On-off switch padlock 

To avoid accidental starting by young children or others not qualified to use the tool, the use of a padlock (not 
provided) is required.  

To lock out the on-off switch (Figure 2-1): 

1. Open 

padlock. 

2. 

Insert through hole in switch guard. 

3. Close 

padlock. 

4. 

Store key in a safe place out of the reach of 
children. 


Figure 1-1 


WARNING:

 This product can expose you to 

chemicals including titanium dioxide which is 
known to the State of California to cause cancer, 
and lead which is known to the State of 
California to cause cancer and birth defects or 
other reproductive harm. For more information 
go to http://www.p65warnings.ca.gov. 


WARNING:

 Some dust, fumes and gases 

created by power sanding, sawing, grinding, 
drilling, welding and other construction activities 
contain chemicals known to the State of 
California to cause cancer and birth defects or 
other reproductive harm. Some examples of 
these chemicals are: 

  lead from lead based paint 

 crystalline silica from bricks, cement and 

other masonry products 

 arsenic and chromium from chemically 

treated lumber 

Your risk of exposure varies, depending on how 
often you do this type of work. To reduce your 
exposure to these chemicals, work in a well-
ventilated area and work with approved safety 
equipment, such as dust masks that are 
specifically designed to filter out microscopic 
particles. For more information go to 
http://www.p65warnings.ca.gov/ and http://www. 
p65warnings.ca.gov/wood. 

Summary of Contents for HVS-8-DMW

Page 1: ...10 DMW HVBS 10 DMWC JET 427 New Sanford Road LaVergne Tennessee 37086 Part No M 424460 Ph 800 274 6848 Edition 8 06 2020 www jettools com Copyright 2017 JET Model HVBS 10 DMWC shown For HVS 8 DMW afte...

Page 2: ...ards immediately after completion of maintenance 14 Check damaged parts Before further use of the machine a guard or other part that is damaged should be carefully checked to determine that it will op...

Page 3: ...t may result in serious or possibly even fatal injury 1 1 On off switch padlock To avoid accidental starting by young children or others not qualified to use the tool the use of a padlock not provided...

Page 4: ...op 15 8 0 Operation 15 8 1 Blade selection 15 8 2 Blade break in 15 8 3 General operating procedure 16 8 4 Evaluating cutting efficiency 16 9 0 User maintenance 17 9 1 Lubrication 17 9 2 Coolant level...

Page 5: ...f used in accordance with the instructions as set forth in this document If there are questions or comments please contact your local supplier or JET JET can also be reached at our web site www jettoo...

Page 6: ...ubing Solids Round 90 deg 8 in 200 mm 10 in 250 mm 45 deg 6 in 150 mm 6 1 2 in 165 mm Rectangle 90 deg 6 1 2 x 8 in 165 x 200 mm 8 x 9 in 200 x 228 mm 45 deg 7 x 5 1 2 in 175 x 137 mm 8 x 5 in 200 x 1...

Page 7: ...kg Table 1 1 subject to local and national electrical codes 2 The specified values are emission levels and are not necessarily to be seen as safe operating levels As workplace conditions vary this in...

Page 8: ...2 Secure position of work stop by tightening set screw A3 onto rod flat 4 If closer reach is needed toward blade insert small rod A4 and tighten with wrench on rod flat Figure 5 2 installing work stop...

Page 9: ...injury Use only 3 wire extension cords that have 3 prong grounding plugs and 3 pole receptacles that accept the tool s plug Repair or replace damaged or worn cord immediately When operated at 115 volt...

Page 10: ...guide arm positioning are adjustable to prevent obstruction of other parts Pull out on handle and rotate it on pin then release it allowing it to resettle on pin 7 2 Bow swivel 1 Disconnect band saw...

Page 11: ...th should engage workpiece at all times If blade teeth are so far apart that they straddle the work severe damage to workpiece and blade can result 1 Disconnect band saw from power source 2 Raise bow...

Page 12: ...adjustment requires operating saw with wheel guards open This adjustment must be completed by qualified persons only Failure to comply may cause serious injury Blade tracking has been set by manufact...

Page 13: ...tock securely clamped in vise make a cut through the bar stock See Figure 7 10 2 Mark the top of bar stock 3 Move the bar stock about 1 4 inch past the blade so that you can begin a second cut 4 Rotat...

Page 14: ...feed pressure If chips are burned and heavy decrease feed pressure If they are still burned and heavy reduce blade speed Optimum feed pressure has been set when chips are curled silvery and warm 7 11...

Page 15: ...three teeth should be on the work piece at all times for proper cutting The blade and workpiece can be damaged if the teeth are so far apart that they straddle the workpiece For very high production...

Page 16: ...es in Figure 8 1 for proper clamping positions If the thickness of profile section is very thin a piece which duplicates the profile should be fitted inside the workpiece itself to prevent workpiece b...

Page 17: ...n table and vise Place a thin coat of oil on table surface on which vise jaw slides If the power cord is worn cut or damaged in any way have it replaced immediately 9 1 Lubrication All ball bearings a...

Page 18: ...sion to proper level Operating saw without pressure on workpiece Do not run blade at idle in on material Bad cuts out of square Workpiece not square with blade Adjust vise so it is square with the bla...

Page 19: ...ooth pitch Insufficient gearbox lubrication Check gearbox oil No coolant flow Pump motor is burned out Replace pump Screen filter on pump is clogged Clean screen filter Impeller is loose Tighten impel...

Page 20: ...20 11 1 1 HVBS 8 DMW Bow Assembly Exploded View Figure 11 1...

Page 21: ...21 11 1 2 HVBS 8 DMW Table Assembly Exploded View Figure 11 2...

Page 22: ...22 11 1 3 HVBS 8 DMW Motor and Support Arm Assembly Exploded View Figure 11 3...

Page 23: ...23 11 1 4 HVBS 8 DMW Vise and Table Assembly Exploded View Figure 11 4 11 1 5 HVBS 8 DMW Base Assembly Exploded View Figure 11 5...

Page 24: ...1 Hex Cap Bolt M6 1 0x20L 4 14 3 TS 1524051 Set Screw M8 1 25x20L 2 14 4 TS 1540061 Hex Nut M8 1 25 2 14 5 TS 2361061 Lock Washer M6 8 14 6 TS 1540041 Hex Nut M6 4 15 HVBS 8 DMW 15 Handle 1 16 1 HVBS...

Page 25: ...t 1 2 13 2 36 HVBS 8 DMW 36 Gearbox 1 36 1 TS 0081031 Hex Cap Bolt 5 16 18NCx3 4L 1 36 2 TS 1524051 Set Screw M8 1 25x20L 4 36 3 TS 0208041 Hex Socket Cap Screw 5 16 18NCx3 4 L 4 36 4 TS 1550061 Flat...

Page 26: ...40081 Hex Nut M12 1 75 2 56 6 TS 2360121 Flat Washer 12mm 2 57 HVBS 8 DMW 57 Shaft Seat 1 57 1 F005452 Hex Socket Cap Screw M12 1 75x30L 2 57 2 TS 2361121 Lock Washer M12 2 57 3 TS 2360121 Flat Washer...

Page 27: ...14 Plastic Knob 1 4 x 1 2 1 78 HVBS 8 DMW 78 45 Degree Plate right 2 78 1 TS 1550041 Flat Washer 6mm 4 78 2 TS 1503051 Hex Socket Cap Screw M6 1 0x20L 4 78 3 TS 1490061 Hex Cap Bolt M8 1 25x35L 2 78...

Page 28: ...28 Index No Part No Description Size Qty LM000268 ID Label HVBS 8DMW not shown 1 LM000269 Label Blade Speeds not shown 1 LM000271 Warning Label not shown 1...

Page 29: ...29 11 2 1 HVBS 10 DMW DMWC Bow Assembly Exploded View Figure 11 6...

Page 30: ...30 11 2 2 HVBS 10 DMW DMWC Table Assembly Exploded View Figure 11 7...

Page 31: ...31 11 2 3 HVBS 10 DMW DMWC Motor and Support Arm Assembly Exploded View Figure 11 8...

Page 32: ...32 11 2 4 HVBS 10 DMW DMWC Vise and Table Assembly Exploded View Figure 11 9...

Page 33: ...33 11 2 5 HVBS 10 DMW DMWC Base Assembly Exploded View Figure 11 10...

Page 34: ...r 1 10 HVBS 10 DMW 10 Idler Wheel Bearing 1 10 1 TS 1490031 Hex Cap Bolt M8 1 25x20L 1 10 2 TS 2361081 Lock Washer M8 1 10 3 TS 1550061 Flat Washer 8x25x2 mm 2 11 HVBS 10 DMW 11 Slider Cover 1 12 HVBS...

Page 35: ...1 HVBS 10 DMW 32 1 Linch Pin 1 32 2 TS 2276081 Set Screw M6x8 1 32 3 HVBS 10 DMW 32 3 Cylinder Pin 1 HVBS 10 DMW 32 3N Cylinder Pin After serial 1701BK00017 1 33 HVBS 10 DMW 33 Handle 1 33 1 TS 15400...

Page 36: ...1 TS 1503061 Hex Socket Cap Screw M6 1 0x25L 2 56 2 TS 2311061 Hex Nut M6 1 0 2 56 3 TS 1540081 Hex Nut M12 1 75 1 56 4 HVBS 10 DMW 56 4 Threaded Rod M12 17 5x70L 1 56 5 TS 2360121 Flat Washer 12x24x...

Page 37: ...03051 Hex Socket Cap Screw M6 1 0x20L 4 77 3 TS 1490041 Hex Cap Bolt M8 1 25x25L 2 77 4 TS 1540061 Hex Nut M8 2 77 5 HVBS 8 DMW 78 5 45 Degree Plate left 1 78 HVBS712 15 Work Stop 1 78 1 HVBS712 13 Th...

Page 38: ...DMW 99 Chip Bin Left Panel 1 100 HVBS 10 DMW 100 Chip Bin Right Panel 1 101 HVBS 10 DMW 101 Holder 1 101 1 F012620 Hex Cap Bolt M8 1 25x8L 2 101 2 TS 2361081 Lock Washer M8 2 101 3 TS 1540061 Hex Nut...

Page 39: ...39 12 0 Electrical Connections for HVBS DMW Band Saws Figure 12 1...

Page 40: ...tional action needed JET has Authorized Service Centers located throughout the United States For the name of an Authorized Service Center in your area call 1 800 274 6846 or use the Service Center Loc...

Reviews: