background image


8

Unpacking 

Open shipping container and check for shipping damage; report any damage immediately to your distributor 
and shipping agent. Do not discard any shipping material until the Lathe is assembled and running properly. 
Compare the contents of your container with the following parts list to make sure all parts are intact. Missing 
parts, if any, should be reported to your distributor. Read the instruction manual thoroughly for assembly, 
maintenance and safety instructions. 

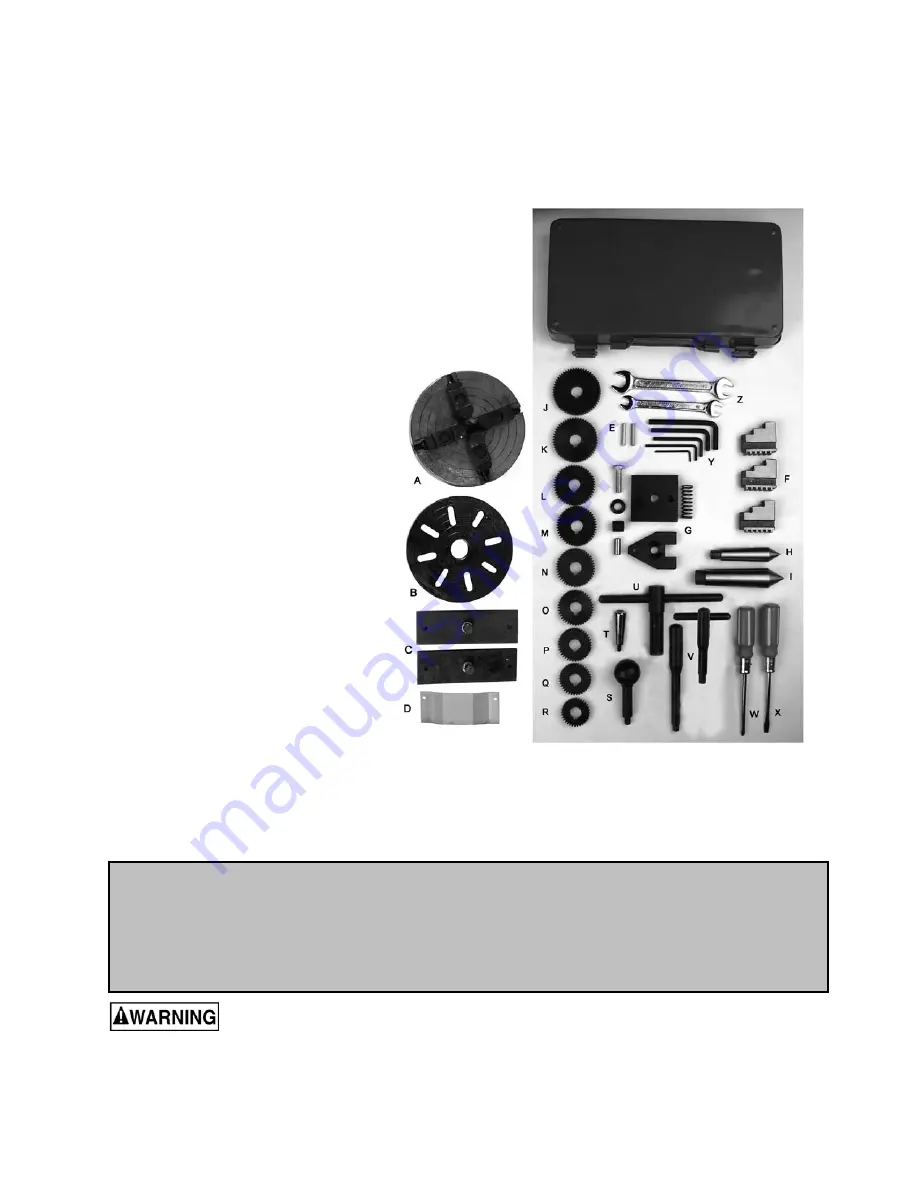
Contents of the Shipping Container 

Referring to Figure 1: 

Lathe (not shown) 

1 6” 

Four-Jaw Independent Chuck (A) 

1 Faceplate 

(B) 

Lifting Plates (C) 

1 Cover 

(D) 

4” Three-Jaw Universal Chuck (pre-mounted) 

Four Way Tool Post (pre-mounted) 

Steady Rest (pre-mounted)  

Follow Rest (pre-mounted) 

Operator's Manual (not shown)  

Warranty Card (not shown)

Shear Pins* (E) 

Chuck Jaws (F) 

Single Tool Post Assembly* (G) 

1 MT-2 

Center* 

(H) 

1 MT-3 

Center* 

(I) 

56T Gear* (J) 

52T Gear* (K) 

48T Gear* (L) 

46T Gear* (M) 

44T Gear* (N) 

40T Gear* (O) 

38T Gear* (P) 

36T Gear* (Q) 

32T Gear* (R) 

Tension Roller Lever (S) 

1 Handle 

(T) 

Female Chuck Key* (U) 

Male Chuck Keys (V) 

#1 Cross Point Screwdriver* (W) 

1 #1 

Flat 

Blade Screwdriver* (X) 

5pc Hex Wrench Set (Y) 

Open End Wrenches – 8/10mm, 12/14mm (Z) 

 
* parts marked with an asterisk are included in the tool box, stock no. BD920W-TB


  Read and understand the entire contents of this manual before attempting set-up or 

operation!  Failure to comply may cause serious injury. 

CAUTION

The three jaw chuck and the face plate have a set screw on their flanges that secures them to the 
threaded spindle. Before removing the three jaw chuck or the faceplate, remove the set screw 
completely from the flange. Failure to remove the set screw may cause damage to the threads on 
the spindle. When installing either the jaw chuck or the faceplate, tighten the set screw firmly to 
prevent the chuck or the faceplate from coming off the spindle during operation. 

Figure 1 

Summary of Contents for BD-920W

Page 1: ... x 20 inch Belt Drive Bench Lathe Model BD 920W WALTER MEIER Manufacturing Inc 427 New Sanford Road LaVergne Tennessee 37086 Part No M 321376 Ph 800 274 6848 Revision H 01 2013 www waltermeier com Copyright 2013 Walter Meier Manufacturing Inc ...

Page 2: ...tion postage prepaid to a location designated by us For the name of the location nearest you please call 1 800 274 6848 You must provide proof of initial purchase date and an explanation of the complaint must accompany the merchandise If our inspection discloses a defect we will repair or replace the product or refund the purchase price at our option We will return the repaired product or replacem...

Page 3: ...ing the V Belt 20 Lubrication Schedule 21 Replacement Parts 22 Headstock Assembly Exploded View 22 Headstock Assembly Parts List 23 Drive Assembly Exploded View 24 Drive Assembly Parts List 25 Tension Roller Assembly Exploded View Parts List 26 Quadrant Assembly Exploded View Parts List 27 Electrical Assembly Exploded View 28 Electrical Assembly Parts List 29 Gear Box Assembly Exploded View 30 Gea...

Page 4: ...rating less than 150 volts This tool is intended for use on a circuit that has an outlet that looks like the one illustrated in Sketch A The tool has a grounding plug that looks like the plug illustrated in Sketch A A temporary adapter which looks like the adapter illustrated in Sketches B and C may be used to connect this plug to a 2 pole receptacle as shown in Sketch B if a properly grounded out...

Page 5: ...k area 10 MAKE WORKSHOP KID PROOF with padlocks master switches or by removing starter keys 11 DON T FORCE TOOL It will do the job better and safer at the rate for which it was designed 12 USE RIGHT TOOL Don t force tool or attachment to do a job for which it was not designed 13 WEAR PROPER APPAREL Do not wear loose clothing gloves neckties rings bracelets or other jewelry which may get caught in ...

Page 6: ... silica from bricks and cement and other masonry products and Arsenic and chromium from chemically treated lumber Your risk from those exposures varies depending on how often you do this type of work To reduce your exposure to these chemicals work in a well ventilated area and work with approved safety equipment such as those dust masks that are specifically designed to filter out microscopic part...

Page 7: ... Number of Spindle Speeds 6 Range of Spindle Speeds 130 2000 RPM Gear Box Number of Longitudinal Feeds 60 Range of Longitudinal Feeds 0 0006 0 037 Number of Inch Threads 30 Range of Inch Threads 8 60 T P I Number of Metric Threads 18 Range of Metric Threads 0 4 3 5 Compound and Carriage Toolpost Type single and 4 Way Maximum Tool Size 1 2 x 1 2 Maximum Compound Slide Travel 1 7 8 Maximum Cross Sli...

Page 8: ...Post Assembly G 1 MT 2 Center H 1 MT 3 Center I 1 56T Gear J 1 52T Gear K 1 48T Gear L 1 46T Gear M 1 44T Gear N 1 40T Gear O 1 38T Gear P 1 36T Gear Q 1 32T Gear R 1 Tension Roller Lever S 1 Handle T 1 Female Chuck Key U 2 Male Chuck Keys V 1 1 Cross Point Screwdriver W 1 1 Flat Blade Screwdriver X 1 5pc Hex Wrench Set Y 2 Open End Wrenches 8 10mm 12 14mm Z parts marked with an asterisk are inclu...

Page 9: ...Carefully read the grounding instructions on pages 4 and 5 It is recommended that the BD920W Lathe be connected to a dedicated minimum 25 amp circuit with a 25 amp circuit breaker or time delay fuse Local codes take precedence over recommendations General Description Lathe Bed The Lathe bed is made of high grade iron By combining high cheeks with strong cross ribs a bed of low vibration and rigidi...

Page 10: ...ross slide travel in dovetailed slides and have gibs adjustable nuts and graduated collars A four way tool post is fitted on the top slide The four way tool post can be converted to a single tool holder with parts enclosed in the toolbox Figure 6 See parts breakdown on page 38 for assembly of tool holder For accurate facing operations the carriage can be locked by tightening the hex socket cap scr...

Page 11: ...h ends The nut and setscrew on the right end are designed to take up play on the leadscrew Gear Box The gearbox Figure 11 is made from high quality cast iron and is mounted on the left side of the machine bed The motor drives through handle changeable speeds Always raise idler to the disengaged position when changing speeds Figure 4 Drive and Electrical Equipment The main drive is provided by a si...

Page 12: ...Cross Slide Handwheel 6 Top Slide Handwheel 7 Longitudinal Lock Screw 8 Tool Post 9 Tailstock Spindle Handwheel 10 Tailstock Spindle Clamping Lever 11 Tailstock Locking Screw 12 Tailstock Off Set Adjustment 13 Automatic Feed Lever 14 Gear Box Quick Change Lever 15 Emergency switch 16 Power Light 17 Left right Screw Lever ...

Page 13: ...be obtained by using shims under the tool Figure 13 When turning the tool has a tendency to bend under pressure For best results tool overhang should be kept to a minimum of 3 8 or less Manual Turning Apron travel cross travel and top slide handwheels can be operated for longitudinal or cross feeding Figure 14 Longitudinal Turning with Auto Feed To use automatic feed establish the gear combination...

Page 14: ...stant adjustment until the piece is absolutely true checks the zero position of the tailstock Taper Turning by Setting the Top Slide By angling the top slide tapers may be turned Figure 17 Loosen two screws 1 Figure 17 top slide can then be rotated A graduated scale permits accurate adjustment of the top slide This method can only be used for short tapers Turning Between Centers For turning betwee...

Page 15: ...e tool reaches the part it will cut the initial threading pass When the tool reaches the end of the cut stop the machine by turning the motor off and at the same time back the tool out of the part so that it clears the thread Do not disengage the half nut lever Reverse the motor direction to allow the cutting tool to traverse back to the starting point Repeat these steps until you have obtained th...

Page 16: ...dent Lathe Chuck This special chuck Figure 23 has four independently adjustable chuck jaws These permit the holding of asymmetrical pieces and enable the accurate set up of cylindrical pieces Drill Chuck Optional Use the drill chuck to hold centering drills and twist drills in the tailstock Figure 24 Morse Taper Arbor Optional An arbor is necessary for mounting the drill chuck in the tailstock It ...

Page 17: ...ady rest can be moved with its fingers around the workpiece Secure the steady rest in position 3 Tighten knurled screws so that fingers are snug but not tight against the workpiece Tighten three nuts 1 Figure 27 Lubricate the sliding points with machine oil 4 When after prolonged operation the jaws show wear the tips of the fingers may be filed or remilled Follow Rest The follow rest Figure 28 is ...

Page 18: ...Spindle Bearings The main spindle bearings are adjusted at the factory If end play becomes evident after considerable use the bearings may be adjusted Loosen setscrew 1 Figure 31 in the slotted nut 2 Figure 31 on the back of the spindle Tighten slotted nut until all end play is taken up The spindle should still revolve freely Caution excessive tightening or preloading will damage the bearing Re ti...

Page 19: ...Remove the compound slide and adjust screw 1 Figure 34 until the backlash between the spindle and the nut is eliminated For operator convenience the compound may be located in two positions on the cross slide Compound Slide Spindle Backlash Adjustment Remove two screws holding the spindle bracket in position and unscrew the spindle Adjust the screw ring 1 Figure 35 until all backlash has been elim...

Page 20: ...loosened and the pinion removed Take off the sleeve and remove the broken pin from the sleeve and the leadscrew Replace the sleeve line up the holes fit the new pin and assemble Replacing the V Belt Remove tension on the V belt by pulling lever toward front of the machine Figure 38 Remove belt from the pulley and replace with new belt Move lever toward motor to tension belt Close the cover Caution...

Page 21: ...o 2 squirts of oil into oil ball on gear hub 4 Wipe bedways clean and coat lightly with oil 5 Grease rack over complete length 6 Clean and oil leadscrew over complete length 7 1 to 2 squirts of oil into oil ball on leadscrew bracket 8 Lightly coat screw and guides of top slide with oil 9 1 to 2 squirts of oil into oil ball on top of tailstock body 10 1 to 2 squirts of oil into oil ball on top of c...

Page 22: ... reach our service department call 1 800 274 6848 Monday through Friday see our website for business hours www waltermeier com Having the Model Number and Serial Number of your machine available when you call will allow us to serve you quickly and accurately Headstock Assembly Exploded View ...

Page 23: ... BD920W 1112 Bushing 3 16 1018 Gear 40T 1 17 2027 Gear 32T 1 18 1013 Washer 3 19 2126 2 Shaft 1 20 BD920N 009 Oil Port 6mm 1 21 2128 Shaft 2 22 BD920W 1110 Gear 35T 1 23 BD920W 1111 Gear 46T 1 24 BD920W 2130 Screw 1 25 3004 Plunger 1 26 3005 Spring 1 27 3003 Bushing 1 27A 3003A Spacer 1 28 3006 Handle 1 29 GB923 88 Cap Nut 1 30 1012 Round Nut M28x1 1 32 GB77 85 Set Screw M5x6 1 33 1008 Pulley 1 34...

Page 24: ...24 Drive Assembly Exploded View ...

Page 25: ... 12 TS 1533032 Pan Head Screw M5x10 2 13 BD920W 0007 Cover 1 14 2104A Label Thread Dial 1 15 BD920W 1108 Machine Label not shown 1 16 BD920W 2105 Threading Chart Plate 1 17 TS 1531012 Phillips Pan Head Machine Screw M3x4 4 18 TS 1503051 Hex Socket Cap Screw M6x20 2 18A TS 1550041 Washer 6mm 2 19 TS 1503061 Hex Socket Cap Screw M6x25 1 20 TS 2361061 Lock Washer 6mm 1 21 BD920W 2003 Spring 1 22 BD92...

Page 26: ... 6001RS 1 6 1039 Roller 1 8 BD920N TR08 Snap Ring 12mm 1 9 1038 Washer 28mm 1 10 TS 1550071 Washer 10mm 1 11 TS 1540071 Nut M10 2 12 1036 Washer 1 13 1037 Spring 1 14 1050 Stud Bolt 1 15 1032 Toggle 1 16 1051 Pin 1 17 1033 Sleeve 1 18 BD920N TR18 Snap Ring 6mm 1 19 TS 1524011 Set Screw M8x8 1 20 1034 Wave Washer 1 21 BD920N TR21 Snap Ring 35mm 1 22 1042 Lever 1 23 1043 Lever 1 24 1044A Knob 1 ...

Page 27: ... 6mm 1 10 TS 1550071 Washer 10mm 1 11 BD920N Q11 Spring Pin 3x12mm 1 12 2071 Gear 60T 1 13 2008 Spacing Ring 1 14 TS 1550041 Washer 6mm 1 14A TS 1551041 Lock Washer 6mm 1 15 TS 1503031 Hex Socket Cap Screw M6x12 1 16 TS 1551041 Lock Washer 6mm 1 17 TS 1503091 Hex Socket Cap Screw M6x40 1 18 2070 Gear 32T 1 19 2011 Gear 36T 1 20 BD920W 2020 Gear 38T 1 21 2072 Gear 40T 1 22 2073 Gear 44T 1 23 2074 G...

Page 28: ...28 Electrical Assembly Exploded View ...

Page 29: ...otor Junction Box Cover 1 BD920N MOTORFAN Motor Fan not shown 1 10 TS 1502021 Socket Head Cap Screw M5x10 2 12 BD920W 1104 Housing 1 13 TS 2361061 Lock Washer 6mm 4 14 TS 1503031 Screw M6x12 4 15 BD920N E06 Condenser 1 16 BD920N E05 Condenser Clip 1 17 TS 1540031 Nut M5 2 18 BD920N E16 Capacitor Support 1 19 1103 Bracket 1 20 TS 1533032 Phillips Pan Head Machine Screw M5x10 2 21 TS 2361051 Lock Wa...

Page 30: ...30 Gear Box Assembly Exploded View ...

Page 31: ... Ring 10x1 8mm 1 24 BD920W GB24 Snap Ring 30mm 1 25 CQ6123B 3103 Gear 36T 1 26 CQ6123B 3101A Key 5x8mm 1 27 CQ6123B 3102 Gear 18T 27T 1 28 CQ6123B 3104 Key 5x68mm 1 29 CQ6123B 3106 Shaft 1 30 CQ6123B 3118 Cover 1 31 TS 1504041 Socket Head Cap Screw M8x20 3 32 CQ6123B 3117 Gasket 1 33 GB3452 1 82 O Ring 8 75x1 8mm 1 34 BD920W 79 Key 4x12mm 1 35 CQ6123B 3116 Shaft 1 36 BD920N TR08 Snap Ring 12mm 1 3...

Page 32: ...32 Apron Assembly Exploded View ...

Page 33: ...1 14 7003 Feed Screw 16TPI 1 15 TS 1540021 Nut M4 2 16 TS 1521051 Set Screw M4x12 2 17 BD920W 0002 Shaft 1 18 4015A Handle 2 19 BD920N A09 Steel Ball 4 5mm 2 20 4021 Spring 1 21 TS 1523011 Set Screw M6x6 2 22 4025 Spring 1 23 4014 Gear 13T 1 24 TS 1521041 Set Screw M4x10 1 25 TS 1503071 Socket Head Cap Screw M6x30 2 26 4013 Bracket 1 27 BD920N A29 Oil Port 6mm 2 28 BD920N A28 Snap Ring 14mm 1 29 B...

Page 34: ...34 Apron Assembly continued Exploded View ...

Page 35: ...Gear 42T 1 47 BD920N A38 Key 4x10mm 1 48 4016 Gear 18T 1 49 BD920N A40 Ring 12mm 1 50 4019 Locking Cam 1 51 BD920N A44 Ring 4mm 1 51A TS 1501011 Socket Head Cap Screw M4x6 1 52 4020 Guide 2 53 TS 1501051 Hex Socket Cap Screw M4x16 4 54 4017 Half Nut 1 55 4023 Apron Cover 1 56 TS 1550021 Washer 4mm 4 57 TS 1532021 Pan Head Machine Screw M4x6 4 58 TS 1502041 Socket Head Cap Screw M5x16 1 59 TS 15010...

Page 36: ...36 Saddle and Cross Slide Exploded View ...

Page 37: ...ck 1 18 5037 Bushing 1 19 BD920N A14 Flat Head Screw M6x8 1 20 TS 1523021 Set Screw M6x8 1 21 5001 Pin 3 22 TS 1521041 Set Screw M4x10 3 23 TS 1540021 Nut M4 3 24 5016 Slide Block 1 25 TS 1550041 Washer M6 3 26 TS 1503041 Socket Head Cap Screw M6x16 3 27 5017 Clip 1 28 TS 1523061 Set Screw M6x20 1 29 TS 1540041 Nut M6 1 30 TS 1503061 Socket Head Cap Screw M6x25 1 31 5042 Way Cover 2 32 5041 Cover ...

Page 38: ...38 Top Slide Assembly Exploded View ...

Page 39: ... 17 TS 1540041 Nut M6 2 18 BD920N TS18 Lock Pin 4x12mm 1 19 BD920N TS19 Lock Pin 3x14mm 1 23 5012 Lead Screw 1 24 5043 Lead Screw Mount 1 25 5004 Micrometer Collar 1 26 5031 Handwheel 1 27 5015 Handle 2 28 BD920N TS28 Key 3x13mm 1 29 5023 Feed Spring 1 30 5022 Nut 1 31 BD920N TS31 Set Screw M8x6 1 32 BD920N TS32 Lock Pin 3x12mm 1 35 BD920N TS35 Bolt M8x30 8 36 BD920N H S Handle Seat 1 37 BD920N H ...

Page 40: ...40 Tailstock Assembly Exploded View ...

Page 41: ... 8005 Tailstock Body 1 10 8010 Leadscrew 1 11 BD920N T17 Key 3x10mm 1 12 5023 Feed Spring 1 13 BD920N 8014 Nut 1 14 TS 1524011 Set Screw M8x8 1 15 BD920N 4002 Screw 1 16 4001 Handle 1 17 8013 Handwheel 1 18 8016 Micrometer Collar 1 19 BD920N T27 Screw M5x6 2 20 8011 Bushing 1 21 BD920N T26 Label 1 22 TS 1524061 Set Screw M8x25 2 23 BD920N T25 Label 1 24 8015 Clamping Plate 1 25 8007 Screw M8x100 1...

Page 42: ...ption Size Qty BD920N SR Steady Rest Complete index nos 1 9 1 1 F1001 Rest Casting 1 2 TS 1540061 Nut M8 4 3 TS 1550061 Washer 8mm 4 4 F1002 Jaw 3 5 F1004 Adjusting Screw 3 6 F1003 Screw 3 7 F1005 Clamping Plate 1 8 TS 1490091 Hex Cap Screw M8x50 1 9 TS 1550061 Washer 8mm 1 ...

Page 43: ...e Qty BD920N FR Follow Rest Assembly index nos 1 9 1 1 F2001 Rest Casting 1 2 TS 1503061 Socket Head Cap Screw M6x25 2 3 TS 1551041 Lock Washer 6mm 2 4 TS 1550041 Washer 6mm 2 5 TS 1540061 Hex Nut M8 2 6 TS 1551061 Washer 8mm 2 7 F2004 Adjusting Screw 2 8 F2002 Jaw 2 9 F2003 Screw 2 ...

Page 44: ...44 Lathe Bed Assembly Exploded View ...

Page 45: ...crew M6x40 2 8 7006 Nut 1 9 BD920N B09 Set Screw M8x8 1 10 7005 Stud M8x45 4 10A TS 1550061 Flat Washer 8mm 4 10B TS 1551061 Lock Washer 8mm 4 11 TS 1540061 Hex Nut M8 4 12 TS 1523081 Set Screw M6x30 4 12A TS 1550041 Flat Washer 6mm 4 13 TS 1551041 Lock Washer 6mm 4 14 TS 1540041 Hex Nut M6 4 15 BD920N B15 Pin Ø5x25mm 1 16 BD920N B16 Label Induction Hardened not shown 1 17 BD920N B17 Rivet not sho...

Page 46: ...46 Wiring Diagram ...

Page 47: ...47 This page intentionally left blank ...

Page 48: ...48 WALTER MEIER Manufacturing Inc 427 New Sanford Road LaVergne Tennessee 37086 Phone 800 274 6848 www jettools com www waltermeier com ...

Reviews: