Jensen VR209 Installation And Operation Manual Download Page 12

VR209

12

SIRIUS RADIO OPERATION

Switching to SIRIUS Mode

Press the 

MODE

 button (4) to change the mode to Sirius Satellite Radio mode. 

Activating Sirius Satellite Radio

Before you listen to Sirius Radio, you must subscribe to the service using your radio's 
identification number. To display the Radio ID, press the 

SEEK /\

 or 

SEEK \/

 button (20, 19) to 

access channel “000”. The screen displays "SID" followed by an 12 figure ID number.

Selecting a Band

In Sirius mode, press the 

BAND

 button (16) to access the Sirius user-preset channel groups in 

the following order: SIR1, SIR2, SIR3.

Tuning a Channel

Rotate the 

TUNE/ENTER

 control (22) clockwise or counter-clockwise to tune up or down in 

one step increments. 
The channel information display can be changed to emphasize either Artist, Song Title or 
Album information by pressing the 

INFO SCROLL

 button (14). 

Storing Preset Channels

The preset buttons (27) can be used to store 6 channels per band (SIR1, SIR2 and SIR3), 
allowing convenient access to your favorite channels.

Programming Channels 

1.

Select the channel you want to store in memory.

2.

Press and hold

 a preset button (27) until the corresponding preset button number appears 

on the screen. 

3.

Repeat steps 1 and 2 to program additional channels.

Recalling a Preset Channel

Press one of the six preset buttons (27) within a selected band to tune a preset channel 
directly.

Auto Store/Preset Scan

Preset Scan

Press the 

AS/PS

 button (15) to preview each stored preset channel in SIR1, SIR2 and SIR3 for 

10 seconds. Press the 

AS/PS

 button again to stop scanning and play the current channel.

Preset Tune

In Sirius mode, 

press and hold

 the 

AS/PS

 button (15) to start the Preset Tuning Mode. This will 

allow the sequential tuning of the SR1, SR2 and SR3 preset channels when the 

TUNE/ENTER


control (22) is used.

 Press and hold

 the 

AS/ PS

 button again to deactivate Preset Tuning 

Mode.

SIRIUS Tuning Modes

Category Mode

Press the 

SEEK/CAT/TRK /\ / \/

 buttons (20/19) to view available categories. 

Each category title and associated channels will be displayed in increments. While in the 
category mode, the individual channels within a category may be accessed by rotating the 

TUNE/ENTER

 control (22). Once a highlighted channel has been selected, press the 

TUNE/

ENTER

 control to tune to that channel. While viewing a category list, press the 

INFO SCROLL


button to change display information between Channel Name, Artist, or Song Title.

Direct Tune Mode

1.

Press and hold

 the 

TUNE/ENTER

 control (22) to switch to Direct Tune/Skip Channel 

mode. After accessing Direct mode, “DIRECT _ _ _” appears on the display.

2.

Turn the 

TUNE/ENTER

 control (22) to select a number for the hundreds digit position.

3.

Press the 

TUNE/ENTER

 control to confirm entry of the hundreds digit. The tens digit will 

flash on/off. 

4.

Turn the 

TUNE/ENTER

 control to select a number for the tens digit position.

5.

Press the 

TUNE/ENTER

 control again to confirm entry of the tens digit. The ones digit will 

flash on/off.

6.

Turn the 

TUNE/ENTER

 control to select a number for the ones digit position.
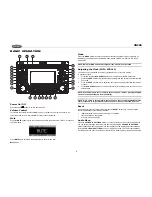
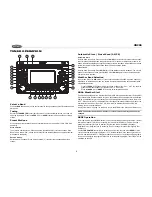
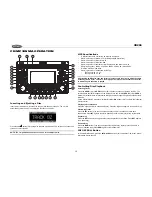
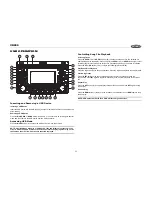
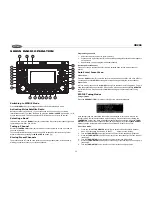
3

2

4

5

11

6

12

7

13

8

14

15

9

16

10

17

18

19

26

1

24

20

22

23

21

27

i

Summary of Contents for VR209

Page 1: ...VR209 Installation and Operation Manual MOBILE AUDIO SYSTEM i...

Page 2: ...em Protect the Disc Mechanism Avoid inserting any foreign objects into the disc slot Misuse may cause malfunction or permanent damage due to the precise mechanism of this unit CAUTION THIS MOBILE CD P...

Page 3: ...quids or any other solvent Be sure to use only round CDs for this unit and do not use any special shape CDs Use of special shape CDs may cause the unit to malfunction Do not stick paper or tape on the...

Page 4: ...il the sleeve easily slides into the opening Do not force the sleeve into the opening or cause it to bend or bow Check that there will be sufficient space behind the dashboard for the radio chassis 3...

Page 5: ...tor GROUND Connect to ground terminal or clean unpainted metal part of chassis MEMORY BATTERY Connect to battery or 12 volt power source that is always live The radio will not work if this wire is not...

Page 6: ...r press and hold to fast forward within 5 seconds 4 Press INFO SCROLL again to exit time set mode After 5 seconds time set mode will exit automatically NOTE If the time mode is set to 12HR in the setu...

Page 7: ...ON OFF Choose ON to receive weather alerts when broadcasted Alert Pwr OFF AUTO Choose ON for the radio to turn on automatically when a weather alert is received P CLOCK ON OFF Choose ON to display the...

Page 8: ...tomatically seek the active weather band automatically and stop Press the SEEK buttons 20 19 to choose a channel from CH1 CH7 You can also press the six preset buttons 27 to select CH1 CH6 directly Pr...

Page 9: ...automatically pick up an FM stereo signal when available When in stereo mode the ST icon appears in the display When no stereo signal is available the unit will automatically revert to mono operation...

Page 10: ...y are expected to played Controlling Disc Playback Selecting Tracks Press the SEEK 19 or SEEK button 20 to advance to the next track on the disc The selected track number will appear on the display Pr...

Page 11: ...vance to the next file The selected file name will appear on the display Press and hold the SEEK 19 or SEEK button 20 to fast forward or fast reverse through the current file Playback begins when the...

Page 12: ...reset channel in SIR1 SIR2 and SIR3 for 10 seconds Press the AS PS button again to stop scanning and play the current channel Preset Tune In Sirius mode press and hold the AS PS button 15 to start the...

Page 13: ...mode tune to the channel you want to lock 2 Press and hold the MODE button 4 for 3 seconds A beep tone is heard and the message Code _ _ _ _ appears 3 Enter your user code to lock the channel CH Lock...

Page 14: ...ted playlist 4 While searching a playlist press the AS PS iMENU button 15 to navigate Controlling Playback Play Pause Press the button 26 to suspend playback Press the button again to resume playback...

Page 15: ...audio in all modes WB Directly accesses weatherband BAND Sequences bands preset banks FM1 FM2 FM3 AM1 AM2 in Radio mode Sequences preset banks SAT1 SAT2 SAT3 in satellite mode AS PS MENU Scans all st...

Page 16: ...atively close to the ignition system engine This type of noise can be easily detected because it will vary in intensity of pitch with the speed of the engine Usually the ignition noise can be suppress...

Page 17: ...settings Wiring is not properly con nected Check wiring connections The operation keys do not work The built in microcomputer is not operating properly due to noise Press the RESET button Sound skips...

Page 18: ...MW Frequency Range USA 530 1710KHz Frequency Range Europe 522 1620KHz Sensitivity S N 20dB 36 dB General Operating Voltage DC 12 Volts Grounding System Negative Ground Speaker Impedance 4 8 ohms per...

Reviews: