Jensen VM9312HD - DVD Player With LCD Monitor Installation And Operation Manual Download Page 23

19

VM9312HD

DVD/VCD VIDEO OPERATION

NOTE: When properly installed, DVD video cannot be 
displayed on the main TFT screen unless the parking 
brake is applied. If you attempt to play a DVD while the 
vehicle is moving, the TFT screen displays “PARKING” 
with a blue background. Rear video screens, if 
applicable, will operate normally.

Opening/Closing the TFT Video Screen

Opening the TFT Screen

To open the TFT video screen, press the 

OPEN

 button (1). 

The unit beeps and then opens.

Closing the TFT Screen

Press the 

OPEN

 button (1) again to close the TFT screen. If 

the screen is in the “IN” position, it moves out before closing. 

Insert/Eject Disc

Upon inserting a DVD disc, DVD mode is entered and disc 
play begins. 

NOTE: If Parental Lock (Rating) is activated and the disc 
inserted is not authorized, the 4-digit code must be 
entered and/or the disc must be authorized (see “General 
Sub-menu Features” on page 13).

You cannot insert a disc if there is already a disc in the unit or 
if the power is off. 

NOTE: DVD-R and DVD-RW will not play unless the 
recording session is finalized and the DVD is closed.

Ejecting a Disc 

Press the   button (21) on the unit or remote control (35) to 
eject the disc. The unit automatically reverts to Tuner mode. 
You may eject a disc with the unit powered off. The unit will 
remain off after the disc is ejected.

Reset the Loading Mechanism

If the disc loads abnormally or an abnormal core mechanism 
operation occurs, press and hold the   button (21) on the 
unit or remote control (35) to reset the loading mechanism. 
Normal operation resumes. 

Accessing DVD Mode

To switch to DVD mode when a disc is already inserted, 
press the 

SRC

 button (15) on the front panel or remote 

control (8) until “DISC” appears at the bottom of the screen.

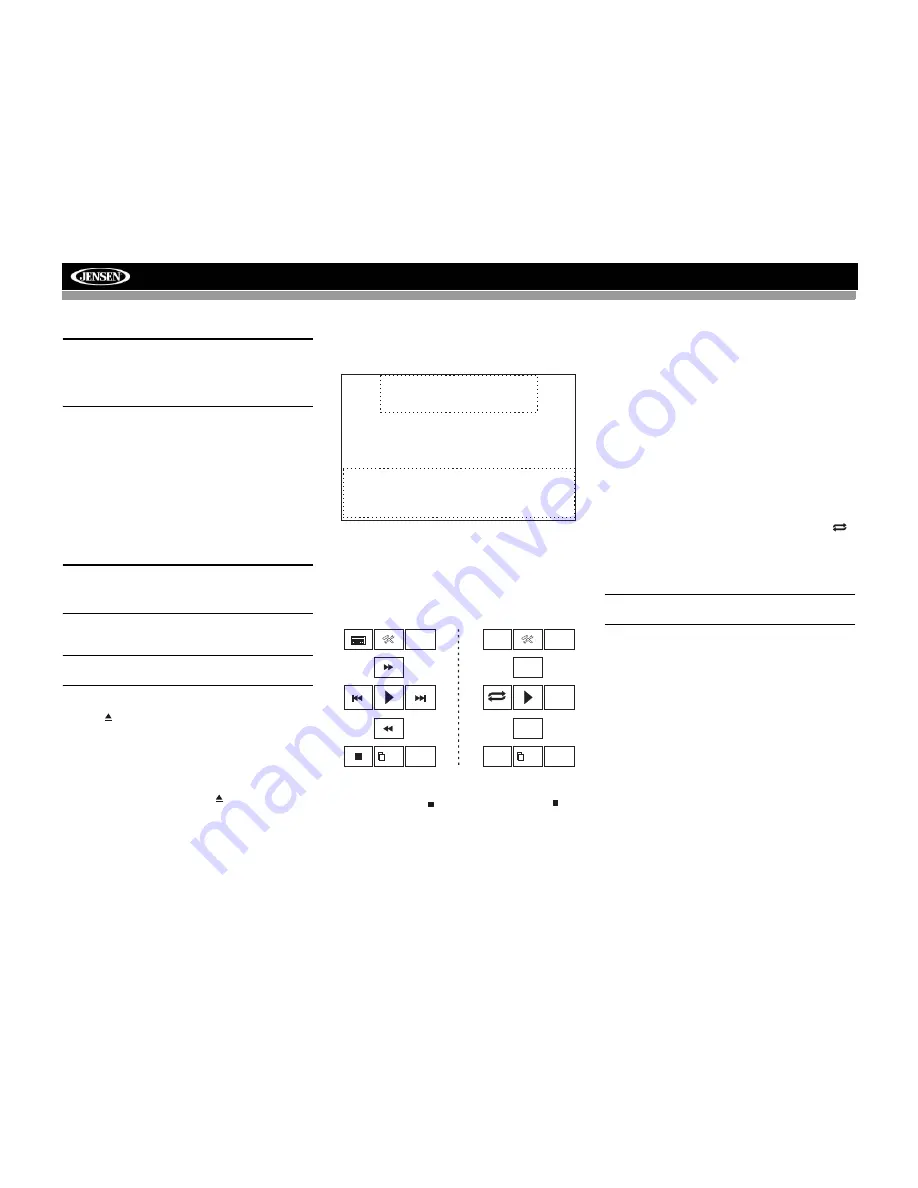
Using the Touch-Screen Controls

The touch key areas for DVD playback are outlined below.

A – Displays playing information

B – Displays on-screen control menu

Controlling Playback

To access the on-screen controls, touch the bottom 1/3 of the 
screen (section B). Touch the 

1/2

 button to view a second 

page of controls

Stopping Playback

Touch the stop button ( ) on the screen or press the 

/

BAND

 button (20) on the remote control to stop DVD play.

Pausing Playback

Touch the play/pause button (

>

) on the screen or press the 

>/

||

 button on the remote control (18) to suspend or resume 

disc play.

Slow Motion Playback

Press the

 <<

 button (22) on the remote control, the 

V

 button 

(11) on the joystick, or the << button on the screen to play the 
current title in slow motion. Keep pressing and releasing the 
button to increase the rate from “2X” to “4X”, “8X”, and “20X”. 

Press 

>/||

 (18) on the remote control or touch the onscreen 

play button (>) to resume normal play. 

Fast Forward Playback

Press the

 >>

 button (14) on the remote control, the 

/\

 button 

(15) on the joystick, or the >> button on the screen to fast 
forward. Keep pressing and releasing the button to increase 
the rate from “2X” to “4X”, “8X”, and “20X”.

Press 

>/||

 (18) on the remote control or touch the onscreen 

play button (>) to resume normal play. 

Repeat Playback

Press the 

REPT

 button (7) on the remote control or the 


button on screen to alter repeat mode according to the 
following:

DVD: Repeat Chapter, Repeat TItle, Repeat Off

VCD (PBC Off): Repeat Single, Repeat Off

NOTE: For VCD play, the repeat function is not available 
if PBC is on.

Sectional Repeat Function (A-B)

Use the A-B function to define a specific area of a disc to 
repeat.

Press the 

REPT


A-B

 button (6) on the remote control (or 

the A-B button on screen) to set the start point (A) of the 
repeated section. 

Press the 

REPT A-B

 button again once you reach the 

desired end point (B) of the repeated section. The 
selected portion of the DVD will now repeat 
continuously. 

Press the 

REPT A-B

 button again to cancel the A-B 

section setting and stop repeat play. 

Random Playback

With a DVD, VCD, or CD playing, press the 

RDM

 button (33) 

on the remote control to activate random playback and play 
all chapters/tracks in random order. “On” appears on the 
screen. 

Press the 

>>|

 button (19) on the remote control or the 

>


button on the joystick (17) to play the next random track.

Press the 

RDM

 button again to turn random play off. 

A

B

1/2

BACK

MENU

2/2

BACK

DISP

EQ

AUDIO

A-B

TITLE

SUBTITLE

Summary of Contents for VM9312HD - DVD Player With LCD Monitor

Page 1: ...VM9312HD Installation and Operation Manual 160Watts Peak 40W x 4 Multimedia Receiver SAT READY VM9312HD PRESS AUDIO...

Page 2: ......

Page 3: ...use all the features of your new Jensen VM9312HD Mobile Multimedia Receiver for maximum enjoyment Preparation 1 Installation 2 Controls and Indicators 6 Remote Control 8 Using the TFT Monitor 11 Opera...

Page 4: ...ii VM9312HD...

Page 5: ...are Coating 336 960 Sub Pixels 1440W X 234H Pixel Pitch 0 321W X 0 370H Screen Tilt Angle Adjustment Beep Tone Confirmation On OFF Option Heat Management System Forced Air Cooling to keep the chip set...

Page 6: ...tions 16 18 gauge speaker wire Disconnecting the Battery To prevent a short circuit be sure to turn off the ignition and remove the negative battery cable prior to installation NOTE If the VM9312HD is...

Page 7: ...of the perforated support strap supplied to the screw stud on the rear of the chassis using the hex nut provided Fasten the other end of the perforated strap to a secure part of the dashboard either...

Page 8: ...OW RED Mute leave open if not connected MUTE BROWN Car Phone SUB W REAR L REAR R BLUE RED WHITE FRONT L FRONT R RED WHITE WHITE RED Rear Video 1 YELLOW WHITE YELLOW RED Rear View Video Camera External...

Page 9: ...n 5 5 or earlier photo or video iPod iPod Touch iPod Classic and iPod Nano with video will only play music files Compatible SAT Tuners 1 XMD1000 requires XMC or XMDJEN100 Cable Kit 2 CNP2000UC 3 SC C1...

Page 10: ...e AS button to automatically store strong radio stations in the preset channels for the current band 4 TILT BAND Press to activate the tilt function Use the joystick to make adjustments while the red...

Page 11: ...d and parental lock setting 13 Pause Play Enter Press to pause or resume plaback or to confirm current selection 14 DVD Mode Press once to enter the next chapter or track TUNER Mode Press once to auto...

Page 12: ...9 32 23 24 31 30 8 35 1 2 10 13 28 25 11 12 14 20 18 17 22 21 29 MUSIC PHOTOS VIDEO iPod DISP WIDE PRESET SLOW TILT MENU SETUP CLEAR NOTE Your remote control may differ slightly from the one pictured...

Page 13: ...the preset station list ANGLE 13 Plays back disc in different angle for a scene Plays back Picture CD with different angle of picture dis played 14 Fast forwards the disc content Fast forwards the di...

Page 14: ...esses track 1 6 selects preset for current band CLEAR 30 Delete entry or move back wards to correct error in Direct Access mode Delete entry or move back wards to correct error in Direct Access mode D...

Page 15: ...anel to select BRIGHT or CONTRAST 3 Set Parameters Press the buttons 15 16 on the remote or turn the rotary encoder 5 on the control panel 4 Exit Picture Quality Setting Mode Press the PIC button 24 o...

Page 16: ...k Up Next Track Preset Up 5 Seek Down Previous Track Preset Down 6 SRC Source 7 Select 8 Select 9 Band If additional steering wheel control buttons are available on the vehicle function 7 8 may be ass...

Page 17: ...ION BUTTONS Setting Options Function Clock Mode 12Hr Clock displays 12 hour time using AM and PM 24Hr Clock displays 24 hour time up to 23 59 Clock HH MM Clock appears in the top right corner of the s...

Page 18: ...ars in a corner quadrant of the screen To begin calibration press and hold the crosshair for one second until it moves to the next quadrant Continue for each quadrant until the calibration is complete...

Page 19: ...visible since Multicast channels are not available for AM stations 19 Touch to view the SETUP menu 20 PROG Touch to view the HD Radio Multicast channel display 21 A D Touch to select Auto Analog or Di...

Page 20: ...elected from the touch screen menu the radio will start scanning for stations broadcasting in the selected category Using Preset Stations You can store up to 18 presets for FM and 6 presets for AM Sto...

Page 21: ...screen displays the radio ID where the channel name is usually displayed Selecting a Station Press the or buttons 16 17 on the joystick the or buttons 17 19 on remote control or the CH or CH buttons...

Page 22: ...nnel Guide mode touch the channel name on the screen The channel will begin playing and the unit will return to the Preset Mode Category Guide Mode When Category Mode is selected folder icons appear o...

Page 23: ...the screen section B Touch the 1 2 button to view a second page of controls Stopping Playback Touch the stop button on the screen or press the BAND button 20 on the remote control to stop DVD play Pa...

Page 24: ...button on screen control to display the direct entry menu Enter the desired chapter track using the on screen number pad Press the enter button arrow to tune to the selected station To exit the screen...

Page 25: ...side single layer DVD 5 Single side double layer DVD 9 Double side single layer DVD 10 Double side double layer DVD 18 MPEG 2 Method 133 minutes 242 minutes 266 minutes 484 minutes Single side single...

Page 26: ...hrough Tracks Press the button 19 on the remote control or on screen or use the button on the joystick 14 to advance to the next track on the disc Press the button 17 on the remote control or on scree...

Page 27: ...are expected to be played may not match the order in which they are actually played You may be able to set the order in which MP3 WMA files are to be played by writing them onto a medium such as a CD...

Page 28: ...en press the joystick button 13 on the front panel or press the button on the remote control 18 to suspend or resume disc play Moving Through Tracks Press the button 19 on the remote control or on scr...

Page 29: ...e 1 button 29 on the remote control keypad while in one of the following directories Playlist Artist Album or Song The selected directory will be accessed with the number of pages and files in that di...

Page 30: ...ion MUTE wire is grounded Check that MUTE connection is not grounded and that it s properly insulated Unit resets itself when engine is off Incorrect connection between ACC and positive battery wire C...

Page 31: ...g Recreate disc with good files Incorrect playback message displayed Message is longer than LCD can display SAT RADIO No Sound Incorrect cable connections Check RCA cables Satellite source not availab...

Page 32: ...e damaged by foreign objects 5 Do not attempt to use a 3 8 cm CD Single disc in this unit either with or without an adaptor as damage to the player and or disc may occur Such damage is not covered by...

Page 33: ...20 Hz 18 kHz Signal to Noise Ratio Stereo 70 dB AM Tuner Tuning Range 530 kHz 1710 kHz Sensitivity 20dB 12uV Signal to Noise Ratio 1 kHz 50dB Image Rejection 60dB Frequency Response 50Hz 2 kHz 3dB Mo...

Page 34: ...30 VM9312HD...

Page 35: ...tenance section of your Installation and Operation Manual for additional information regarding the proper use of your product Limitations THE EXTENT OF THE COMPANY S LIABILITY UNDER THIS WARRANTY IS L...

Page 36: ...Audiovox Electronics Corporation Hauppauge NY 11788 Technical Assistance 1 800 323 4815 www jensen com 2008 Audiovox Ver 041808 Printed in China...

Page 37: ......

Page 38: ...e and are subject to eMusic s Terms of Use eMusic is a registered trademark of eMusic com Inc in the U S A and other countries iPod is a registered trademark of Apple Inc Apple is not a partner sponso...

Reviews: