background image

2

MPR2110

 INSTALLATION

Preparation

Please read entire manual before installation.

Before You Start

•  Disconnect negative battery terminal. Consult a qualified technician for instructions.
•  Avoid installing the unit where it would be subject to high temperatures, such as from 

direct sunlight, or where it would be subject to dust, dirt or excessive vibration. 
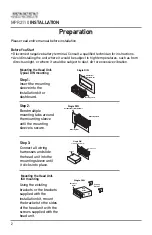
Step 3: 

Connect all wiring 
harnesses and slide 
the head unit into the 
mounting sleeve until 
it clicks into place. 

Using the existing 
brackets or the brackets 
supplied with the 
installation kit, mount 
the brackets to the sides 
of the head unit with the 
screws supplied with the 
head unit.

Mounting the Head Unit:  
ISO mounting

Step 1: 

Insert the mounting 
sleeve into the 
installation kit or 
dashboard.

Step 2: 

Bend multiple 
mounting tabs around 
the mounting sleeve 
until the mounting 
sleeve is secure.

Mounting the Head Unit: 
Typical DIN mounting

Mounting Sleeve

Dashboard or 
Installation Kit

Single DIN

Mounting Sleeve

Dashboard or Installation Kit

Mounting Tabs

Single DIN

New

Radio

Existing

Brackets

Decorative

Bezel

Single DIN

Mounting Sleeve

Dashboard or Installation Kit

Head Unit

Single DIN

Summary of Contents for MPR2110

Page 1: ...INSTALLATION OWNER S MANUAL AM FM Receiver with Bluetooth and Fixed Face MPR2110...

Page 2: ...the existing brackets or the brackets supplied with the installation kit mount the brackets to the sides of the head unit with the screws supplied with the head unit Mounting the Head Unit ISO mountin...

Page 3: ...ALLATION Wiring Diagram FUSE When replacing the fuse make sure new fuse is the correct type and amperage Using an incorrect fuse could damage the radio The unit uses one 10 amp ATM fuse located beside...

Page 4: ...4 13 12 11 10 9 8 17 18 15 16 Auxiliary Input Preset 6 Folder Up Preset 5 Folder Down Preset 4 Random Preset 3 Repeat Preset 2 Intro 1 2 4 5 7 8 9 3 10 12 14 15 16 6 17 11 13 Preset 6 Folder Up Mute A...

Page 5: ...reset button is located on the front panel With the unit on long press DISP to display clock time Press and hold DISP until the hours or minutes begin to flash then release Rotate the volume knob to...

Page 6: ...een FM1 FM2 FM3 AM1 and AM2 bands Up to six presets can be programmed for each band enabling up to 18 FM stations and 12 AM stations to be stored in memory Up to 18 FM and 12 AM stations can be stored...

Page 7: ...one second after the folder name is displayed the first file under the selected folder will be displayed and playback will begin Press RPT to toggle between RPT ALL RPT FLR and RPT ONE RPT ALL Plays...

Page 8: ...etooth device Refer to the owner s manual for your device for more details The device name is Jensen Media Player The Bluetooth passcode is 1234 Note The head unit can be in any mode of operation when...

Page 9: ...tions at speakers One or more speaker wires touching each other or touching chassis ground Insulate all bare speaker wires from each other and chassis ground Unit blows fuses Yellow or red wire touchi...

Page 10: ...turn shipment of the product Specific license conditions and copyright notices for the software can be found via www jensenmobile com What to do 1 Before you call for service check the troubleshooting...

Page 11: ...tion against harmful interference in a residential installation This equipment generates uses and can radiate radio frequency energy and if not installed and used in accordance with the instructions m...

Page 12: ...vity 42dBu Frequency response 30Hz 2 2kHz Speaker output impedance 4 8 ohms Line output voltage 2 Volts RMS Dimensions 7 x 3 8 x 2 178 x 97 x 50 mm Design and specifications subject to change without...

Page 13: ...13 MPR2110 OPERATION Notes...

Page 14: ...e 888 921 4088 www jensenmobile com 2019Namsung America Inc All rights reserved The Bluetooth word mark and logos are owned by the Bluetooth SIG Inc Other trademarks and trade names are those of their...

Reviews: