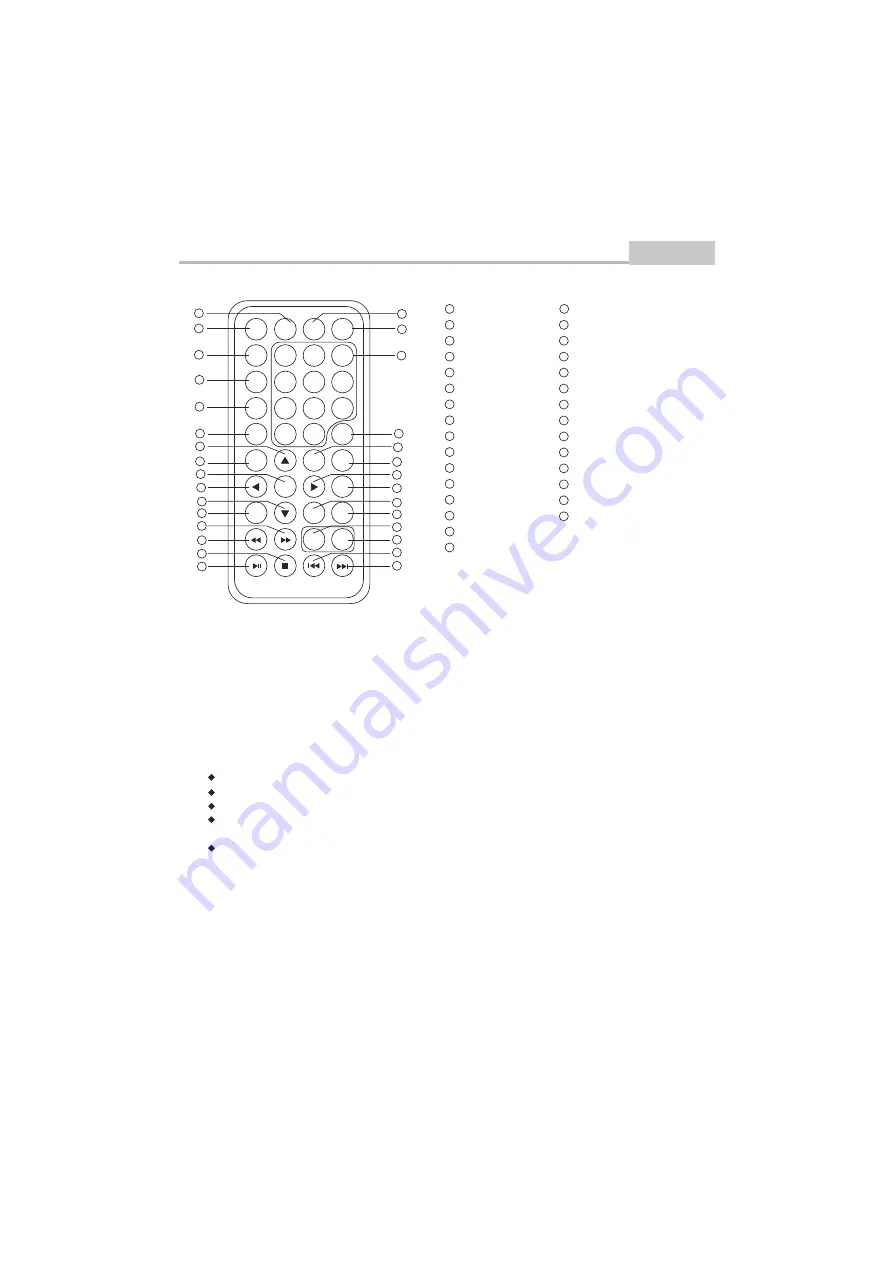
Jensen MEDIA LINK 7100 Twin User Manual Download Page 8

Introduction

Remote Control

Using the Remote Control
Point the remote control at the remote sensor in order for the player to function correctly. The remote will
function to approximately 21' from the remote sensor at an angle of approximately 30 each direction.

Note: Directing the remote sensor toward any light source, such as direct sunlight, may cause the unit to
malfunction. Do not spill water or put wet items on the remote control. Never disassemble remote control.

BATTERIES
INCORRECT USE OF BATTERIES MAY CAUSE THEM TO LEAK, CORRODE OR EXPLODE.

Be sure to place the batteries in the correct direction.
It is dangerous to charge/heat/open or short-circuit the batteries.
Do not leave dead or expired batteries or mix old/new batteries.
When not using the remote control for a long duration of time, remove the batteries. When operating
range becomes reduced, replace all batteries with new, fresh ones.
If leakage from the battery occurs, wipe the battery liquid from the battery compartment, then replace.

PROGRAM

DISPLAY

SUBTITLE

ANGLE

UP

LEFT

ENTER

DOWN

STOP

REV

FWD

MUTE

SLOW

PLAY/PAUSE

ZOOM

NUMBER KEY SELECT

TIME

RIGHT

CLEAR

A-B REPEAT

REPEAT

VOLUME -

NEXT

PREV

30

29

28

26

27

25

24

23

22

21

20

19

18

17

16

15

14

13

12

11

10

9

8

7

6

5

4

3

2

1

AUDIO

TITLE

MENU/PBC

SETUP

MODE

1

2

3

4

5

6

9

7

8

10

11

12

13

14

15

16

17

18

19

20

21

22

23

24

25

26

27

28

29

30

MUTE

DISPLAY

SLOW

MODE

SUB

TITLE

ANGLE

1

2

3

4

5

6

7

8

9

0

10+

AUDIO

TIME

TITLE

MENU

PBC

A-B

REPEAT

CLEAR

ZOOM

ENTER

PROG

VOL-

SETUP

VOL+

7

ML7100 Twin

Summary of Contents for MEDIA LINK 7100 Twin

Page 1: ...7100 Twin User Manual...

Page 2: ...ntrol Introduction 2 3 5 7 Connecting to a TV set Connections 9 Basic Operation Basic Playback Modes and Features Setup Remote Control Operation MP3 and MPEG4 Playback Advanced Features 10 19 Others 2...

Page 3: ...DIRECT EXPOSURE TO THE LASER RADIATION DO NOT OPEN THE CABINET VISIBLE LASER MAY RADIATE WHEN THE CABINET IS OPENED OR THE INTERLOCKS ARE DEFEATED DO NOT STARE INTO THE LASER BEAMS THE LIGHTNING FLAS...

Page 4: ...art Warning A product and cart combination should be moved with care Quick stop excessive force and uneven surface may cause the product and cart combination to overturn 10 Ventilation Slots and openi...

Page 5: ...ll outlets extension cords or integral convenience receptacles as this can result in a risk of fire or electric shock 15 Object and Liquid Entry Never push objects of any kind into this product throug...

Page 6: ...PHONE JACK USB SOCKET SD MMC MS CARD SOCKET AV OUT JACK 14 DC IN 9 12V AV OUT MODE SD MMC MS ON OFF POWER 1 2 5 6 7 9 10 11 12 13 15 16 3 4 8 1 2 3 4 5 EARPHONE JACK AV IN JACK DC OUT JACK 7 8 9 FUNCT...

Page 7: ...s Using backwire Introduction 6 ML7100 Twin AV OUT SD MMC MS OFF ON POWER DC OUT DC IN AV IN Slave Master 12V 220V White Yellow Yellow White AV OU T SD M MC M S Use the backwire support when using ML7...

Page 8: ...t the batteries Do not leave dead or expired batteries or mix old new batteries When not using the remote control for a long duration of time remove the batteries When operating range becomes reduced...

Page 9: ...2 xEarphone AV cable AV Power cable Introduction Accessories 2 x Backwire ML7100 Twin 8 2 x Strap...

Page 10: ...AV OUT SD MMC MS Connecting to a TV Set Connections VIDEO IN AUDIO IN WHITE RED YELLOW 9 ML7100 Twin...

Page 11: ...label side up Then close the disc MODE PORTABLE DVD TV USB CARD READER DIVX PLAYER STEP 1 Press POWER to start the player The startscreen appears on the LCD screen STEP 3 Press the PLAY button on the...

Page 12: ...e SETUP button again In the SETUP MENU you may choose any of the following options as you like 1 1 GENERAL SETUP This option is used to set up TV screen format video functions and DVD functions With o...

Page 13: ...ting instructions stated in DVD MENU SETUP in combination with the desired option in the following figure 1 1 3 OSD LANGUAGE The user may use this item to set the language of the setup menu and screen...

Page 14: ...er Last Memory On Off 1 2 AUDIO SETUP Audio setup includes Dolby Digital and Downmix General Setup Page PS On ENG Off On Off TV Display Angle Mark OSD Language Closed Captions Screen saver Last Memory...

Page 15: ...3 4 1 2 1 4 OFF Set DRC Off STR 1 2 2 DOWNMIX nd Audio Setup Page Set Downmix Mode LT RT Stereo Dolby Digital Setup Downmix 14 ML7100 Twin Follow the operation instructions stated in DVD MENU SETUP i...

Page 16: ...tup includes Panel Quality DivX VOD Video Setup Page Panel Quality Divx VOD Go To Video Setup Page 15 ML7100 Twin To check the DivX registration code of your ML7100 DivX VOD files are downloaded after...

Page 17: ...s the N P button on the Remote Control to return to normal screen Always remember to choose the correct system NTSC or PAL 2 For more information of output format refer to the instructions or your TV...

Page 18: ...Modes and Features Setup Advanced Features Preference Page TV Type Audio Subtitle Disc Menu Parental Default PAL ENG ENG ENG Preferred Subtitle Language Preference Page TV Type Audio Subtitle Disc Me...

Page 19: ...tions stated in DVD MENU SETUP in combination with the desired option in the following figure 1 5 PASSWORD SETUP 1 5 1 PASSWORD MODE Password Setup Page Password Mode Password Off On Off Password Mode...

Page 20: ...repeat and clear points A and B A B 0 10 keys These keys are used to input the time as well as title chapter and track numbers When a numeric item is displayed on the screen press the 0 10 keys to se...

Page 21: ...Single Elapsed Total tracks Current track VCD Track 01 15 03 02 VCD Single Remain Total tracks Current track T 01 10 C 01 14 0 00 15 DVD Title Elapsed Remain Total chapters Current chapters Current ti...

Page 22: ...n exact time in the movie In Title Chapter mode you cannot SELECT a value outside the range of the total number of titles or chapters For some DVD discs the Search function is unavailable Bitrate 58 T...

Page 23: ...PLAY During DVD or CD playback press button to scan in reverse The player will review the disc at 2 4 816 32 times normal speed as follows Press PLAY to resume normal playback Press to skip to previou...

Page 24: ...ack Press PLAY PAUSE during playback to pause playback Press PLAY PAUSE to resume normal playback Advanced Features Remote Control Operation During DVD playback press TITLE to display the DVD title me...

Page 25: ...ART to play the chapters in the order you have set 2 3 4 5 6 7 8 9 10 Tt 01 Ch 01 Tt Ch Tt Ch Tt Ch Tt Ch Tt Ch Tt Ch Tt Ch Tt Ch Tt Ch 1 Exit DVD 2 3 4 5 6 7 8 9 10 02 _ _ 1 Exit _ _ _ _ _ _ _ _ _ _...

Page 26: ...ct Single Repeat one Repeat folder Folder Random or Shuffle REPEAT VOL VOL Press VOL button to increase Volume Press VOL button to reduce volume till to no volume output MUTE Press MUTE to mute the Au...

Page 27: ...ion is disc specific languages will vary SUBTITLE During DVD playback Press SUBTITLE repeatedly to select from up to 32 subtitle languages ZOOM 2X 3X 4X Q Off During DVD SVCD VCD2 0 playback press to...

Page 28: ...ress direction key to 3 select other pictures In condition of stop select the first line file 4 item on the right Then press play key to return to upper menu OPERATION OF MP3 MPEG4 FUNCTION MP3 is an...

Page 29: ...e the AV connector or the output terminal is not damaged REMOTE NOT WORKING Ensure the remote batteries are working Point the remote control directly at the player s IR sensor Remove any obstacles bet...

Page 30: ...cy response Audio S N ratio Dynamic range Distortion D A Converter Output characteristic Video output Audio output Power Voltage Power consumption Size Weight ML7100 Twin NTSC PAL 65dB 500 lines fs 96...

Page 31: ...Jensen Media Link 7100 Twin...

Reviews: